|


![Read exactly what FREE PATTERNS really means...respect our designers and authors rights [and thank you]](../images/OFFnavLEGAL.gif)

 
|
|
 <click
for more! <click
for more!


|

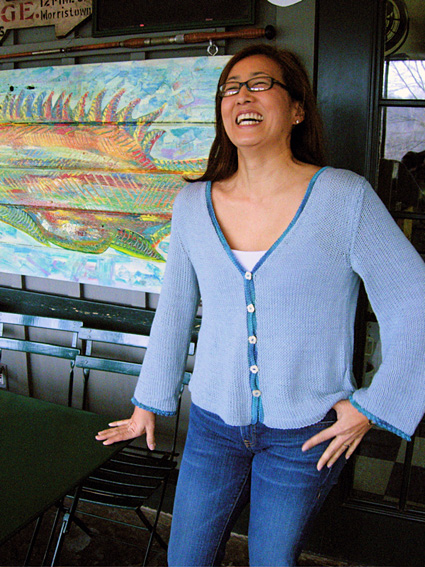 by
Kirsten Kapur by
Kirsten Kapur

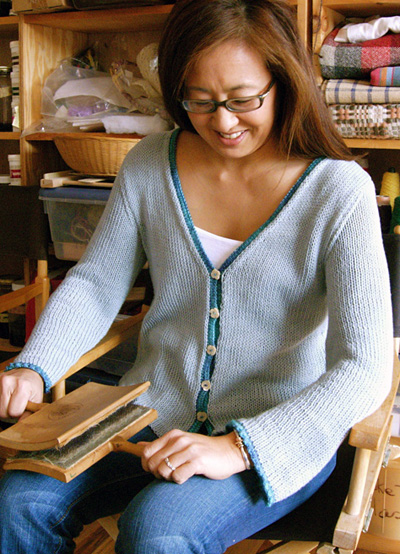
This pattern was inspired
by a trip to Lake Tahoe for some spring skiing
with a group of wonderful friends. The color
of the sky and mountains are reflected in the
colors I chose.
I love simple swingy cardigans
in the spring. They make great layering pieces
in the changeable weather.
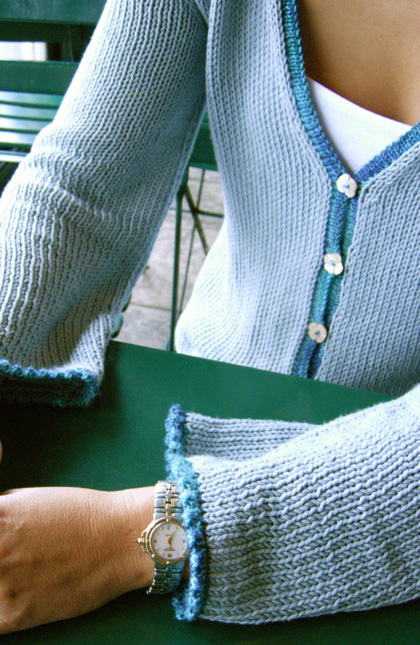
Tahoe is fitted through the
bust and roomy in the hips. The contrasting
sleeve and front edges make use of beautiful
hand painted fingering weight yarn, and add
a feminine touch.
This pattern is knit at a
larger gauge than specified on the Cathay ball
band. The resulting fabric is very fluid and
drapey. |
 model: Kelly
M.
photos: Kirsten Kapur
model: Kelly
M.
photos: Kirsten Kapur
|
|
|
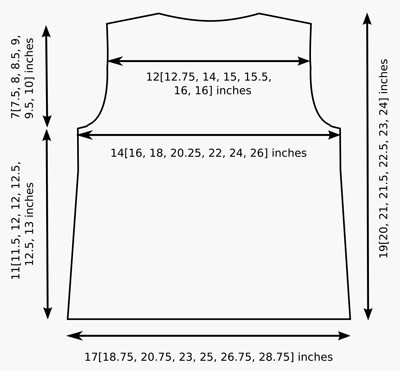
| XS[S, M, L, 1X, 2X, 3X] |
Chest: 28[32, 36, 40.5, 44,
48, 52] inches
Length: 19[20, 21, 21.5, 22.5, 23, 24] inches |
[MC]: Debbie Bliss Cathay [50% Cotton, 35% Viscose
Microfibre, 15% Silk, 109yd/100m per 50g ball];
color: #08; 7[8, 8, 9, 10, 11, 12] balls
[CC]: Koigu KPPPM [100% Merino Wool, 175yd/160m
per 50g skein]; color: P529; 1[1, 1, 1, 1, 2,
2] skeins
1 set US #7/4.5mm straight needles
1 set US #9/5.5mm straight needles
1 US #7/4.5mm circular needle, 24 inches or longer
Stitch holder
Tapestry needle
5 small safety pins
5 x 5/8 inch buttons |
17 sts / 24 rows = 4 inches
using MC and larger needles
21 sts / 32 rows = 4 inches using CC and smaller
needles |
[Knitty's list
of standard abbreviations and techniques can
be found here] |
| |
 BACK BACK
Using larger needles and MC, CO 72[80, 88, 98,
106, 114, 122] sts.
Work 4 rows in stockinette st, beginning with
a RS row.
Next Row [RS]: P all sts. This row forms
a turning ridge for the hem.
Work 7 rows in stockinette st.
Next Row [RS]: K2, ssk, k to last 4 sts,
k2tog, k2.
Repeat these 8 rows 5 times more. 60[68, 76, 86,
94, 102, 110] sts.
Continue in stockinette st until work measures
11[11.5, 12, 12, 12.5, 12.5, 13] inches from turning
ridge, ending with a WS row.
Shape Armhole
BO 3[3, 4, 5, 7, 8, 10] sts at beginning of next
2 rows. 54[62, 68, 76, 80, 86, 90] sts.
Next Row [RS]: K2, ssk, k to last 4 sts,
k2tog, k2.
P 1 row.
Repeat these 2 rows 1[3, 3, 5, 6, 8, 10] times
more. 50[54, 60, 64, 66, 68, 68] sts.
Continue in stockinette st until work measures
18[19, 20, 20.5, 21.5, 22, 23] inches (armhole
measures 7[7.5, 8, 8.5, 9, 9.5, 10] inches), ending
with a WS row.
Next Row [RS]: K16[17, 18, 19, 20, 21,
21], place these sts on a stitch holder; BO next
18[20, 24, 26, 26, 26, 26] sts, k to end. 16[17,
18, 19, 20, 21, 21] sts on needle.
Left Shoulder
Row 1 [WS]: BO 4[5, 5, 5, 6, 6, 6] sts,
p to end. 12[12, 13, 14, 14, 15, 15] sts.
Row 2 [RS]: K2, ssk, k to end.
Row 3 [WS]: BO 5[5, 5, 6, 6, 6, 6] sts,
p to end. 6[6, 7, 7, 7, 8, 8] sts.
Row 4 [RS]: K2, ssk, k to end.
BO remaining 5[5, 6, 6, 6, 7, 7] sts.
Replace held sts of Right Shoulder on needle with
RS facing and reattach yarn.
Row 1 [RS]: BO 4[5, 5, 5, 6, 6, 6] sts,
k to last 4 sts, k2tog, k1. 11[11, 12, 13, 13,
14, 14] sts.
Row 2 [WS]: P all sts.
Row 3 [RS]: BO 5[5, 5, 6, 6, 6, 6] sts,
k to last 4 sts, k2tog, k1. 5[5, 6, 6, 6, 7, 7]
sts.
Row 4 [WS]: P all sts.
BO remaining sts.
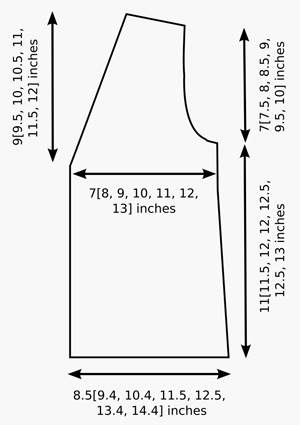
LEFT FRONT
Using larger needles and MC, CO 36[40, 44, 49,
53, 57, 61] sts.
Work 4 rows in stockinette st, beginning with
a RS row.
Next Row [RS]: P all sts. This row forms
a turning ridge for the hem.
Work 7 rows in stockinette st.
Next Row [RS]: K2, ssk, k to end.
Repeat these 8 rows 5 times more. 30[34, 38, 43,
47, 51, 55] sts.
Continue in stockinette st until work measures
10[10.5, 11, 11, 11.5, 11.5, 12] inches from turning
ridge, ending with a WS row.
Note: Read ahead! Neckline and Armhole shaping
directions are worked at the same time.
Shape Neckline
Next Row [RS]: K to last 4 sts, k2tog,
k2.
Work 3 rows in stockinette st.
Repeat these 4 rows 10[11, 13, 14, 14, 14, 14]
times more.
AT THE SAME TIME, when
work measures 11[11.5, 12, 12, 12.5, 12.5, 13]
inches, ending with a WS row, shape armhole as
follows:
Next Row [RS]: BO 3[3, 4, 5, 7, 8, 10]
sts, k to end.
P 1 row.
Next Row [RS]: K2, ssk, k to end.
Repeat these 2 rows 1[3, 3, 5, 6, 8, 10] times
more.
When all neckline and armhole decreases have been
worked, 14[15, 16, 17, 18, 19, 19] sts remain.
When work measures 18[19, 20, 20.5, 21.5, 22,
23] inches (armhole measures 7[7.5, 8, 8.5, 9,
9.5, 10] inches), ending with a WS row, shape
shoulder as follows:
Row 1 [RS]: BO 4[5, 5, 5, 6, 6, 6] sts,
k to end.
Row 2 [WS]: P all sts.
Row 3 [RS]: BO 5[5, 5, 6, 6, 6, 6] sts,
k to end.
Row 4 [WS]: P all sts.
BO remaining 5[5, 6, 6, 6, 7, 7] sts.
RIGHT FRONT
Using larger needles and MC, CO 36[40, 44, 49,
53, 57, 61] sts.
Work 4 rows in stockinette st, beginning with
a RS row.
Next Row [RS]: P all sts. This row forms
a turning ridge for the hem.
Work 7 rows in stockinette st.
Next Row [RS]: K to last 4 sts, k2tog,
k2.
Repeat these 8 rows 5 times more. 30[34, 38, 43,
47, 51, 55] sts.
Continue in stockinette st until work measures
10[10.5, 11, 11, 11.5, 11.5, 12] inches from turning
ridge, ending with a WS row.
Note: Read ahead! Neckline and Armhole shaping
directions are worked at the same time.
Shape Neckline
Next Row [RS]: K2, ssk, k to end.
Work 3 rows in stockinette st.
Repeat these 4 rows 10[11, 13, 14, 14, 14, 14]
times more.
AT THE SAME TIME, when
work measures 11[11.5, 12, 12, 12.5, 12.5, 13]
inches, ending with a RS row, shape armhole as
follows:
Next Row [WS]: BO 3[3, 4, 5, 7, 8, 10]
sts, p to end.
Next Row [RS]: K to last 4 sts, k2tog,
k2.
P 1 row.
Repeat these 2 rows 1[3, 3, 5, 6, 8, 10] times
more.
When all neckline and armhole decreases have been
worked, 14[15, 16, 17, 18, 19, 19] sts remain.
When work measures 18[19, 20, 20.5, 21.5, 22,
23] inches (armhole measures 7[7.5, 8, 8.5, 9,
9.5, 10] inches), ending with a RS row, shape
shoulder as follows:
Row 1 [WS]: BO 4[5, 5, 5, 6, 6, 6] sts,
p to end.
Row 2 [RS]: K all sts.
Row 3 [WS]: BO 5[5, 5, 6, 6, 6, 6] sts,
p to end.
Row 4 [RS]: K all sts.
BO remaining 5[5, 6, 6, 6, 7, 7] sts.
 SLEEVES
(Make 2) SLEEVES
(Make 2)
Using smaller straight needles
and CC, CO 57[63, 68, 74, 79, 84, 89] sts.
Work 4 rows in stockinette st, beginning with
a RS row.
Next Row [RS]: K1[1, 2, 2, 1, 2, 1],
[yo, k2tog] to end. This row forms a turning ridge
for the picot hem.
Work 3 rows in stockinette st. Break CC.
Next Row [RS]: Using MC and larger needles,
k7[3, 3, 4, 4, 4, 4], [k2tog, k3] to end. 47[51,
55, 60, 64, 68, 72] sts.
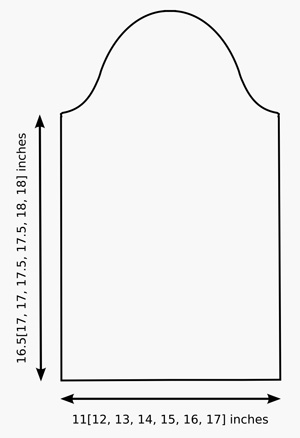
Work in stockinette st until work measures 16.5[17,
17, 17.5, 17.5, 18, 18] inches from turning ridge
or desired length to underarm, ending with a WS
row.
Shape Sleeve Cap
BO 3[3, 4, 5, 7, 8, 10] sts at beginning of next
2 rows. 41[45, 47, 50, 50, 52, 52] sts.
Decrease Row [RS]: K2, ssk, k to last
4 sts, k2tog, k2.
P 1 row.
Repeat these 2 rows twice more. 35[39, 41, 44,
44, 46, 46] sts.
Work 6[6, 6, 8, 10, 12, 14] rows in stockinette
st.
Work Decrease Row as above.
P 1 row.
Repeat these 2 rows 9[11, 12, 13, 13, 14, 14]
times more.
BO remaining 15[15, 15, 16, 16, 16, 16] sts. |
 Block
pieces as desired. Block
pieces as desired.
Sew shoulder seams.
Sew side seams and sleeve seams. Fold hems
along turning ridges to inside of work, and
sew in place. Be sure to sew fairly loosely,
so that the hems do not bind.
Sew sleeves into armholes.
Try on sweater and determine desired positions
for buttons. Place one at beginning of neckline
shaping and one several inches from lower edge
of sweater, and space remaining buttons evenly
between these points. Mark button positions
close to right front edge using safety pins.
(Buttonholes will be worked on right front band
to correspond to positions of pins.)
Front Band
Using CC and circular needle, with RS facing
and beginning at lower edge of right front,
pick up and k 1 st in each row along right front
edge, 1 st in each row and 1 st in each bound
off st along back neckline edge, and 1 st in
each row along left front edge.
P 1 row.
Buttonhole Row [RS]: [K to desired
location of buttonhole, k2tog, yo] until all
buttonholes have been worked; k to end.
P 1 row.
Next Row [RS]: P all sts. This row
forms a turning ridge for the front band.
P 1 row.
Work Buttonhole Row as before.
P 1 row.
BO all sts.
Fold front band along turning ridge to inside
of work and sew in place.
Sew buttons to left front band, opposite buttonholes.
Weave in ends. |
 Kirsten's
early forays into making clothing involved playing
with her mother's sewing machine and hopelessly
tangling the thread. Eventually she figured
out how to use the machine properly and has
been crafting garments ever since. Kirsten's
early forays into making clothing involved playing
with her mother's sewing machine and hopelessly
tangling the thread. Eventually she figured
out how to use the machine properly and has
been crafting garments ever since.
In the past 4 years her passion has turned
from sewing to knitting. Her yarn stash has
become legendary among her friends and family.
She blogs about her obsession at throughtheloops.
|
| Pattern & images
© 2007 Kirsten
Kapur. Contact Kirsten. |
|
|
|
|
|