  by
Natalie Wilson by
Natalie Wilson

Here is a child's cardigan
pattern in many sizes and several design options,
each cute and comfy. It is a unisex design despite
the girliness of the model and garment here.
Have fun selecting colors from the Mission Falls
1824 Cotton rainbow of softness to suit the
personality of your lucky recipient!
The hood is very generously
sized, so you may wish to test it on the intended
head before finishing it. Hoodhaters may choose
the neckband option. Snaps do the actual work
of the front closure to give a neater front
appearance, simplify the band construction,
and make the on-off quicker and friendlier.
But hey, if you want buttonholes, go right ahead
and work 'em! |
|  model:
Olivia Nave
photos:
Natalie Wilson
model:
Olivia Nave
photos:
Natalie Wilson |
|
0-6 months [6-12 months,
1-2 years, 2-3 years, 3-4 years, 5-6 years]
Shown in size 3-4 years.
|
| |
|
Chest: 20[22, 24, 26, 28,
30] inches
Length: 10[12, 12.5, 13, 14, 15] inches
Sleeve Length: 7[8, 9.5, 10, 11, 13] inches
|
| |
| |
Mission Falls 1824 Cotton [100% cotton; 84 yds
per 50 g skein].MC Peony [206]; CC Merlot [208].
Solid Cardigan, No Hood: 4[4,
5, 5, 6, 7] skeins
Solid Cardigan, With Hood: 5[6, 7, 7, 8, 9]
skeins
Striped Cardigan, No Hood: MC 3[4, 4, 5, 5,
6] skeins;CC 1[1, 1, 2, 2, 2] skeins
Striped Cardigan, With Hood: MC 4[4, 5, 5, 5,
7] skeins; CC 2[2, 2, 3, 3, 3] skeins
1 set US #7/4.5mm double-point needles
1 set US #7/4.5mm straight needles
1 set US #6/4mm straight needles
5 stitch holders
2 safety pins 1-2.5 inches long
3[3, 3, 4, 4, 4] buttons [decorative only]
3[3, 3, 4, 4, 4] clear jumbo snaps
Sewing thread to match
|
| |
| 18
sts/24 rows = 4" in stockinette stitch using
larger needles |
| |
 Note:
If working solid color version, ignore all
references to CC and just chug along in your
chosen MC hue. Note:
If working solid color version, ignore all
references to CC and just chug along in your
chosen MC hue.
Garter Stripe Pattern
Row 1 [RS]: K with MC.
Row 2 [WS]: K with MC.
Row 3 [RS]: K with CC.
Row 4 [WS]: K with CC.
Rows 1-4 form Garter Stripe
Pattern. Do not cut yarn when not in use.
Instead, strand neatly along side of work.
Stockinette Stripe Pattern
Row 1 [RS]: K with MC.
Row 2 [WS]: P with MC.
Row 3 [RS]: K with CC.
Row 4 [WS]: P with CC.
Rows 1-4 form Stockinette
Stripe Pattern. Do not cut yarn when not in
use. Instead, strand neatly along side of
work.
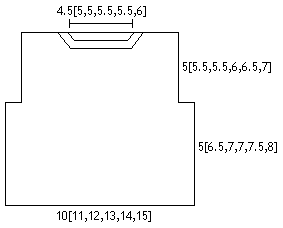
Back
With smaller needles and
CC, CO 45[50, 54, 59, 63, 68]sts using long-tail
method.
K 1 row [WS].
Work 8 rows Garter Stripe Pattern. Cut CC.
Change to larger needles and MC, and beg with
a k row, work in St st until work measures
5[6.5, 7, 7, 7.5, 8] inches from CO edge,
ending with a WS row.
Beg armhole shaping
BO 2[2, 4, 4, 4, 4]sts
at beg of next 2 rows -- 41[46, 42, 51, 55,
60]sts on needle.
NO
HOOD version
Cont working even in patt
until piece measures 4[4.5, 4.5, 5, 5, 5,
6] inches from armhole shaping, ending with
a WS row.
K9[11, 9, 12, 14, 15]sts for right shoulder,
k center 23[24, 24, 27, 27, 30]sts and place
on holder for back neck, then k rem 9[11,
9, 12, 14, 15]sts for left shoulder.
Work each shoulder sep beg with left shoulder.
Row 1 [WS]: P.
Row 2 [RS]: K2, k2tog, k to end.
Rep these last two rows 2 times more --
6[8, 6, 9, 11, 12]sts remain.
Work WS row and place sts on holder.
Rejoin yarn to right shoulder with WS facing.
Row 1[WS]: P.
Row 2 [RS]: K to last 4 sts, k2tog tbl,
k2.
Rep these last two rows 2 times more --
6[8, 6, 9, 11, 12]sts.
Work WS row and place sts on holder.
WITH
HOOD version
Work even until
piece measures 5[5.5, 5.5, 6, 6.5, 7] inches
from armhole shaping, ending with a WS row.
With RS facing, place 10[12, 10, 13, 15,
16]sts on holder for right shoulder, 21[22,
22, 25, 25, 28]sts on holder for back neck,
and rem 10[12, 10, 13, 15, 16]sts on holder
for left shoulder.
With smaller needles and
CC, should be CO 26[28,30,32,34,37] sts using
long-tail method. K 1 row [WS].
Work 8 rows Garter Stripe
Pattern. Cut CC.
Next row [RS]: Change
to larger needles and MC, k21[23, 25, 27,
29, 32]sts and slip rem 5 sts to safety pin
holder for front band.
Beg with a p row, work
in St st until work measures 5[6.5, 7, 7,
7.5, 8] inches from CO edge, ending with a
WS row.
Shape Armhole
BO 2[2, 4, 4, 4, 4]sts at beg of next [RS]
row -- 19[21, 21, 23, 25, 28]sts. Work even
until work measures 7.5[9.5, 9.5, 9.5, 10.5,
11] inches from CO edge, ending with a RS
row.
Beg Neck Shaping
Row 1[WS]: P2, p2tog, p to
end of row.
Row 2[RS]: K to last 4 sts, k2tog, k2.
Repeat last two rows until
6[8, 6, 9, 11, 12]sts rem.
Work even until piece
measures 5[5.5, 5.5, 6, 6.5, 7] inches from
armhole shaping, ending with a WS row.
Repeat last two rows until
10[12, 10, 13, 15, 16]sts rem.
Work even until
piece measures 5[5.5, 5.5, 6, 6.5, 7] inches
from armhole shaping, ending with a WS row.
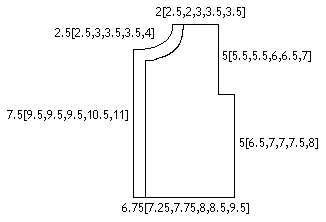
Right Front
With smaller needles and
CC, should be CO 26[28,30,32,34,37] sts using
long-tail method. K 1 row [WS].
Work 8 rows Garter Stripe Pattern. Cut CC
and MC.
Next row [RS]: Slip 5 sts to safety pin holder
for front band, change to larger needles,
rejoin MC, and k21[23, 25, 27, 29, 32]sts.
Beg with a p row, work in St st until work
measures 5[6.5, 7, 7, 7.5, 8] inches from
CO edge, ending with a RS row.
Shape Armhole
BO 2[2, 4, 4, 4, 4]sts at
beg of next [WS] row -- 19[21, 21, 23, 25,
28]sts.
Work even until work measures 7.5[9.5, 9.5,
9.5, 10.5, 11] inches from CO edge, ending
with a RS row.
Beg Neck Shaping
Row 1[WS]: P to last 4 sts,
p2tog tbl, p 2.
Row 2[RS]: K 2, k2tog
tbl, k to end of row.
NO HOOD version
Repeat last two rows until
6[8, 6, 9, 11, 12]sts rem.
Work even until piece measures 5[5.5, 5.5,
6, 6.5, 7] inches from armhole shaping, ending
with a WS row.
Repeat last two rows until
10[12, 10, 13, 15, 16]sts rem.
Work even until piece measures 5[5.5, 5.5,
6, 6.5, 7] inches from armhole shaping, ending
with a WS row.
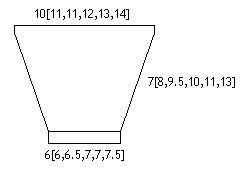
Sleeves [Make 2]
With smaller needles and
CC, CO 27[27, 29, 32, 32, 34]sts using long-tail
method.
K 1 row [WS].
Work 8 rows Garter Stripe Pattern.
Change to larger needles and beg working in
Stockinette Stripe Pattern and, AT
THE SAME TIME, inc 1 st at beg and
end of this row and every fourth
foll row until there are 45[49, 49, 54, 58,
64]sts on the needle.
Work even until sleeve
measures 7.5[8.5, 10.5, 11, 12, 14] inches
from CO edge.
BO.
|
|
Block pieces to measurements. Place shoulder sts on
double-pointed needles. With right sides together,
join back and front at shoulders using 3-needle
BO technique.
Front Bands Place
5 held Left Front band sts on smaller needle.
Beg with RS facing, work in Garter Stripe Pattern
over band sts until band fits neatly when slightly
stretched up front to beg neck shaping, ending
with a Row 2 row. Place sts on safety pin
holder. Cut yarns. Slip st band into place.
Work Right Front band to match. Place sts on
safety pin holder. Do not cut yarns.
Slip st band into place.
Neck Band [No Hood version only]
With RS facing, smaller needles
and CC, k5 sts from safety pin holder for Right
Front band, pick up 15[15, 18, 21, 21, 24]sts
along right front neck edge, pick up 4 sts along
right back neck edge, k23[24, 24, 27, 27, 30]sts
from back neck holder, pick up 4 sts along left
back neck edge, pick up 15[15, 18, 21, 21, 24]
sts along left front neck edge, and k 5 sts
from safety pin holder for Left Front band --
71[72, 78, 87, 87, 96] sts.
Work in Garter Stripe Pattern
for 8 rows, beg with a Row 4 row. BO all.
Hood
With RS facing, using larger
needles and CC, k5 sts from safety pin holder
for Right Front band, pick up 15[15, 18, 21,
21, 24] sts along right front neck edge
to back neck, k21[22, 22, 25, 25, 28]sts from
back neck holder, pick up 15[15, 18, 21, 21,
24]sts from back neck and along left front neck
edge, and k5 sts from safety pin holder for
Left Front band -- 61[62, 68, 77, 77, 86]sts.
Next row [WS]: K5, p to last
5 sts, k5.
Change to MC, k20[20, 23,
26, 26, 29]sts, m1, k10[11, 11, 12, 12, 13]sts,
m1, k1, m1, k10[10, 10, 12, 12, 14]sts, m1,
k20[20, 23, 26, 26, 29]sts -- 65[66, 72, 81,
81, 90] sts on needle.
K5, p to last 5 sts, k5.
Change to CC, k21[21, 24, 27, 27, 30]sts, m1,
k10[10, 10, 12, 12, 14] sts, m1, k3, m1, k10[11,
11, 12, 12, 13]sts, m1, k 21[21, 24, 27, 27,
30] sts -- 69[70, 76, 85, 85, 94] sts.
K5, p 30[30, 33, 38, 38, 42], m1p[-, -, m1p,
m1p, -], p 29[30, 33, 37, 37, 42], k5 -- 70[70,
76, 86, 86, 94]sts.
Always k the first and last 5 sts each row to
maintain garter edging, work even in Stockinette
Stripe Pattern beg with a Row 1 row, until hood
measures 10[10.5, 11, 11.5, 12, 12.5] inches
from pick up row, ending with a Row 1 or Row
3 row.
With right sides together, fold hood in half,
and divide sts evenly over 2 dpns
Join two halves of hood using 3-needle BO technique.
Sew sleeves into armholes.
Sew side and sleeve seams.
Sew on buttons and snaps: For girl, arrange
buttons on RS of right front band. For boy,
arrange buttons on RS of left front band.
Position the first button 1 inch from bottom
edge, the last button 1 inch below neck edge
[or beginning of hood], and the others spaced
evenly between.
As you sew each button into position, sew a
snap top to WS of button band under button with
the same thread.
Sew snap bases to RS of rem band under snap
and button positions.
|
 Natalie
knits and lives [wait, that's redundant!] in the
Detroit area with her husband and two young children.
She teaches knitting classes and special project
workshops at local community centers. Natalie
knits and lives [wait, that's redundant!] in the
Detroit area with her husband and two young children.
She teaches knitting classes and special project
workshops at local community centers.
Much to her delight, she is
becoming a regular design contributor to Knitty.
|
| Pattern &
images © 2003 Natalie D. Wilson. Contact
Natalie. |
|