|


![Read exactly what FREE PATTERNS really means...respect our designers and authors rights [and thank you]](../images/OFFnavLEGAL.gif)

 
|
|
 <click
for more! <click
for more!
 
|

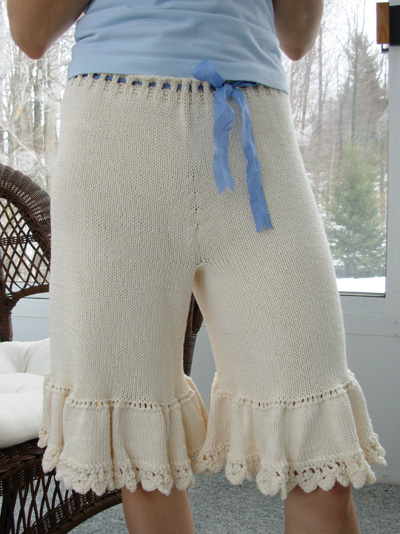
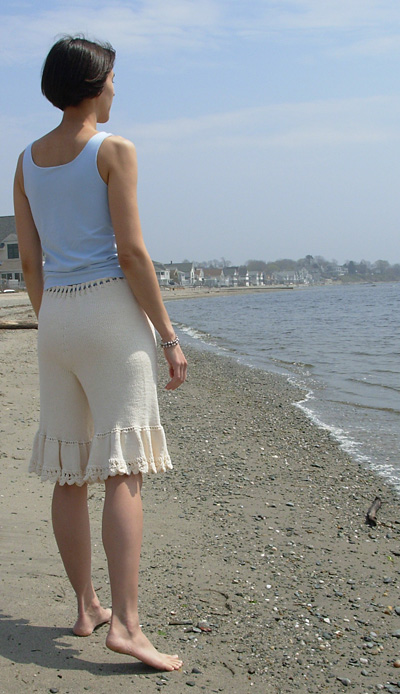
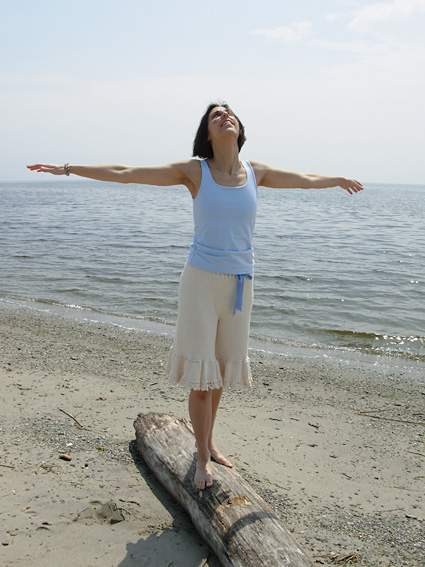 By Lee Wood Juvan By Lee Wood Juvan

For reasons that I'd rather not probe too deeply, I
have always been fascinated by the history of underthings. What do we
wear under there?
Imagine an age in which moralists could work
themselves into a froth of righteous indignation at the very
thought of women--nay, ladies--wearing drawers because (gasp!)
they had separate legs. In the early nineteenth century, this
immodest garment was the choice of Princess Charlotte, who had
a reputation for riding astride, swearing, and being thoroughly
modern.
Eyebrows were raised all over Britain, but young women
began to gravitate toward this practical, formerly masculine
option. (If your interest is piqued, pick up The History
of Underclothes by C.
Willett and Phillis Cunnington, which includes an image of women's
drawers in knitted silk, circa 1810-20.)
My version of these liberating Unmentionables is based
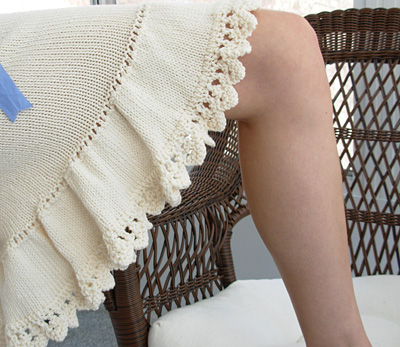
on the more elaborate frillies worn during the Edwardian period. They
are knit entirely in the round. Each leg begins separately with a crochet-chain
provisional cast on and then crotch stitches are set aside (to be grafted
later) before the legs are joined and the body is knitted up to the low-rise
waist. Then stitches for each leg are picked up and the ruffle and lace
edging are knitted downward. Don't let the piquant label put you off;
once you brave the provisional cast on, the most challenging part is
the lace edging. Whether you wear them as summer outerwear or loungewear,
do give a nod to the forward-thinking ladies of days long past. |  model: Lee Wood Juvan photos: Tom Juvan model: Lee Wood Juvan photos: Tom Juvan
| | | |
|
|
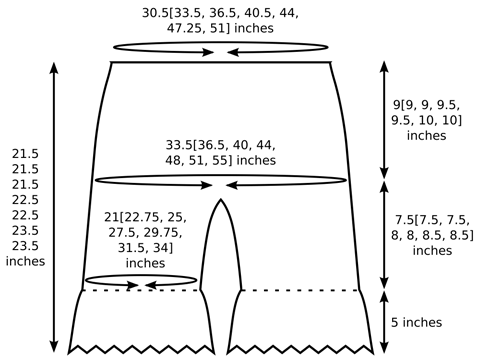
Hip:
33.5[36.5, 40, 44, 48, 51, 55] inches
High hip/low waist circumference: 30.5[33.5, 36.5, 40.5, 44, 47.25, 51] inches
Length (waistband to lace edging): 21.5[21.5, 21.5, 22.5, 22.5, 23.5, 23.5] inches | |
|
Brown Sheep Cotton Fleece [80% cotton, 20% merino wool; 215 yd/197m per 100 g skein]; color CW-100 Cotton Ball; 5[5, 7, 7, 8, 9, 10] skeins
1 US #6/4.0mm 24-inch circular needle
Larger sizes may also wish to have a US #6/4.0mm circular needle that is 32 inches or longer.
1 set US #7/4.5mm double-point needles
Spare circular needle, 24-inch or longer, size US #6/4.0 mm or smaller (used as stitch holder)
Crochet hook
Waste yarn
Stitch markers
Stitch holders or waste yarn
Tapestry Needle
1.5[1.5, 1.5, 1.75, 2, 2, 2] yards 0.5-inch wide ribbon for drawstring | |
|
| 21 sts/28 rows = 4 inches in stockinette stitch | |
|
[Knitty's list of standard abbreviations and techniques can be found here] |
 I don't recommend substituting
100% cotton yarns since they can be heavy and inelastic; if
you choose to use a different yarn, try another cotton/wool
or cotton/microfiber blend in a DK weight. I don't recommend substituting
100% cotton yarns since they can be heavy and inelastic; if
you choose to use a different yarn, try another cotton/wool
or cotton/microfiber blend in a DK weight.
I used vintage rayon seam binding for the drawstring, but you can easily substitute a crochet chain if desired.
Crochet Cast On
Using waste yarn, work a crochet chain several sts longer than the number of sts to be cast on. Starting 1 or 2 sts in from end of chain and using working yarn, pick up and k 1 st in the back loop of each ch until the required number of sts have been picked up. Later, the chain will be unraveled and the resulting live sts picked up.
Grafting
Instructions for grafting can be found here:
2x2 Rib (Worked in the round over a multiple of 4 sts):
Round
1: [K2, p2] to end.
Repeat this round for 2x2 Rib.
Lace Edging
In the directions below, the [k2tog] worked at the end of each RS row indicates that the last st of the edging is worked together with the next st of the ruffle. This is explained more fully in the directions for the ruffle. Note that stitch counts given below are for stitches of Lace Edging only.
CO 5 sts.
Row
1 [WS]: Sl 1 knitwise, k1, [yo] twice, k2tog, k1. 6 sts.
Row
2 [RS]: Sl 1 knitwise, k2, p1, k1, k2tog.
Row
3 [WS]: Sl 1 knitwise, k3, [yo] twice, k2. 8 sts.
Row
4 [RS]: Sl 1 knitwise, k2, p1, k3, k2tog.
Row
5 [WS]: Sl 1 knitwise, k1, [yo] twice, k2tog, k4. 9 sts.
Row
6 [RS]: Sl 1 knitwise, k5, p1, k1, k2tog.
Row
7 [WS]: Sl 1 knitwise, k8.
Row
8 [RS]: BO 4 sts, k to last st of edging, k2tog. 5 sts.
Repeat these 8 rows for Lace Edging. |
|
|
 LEGS (Make 2) LEGS (Make 2)
Using 24-inch circular needle and Crochet Cast On method, CO
110[120, 132, 144, 156, 166, 178] sts.
Place marker and join
to begin working in the round, being careful not to twist.
Work in stockinette st until work measures 7.5[7.5, 7.5,
8, 8, 8.5, 8.5] inches, ending last round 11[12, 13, 14,
15, 16, 17] sts before marker.
Place next 22[24, 26, 28,
30, 32, 34] sts on hold on waste yarn or stitch holder.
Slip
remaining 88[96, 106, 116, 126, 134, 144] sts to spare needle.
Break yarn, leaving a 12-inch tail.
Make second Leg in the same way as first but, after placing
22[24, 26, 28, 30, 32, 34] sts on hold, do not remove remaining
88[96, 106, 116, 126, 134, 144] sts from working needle,
and do not break yarn.
BODY
Note: When working the next step, you may prefer to use a
longer US #6/4mm circular needle.
Joining Round: Holding second leg (on working needle) with
yarn still attached, and with crotch stitches of both legs
facing, k 88[96, 106, 116, 126, 134, 144] sts of first leg
from spare needle, place marker, k 88[96, 106, 116, 126,
134, 144] sts of second leg, place marker. 176[192, 212,
232, 252, 268, 288] sts.
Join to work in the round. This point is center back, and
will be beginning of round.
Work in stockinette st until work measures 2 inches from
joining round.
Decrease Round: [K2tog, k to 2 sts before marker, ssk] twice.
4 sts decreased.
K 4 rounds.
Repeat these 5 rounds 3[3, 4, 4, 4, 4, 4] times more. 160[176,
192, 212, 232, 248, 268] sts.
Continue in stockinette st until work measures 8[8, 8, 8.5,
8.5, 9, 9] inches from joining round.
Note: Waistband will fall approx. 1.75 inches below the navel.
For a lower rise, work 1 inch less than indicated above.
WAISTBAND
Work 3 rounds in 2x2 Rib.
Eyelet Round: [Yo, k2tog, yo, p2tog] to end.
Work 2 rounds in 2x2 Rib.
BO all sts in 2x2 Rib.
RUFFLE
Remove waste yarn from CO edge of one leg and place resulting
110[120, 132, 144, 156, 166, 178] live sts on 24-inch circular
needle. Place marker and k 1 round.
P 1 round.
Increase Round: [K1, yo] to end. 220[240, 264, 288, 312,
332, 356] sts.
P 1 round.
Work in stockinette st until work measures 2.75 inches from
last p round. Break yarn, leaving a 12-inch tail.
 LACE
EDGING LACE
EDGING
Note: Lace edging is worked using double-point needles throughout.
Using double-point needle, CO 5 sts. Work Row 1 of Lace Edging
(a WS row).
Next Row (Row 2 of Lace Edging) [RS]: Work in
pattern to last st; with RS of ruffle facing, slip next
st of ruffle to tip of left needle (2 sts on left needle),
k2tog.
Continue working lace edging in this way, attaching edging
to ruffle as above, until all sts of ruffle have been attached.
(4 sts of ruffle will be attached for every 8-row repeat
of edging worked.)
BO edging sts.
| |
|
|
| Slip held sts of each leg to a double-point needle. To minimize any gap at front and back leg joins, insert the tip of each end of each needle into the adjacent leg stitch (adding two more stitches to each needle). Graft crotch sts together, including additional picked-up sts. Use yarn tail to close up any gaps that remain. Weave in all ends.
Hand wash in cool water and lay flat to dry, gently stretching lace edging to open pattern. Weave drawstring through waistband eyelets (I started off-center). | |
Lee
Wood Juvan spins, dyes, knits, and thinks apocalyptic thoughts
in Burlington, Vermont. Her work has also appeared in Spin-Off.
|
| Pattern & images © 2007 by
Lee Wood Juvan. Contact Lee |
|
|
|
|
|