|
By
Theresa Vinson Stenersen
Photos by Sigurd Stenersen
All of us were new to knitting at one time or another.
For me, that was around 3 1/2 years ago and at a time
when I was far away from my knitting aunts. I depended
on the kindness of online strangers and books like
Vicki
Square's Knitter's Companion and Elizabeth
Zimmermann's Knitting Without Tears to help me
over the rough spots, of which there were...well,
several.
But
perhaps because no one told me otherwise, I have always
felt like I can do anything I put my mind to, at least
when it comes to knitting. I believe that becoming
aware, as you knit, of the structure of knitting --
how the stitches are combined side by side and row
upon row to create a fabric -- is the key to gaining
that kind of confidence. Then you'll be able to recognize
quickly when something is not quite right and feel
comfortable fiddling with it until it's back to looking
the way it should.

When
Good Stitches Go Bad
recognizing
and correcting twisted or dropped stitches
The
needle is going to get pulled out of your knitting
eventually, whether it be your cat, your toddler or
just plain ol' slippery yarn. When this happens, do
not panic.
Remember:
"The first thing to do in a cardiac arrest is take
your own pulse."
Take the needle [one with a smaller gauge than you
were working with, if it's handy] and begin inserting
it into the loops, one by one. Be sure you get an
equal number of loops as you had stitches. Once all
the loops are back on the needle, lay it down carefully
and take a few cleansing breaths.
Now
check to see if any of the stitches look different
than they should. It's possible, even likely, that
some of the stitches will be twisted or dropped one
or more rows. First let's talk about what that looks
like, then we'll do something about it.
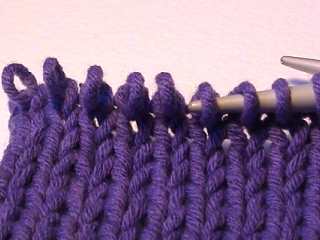
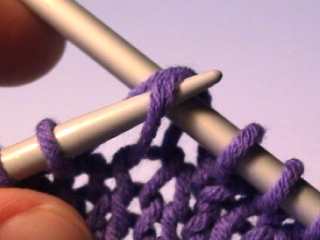
These stitches [above] are "twisted". Look at each
individual stitch. The loop is sitting over the needle
like an upside-down U. The part of the U that is visible
on the front of the needle in this picture is the
left-hand leg which indicates that they are twisted.
When the stitches are sitting they way they should,
the part of the U that is most visible from the front
of the needle should be the right-hand leg both on
knit and purl stitches.

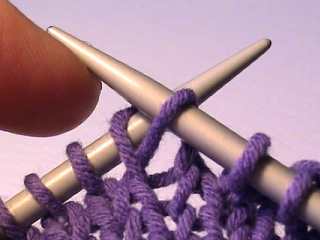
You may be asking yourself: What shall I do if my
stitches are twisted? The easiest thing to do is knit
the stitch through the back loop [a.k.a. tbl]. To
knit tbl, insert the working needle into the half
of the U that is extending from the top of the needle
toward the back. When you work a stitch in this manner,
you untwist a twisted stitch. [Say that three times
fast!]
On
a side note: If you work a untwisted stitch tbl, you
make it twisted. Why, you ask, would I want to? For
some stitch patterns or for eliminating gaps after
picking up stitches around a sock gusset or while
doing short rows.
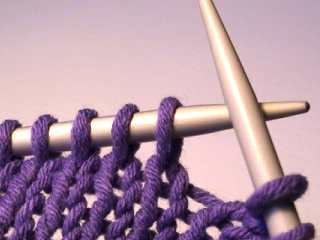
"Dropped stitches" may have unravelled themselves
one row or many rows. Let's talk about those that
only went down to the row beneath the current row
on the "knit" side. You will see a loose strand of
yarn on the back of the work that extends horizontally
from one stitch before the dropped stitch to one stitch
after. Bring that loose strand onto the right-hand
needle as shown above.
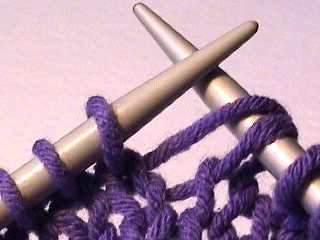
Then insert the tip of the needle in your left-hand
into the loop of the dropped stitch from the back
and use the needle in your right-hand to bring the
loose strand...
...forward through the loop. Then remove the left-hand
needle, leaving the newly fixed stitch on the right-hand
needle. Since this stitch has not been worked yet,
you'll need to transfer it back onto the left-hand
needle by inserting the tip of the left-hand needle
into the loop from front to back and slipping it off
the right-hand needle.
For
single dropped stitches on the "purl" side,
the technique is identical, except that you'll insert
the needle through the dropped stitch through the
front.

When stitches drop more than one row, they create
a run with loose strands extending, ladder-like, from
just above the dropped stitch's loop all the way up
to the needle. On the "knit" side, insert a crochet
hook into the loop of the dropped stitch from front
to back, hook the lowest horizontal strand, and pull
it through the loop. Repeat, working up the "ladder"
until the strand closest to the needles is pulled
through, then return this stitch to the left-hand
needle, being sure it's not twisted.
For
"purl" side dropped stitches, insert the needle from
back to front, and pull the strand [which should be
in front of the loop] through, repeating until
all are picked up, then return to the needle. Once
you've worked your way over all the stitches, you'll
be ready to continue on with your knitting like nothing
ever happened. And when you decide to take a break
this time, put it somewhere your cat can't get to
it!
Send
your questions, comments or suggestions for future
"Techniques" to Theresa.
|