|
By
Wendy D. Johnson
Photos by Ian M. Ories
editor's
note: There are many photos in this article, and they're
quite large. Being able to see Wendy's work up close
is essential, so if you have a slow modem, please
grab a coffee and let this page load. It's worth it.
Oh, and once you're done the toes, you can find Wendy's
fabulous toe-up sock pattern here.
It's the only one I use.
I
love toe-up socks. I love the idea that once I finish
a sock and bind it off, all that remains is to weave
in a couple of ends. I love being able to easily try
on socks as I knit so I can custom fit them to the
foot as I go along.
Here
are three different ways to start a toe-up sock. I’ve
used all three of them and like them all. I didn’t
invent any of these methods; I’m just demonstrating
how I make them. I encourage you to try all three.
If you’re like me, one of the methods will make
a toe you really like and/or will be easier for you
to master.
For
the purpose of this demonstration, I am making toes
for a sock that is 48 stitches around, but you can
easily adapt the instructions to any number divisible
by four. You’ll need a set of 5 double-pointed
needles [dpns] in a size appropriate for your gauge
and sock yarn. For the Short Row Toe and the Easy
Toe, you'll also need some waste yarn similar in weight
to your sock yarn and a crochet hook in a size appropriate
for the waste yarn.

Short
Row Toe
The
first toe is the short row toe. If you already know
how to make a short row heel, you know how to make
this toe. Here’s how I do it:
Start
with half of the total sock stitches, in this case,
24.
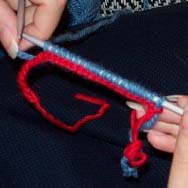
Using
waste yarn, crochet a chain that is several chain
stitches longer than the number of knit stitches you
need [I made my chain 30 stitches long]. Cast
off the last stitch and cut the yarn. Tie a knot in
this tail of yarn — you are going to "unzip"
this provisional cast on later by undoing and pulling
on this end, so the knot will make the right end easier
to find.
 Look
at your chain. One side of it will be smooth and look
like a row of little "vees." The other side
will have a bump in the center of each vee. Using
your sock yarn and 2 dpns, knit 1 stitch into the
bump in the center of each little vee on the back
side of the chain until you have 24 stitches.
[See left.] Look
at your chain. One side of it will be smooth and look
like a row of little "vees." The other side
will have a bump in the center of each vee. Using
your sock yarn and 2 dpns, knit 1 stitch into the
bump in the center of each little vee on the back
side of the chain until you have 24 stitches.
[See left.]
Purl
back across the stitches. You are ready to start the
short rows.
Row 1: Knit 23 stitches. Move the working yarn as
if to purl and slip the last stitch from the left
needle to the right needle. Turn your work.
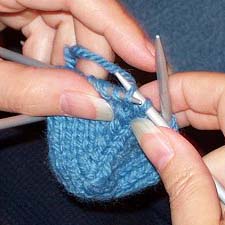
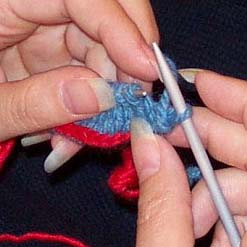 Row
2: Slip the first, unworked, stitch from the left
needle to the right needle. [See right.] Purl the
next stitch [you will have wrapped that first stitch
around its base with the working yarn] and purl across
the next 21 stitches. Move the working yarn as if
to knit and slip last stitch. Turn. Row
2: Slip the first, unworked, stitch from the left
needle to the right needle. [See right.] Purl the
next stitch [you will have wrapped that first stitch
around its base with the working yarn] and purl across
the next 21 stitches. Move the working yarn as if
to knit and slip last stitch. Turn.
Row
3: Slip the first stitch and knit across to the last
stitch before the unworked stitch. Wrap and turn.
Row
4: Slip the first stitch and purl across to the stitch
before the unworked stitch. Wrap and turn.
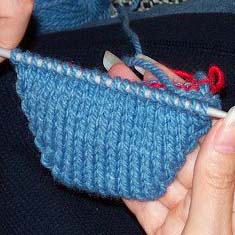
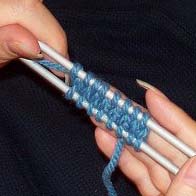
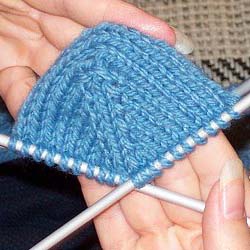
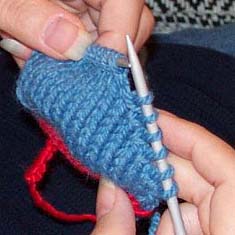 Repeat
Rows 3 and 4 until 8 of the toe stitches are wrapped
and on left side, 8 stitches are "live" in the middle,
and 8 are wrapped and on the right. [The photo at
left shows 6 stitches wrapped on the right needle.]
At this stage, you should be ready to work a right
side row. Your toe is half done. Repeat
Rows 3 and 4 until 8 of the toe stitches are wrapped
and on left side, 8 stitches are "live" in the middle,
and 8 are wrapped and on the right. [The photo at
left shows 6 stitches wrapped on the right needle.]
At this stage, you should be ready to work a right
side row. Your toe is half done.
Note:
How many stitches you leave unworked in the middle
depends on how wide you want your sock toe to be.
If you want it a bit wider, do a couple fewer short
rows. If you want it a bit narrower, do a couple more
short rows.
Now
work the second half of the toe:
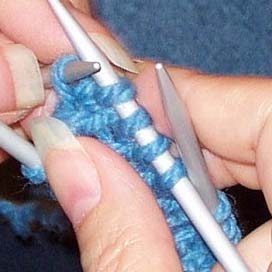
Row
1: Knit across the live stitches across to the first
unworked, wrapped stitch. On the next stitch, pick
up the wrap and knit it together with the wrapped
stitch. Note: the wrap sits almost horizontal around
the vertical stitch. Put your needle through the horizontal
wrap, then the vertical stitch, and then knit the
two together:
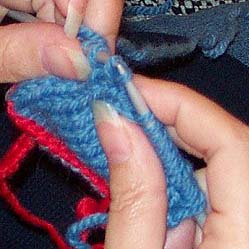
Wrap
the next stitch [so that it now has two wraps] and
turn.
Row
2: Slip the first [double-wrapped] stitch and purl
across to the first unworked, wrapped stitch. Pick
up the wrap and purl it together with the wrapped
stitch. Wrap the next stitch and turn.
On
subsequent rows you will pick up both wraps and knit
or purl them together with the stitch:

Continue until you have worked all the stitches and
you once again have 24 "live" stitches:
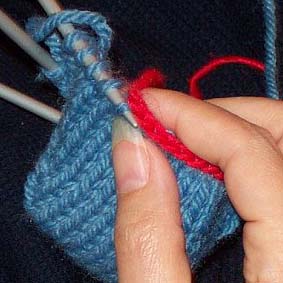
Divide the 24 stitches over 2 dpns.
Undo
the cast-off end of your crocheted chain. Stick the
point of the third dpn in the stitch below the chain.
Unzip the chain [like opening a bag of sugar], one
stitch at a time, as you stick the tip of the needle
in each stitch, moving each stitch onto the needle:
Divide
these 24 stitches over the third and fourth dpns:
On
your first round after toe shaping, you may want to
pick up an extra stitch or two between the "live"
stitches and the stitches you've picked up from the
cast-on, to close up any holes there might be there.
On the next round, remember to decrease back down
to 12 stitches per needle.
Your
toe is complete! Continue on with the sock.
Figure-Eight Toe
This
toe can be very tricky at the start, but with a little
practice, you can easily master it. You don’t
need a provisional cast-on or waste yarn. You just
start with your sock yarn and go!
Take
2 of your dpns and wrap your sock yarn around them
in a figure-eight:
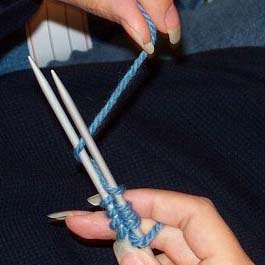
You
want to have 8 loops on each needle, like this: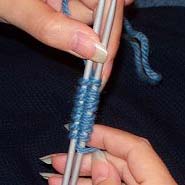
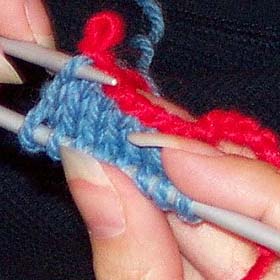
Using
the third dpn, knit the 8 stitches on the top needle: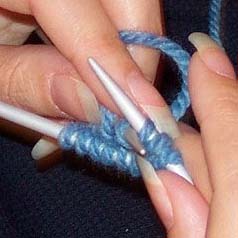
Using
the fourth dpn, knit the stitches on the bottom needle.
On
either the top or the bottom dpn, the stitches will
be twisted the wrong way, so remember to knit into
the backs of the loops when you encounter the twisted
stitches.
Repeat
the last 2 rows, so that you have completed 4 rows.
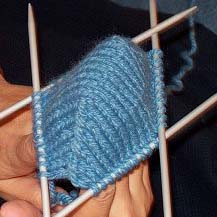
You will have a needle at the top of your work with
8 stitches on it and a needle at the bottom of your
work with 8 stitches on it:
The stitches in the middle of your work may be loose,
but you can tighten them up a little by working the
excess yarn towards one side after you have completed
a couple of rounds.
Begin
knitting circularly.
Round
1: Make 1 stitch at the
beginning of the round, knit 4. These stitches will
go on Needle 4. Mark the next stitch as the beginning
of your round. Using another dpn, knit 4, make 1.
This is Needle 1. Use the third dpn to make 1, knit
4, [Needle 2] then use a fourth dpn to knit 4, make
1 [Needle 3]. Knit the 5 stitches on Needle 4.
You
now have 4 dpns with 5 stitches on each needle.
Begin
working in stockinette increasing as follows:
Round
1: Knit
Round
2:
Needle 1: Knit until the last stitch, M1, K1
Needle 2: Knit 1, M1, knit to the end
Needle 3: Knit until the last stitch, M1, K1
Needle 4: Knit 1, M1, knit to the end
Repeat
these 2 rounds until you have 12 stitches on each
needle [48 stitches total].
The
toe is done!
Easy
Toe
The
construction of the Easy Toe is very similar to the
Figure-Eight Toe, but as the name suggests, it’s
much easier. Using waste yarn, crochet a chain that
is several chain stitches longer than the number of
knit stitches you need. I made my chain 12 stitches
long. Cast off the last stitch and cut the yarn. Tie
a knot in this tail of yarn — you are going to
"unzip" this provisional cast on later by
undoing and pulling on this end, so the knot will
make the right end easier to find.
Look
at your chain. One side of it will be smooth and look
like a row of little "vees." The other side
will have a bump in the center of each vee. Using
your sock yarn and 2 dpns, knit 1 stitch into the
bump in the center of each little vee on the back
side of the chain until you have 8 stitches: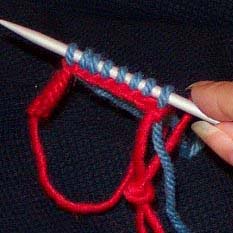
Work
in stockinette stitch for 4 rows. Unzip your provisional
cast on stitches and place them on a second dpn:
You
will have a needle at the top of your work with 8
stitches on it and a needle at the bottom of your
work with 8 stitches on it: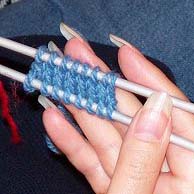
Begin
knitting circularly. Complete the toe in the same
manner as the Figure-Eight
Toe.
|


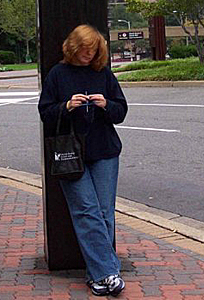 Commuters
who use the subway system in the Washington DC metropolitan
area are used to the sight of Wendy working on her
latest sock-in-progress while waiting for and riding
the train.
Commuters
who use the subway system in the Washington DC metropolitan
area are used to the sight of Wendy working on her
latest sock-in-progress while waiting for and riding
the train.