 Lower
Body
Lower
Body
Using 32-inch circular needle, CO 94[106,
118, 130, 142, 154, 166] sts. Do not join.
Work 20 rows in 2x2 Rib.
Next Row
[RS]: K19[20, 23, 24, 27, 28, 31], place marker,
k4[6, 6, 8, 8, 10, 10], place marker, k4[6,
6, 8, 8, 10, 10], place marker, k40[42, 48,
50, 56, 58, 64], place marker, k4[6, 6, 8,
8, 10, 10], place marker, k4[6, 6, 8, 8, 10,
10], place marker, k19[20, 23, 24, 27, 28,
31]. 6 markers placed; first, third, fourth,
and sixth markers indicate waist shaping points,
and second and fifth markers indicate side
"seam" placement.
Continue in stockinette
st until work measures 6[6, 7, 8, 8, 8, 9]
inches, ending with a WS row.
Shape Waist
Waist Decrease Row [RS]: K to 2 sts
before first marker, ssk, k to third marker,
k2tog, k to 2 sts before fourth marker, ssk,
k to sixth marker, k2tog, k to end. 4 sts
decreased.
Work 5 rows in stockinette
st.
Repeat these 6 rows once,
then work Waist Decrease Row once
more. 82[94, 106, 118, 130, 142, 154] sts.
Work 3 rows in stockinette
st. Work measures approx. 9[9, 10, 11, 11,
11, 12] inches. Place a safety pin in your
work at end of last row worked (on right front
edge).
NOTE: Read ahead!
Neckline, waist and raglan shaping are worked
at the same time.
Shape Neckline
Neckline Decrease Row [RS]: K2, k2tog,
work in patt to last 4 sts, ssk, k2.
Work 9[7, 5, 5, 5, 3, 3] rows in patt as set.
Repeat these 10[8, 6, 6, 6, 4, 4] rows 4[6,
7, 8, 10, 11, 13]. (This shaping will continue
to be worked while raglan shaping is being
worked.)
AT THE
SAME TIME: When work measures
11[11, 12, 13, 13, 13, 14] inches, ending
with a WS row, continue waist shaping as follows:
Waist Increase Row
[RS]: K to first marker, m1, slip marker,
k to third marker, slip marker, m1, k to fourth
marker, m1, slip marker, k to sixth marker,
slip marker, m1, k to end. 4 sts increased.
Work 5 rows in stockinette st.
Repeat these 6 rows twice more. When waist
shaping is complete, remove first, third,
fourth, and sixth markers, leaving second
and fifth markers in place. There should be
48[54, 60, 66, 72, 78, 84] sts between markers.
Continue in stockinette
st, working neckline decreases as set, until
work measures 16[16, 17, 18, 18, 18, 19] inches,
ending with a RS row.
Next Row
[WS]: [P to 3[3, 4, 4, 4, 5, 5] sts after
marker, place last 6[6, 8, 8, 8, 10, 10] sts
worked on hold on waste yarn, removing marker]
twice, p to end. Set work aside and work sleeves.
Do not break yarn; begin a new ball of yarn
for sleeve.
Make a note of how
many neckline decreases have been worked,
and how many rows have been worked since the
last decrease. When you begin working the
raglan yoke, you will continue working the
neckline decrease sequence.
Sleeves
Using double-point needles, CO
28[28, 32, 32, 32, 36, 36] sts. Divide between
needles and join to begin working in the round,
being careful not to twist. After the first
few rounds have been worked, place a split
ring marker or safety pin in your work to
indicate beginning of round.
Work 20 rounds in 2x2 Rib.
K 8 rounds.
Sleeve Increase Round:
K2, m1, k to last 2 sts, m1, k2.
K 9[9, 7, 6, 6, 6, 5] rounds.
Repeat these 10[10, 8, 7, 7, 7, 6] rounds
4[5, 6, 7, 8, 8, 9] times more. 38[40, 46,
48, 50, 54, 56] sts.
Continue in stockinette
st until work measures 17.5[18, 18, 18.5,
18.5, 19, 19] inches, or desired length to
underarm, ending last round 3[3, 4, 4, 4,
5, 5] sts before end of round.
Break yarn, leaving an
18-inch tail. Place last 3[3, 4, 4, 4, 5,
5] sts of this round and first 3[3, 4, 4,
4, 5, 5] sts of next round on hold on waste
yarn, and place remaning 32[34, 38, 40, 42,
44, 46] sts on hold on spare circular needle
or double-point needles.
Make a second sleeve in
the same way, but do not remove remaining
32[34, 38, 40, 42, 44, 46] sts from working
needles.
 Yoke
Yoke
(When working the Joining Row which
follows, remember to work neckline decreases
if this is a decrease row for your size!)
Pick up lower body and
resume working using ball of yarn attached
to right front edge, working all sts onto
circular needle as follows:
Joining Row [RS]:
K to last 3 sts of right front, place marker,
k3; k first 3 sts of one sleeve, place marker,
k to last 3 sts of sleeve, place marker, k3;
k first 3 sts of back, place marker, k to
last 3 sts of back, place marker, k3; k first
3 sts of second sleeve, place marker, k to
last 3 sts of second sleeve, place marker,
k3; k first 3 sts of left front, place marker,
k to end.
There will be 140[154,
166, 182, 198, 204, 220] sts on the needle:
14[16, 16, 19, 22, 21, 24] sts for each front,
26[28, 32, 34, 36, 38, 40] sts for each sleeve,
and 36[42, 46, 52, 58, 62, 68] sts for the
back, with 6 sts between each pair of markers.
If you have 1 st more or less in each front,
don't worry; however, be sure you have the
right number of sleeve and back sts.
Work 5[5, 5, 1, 3, 5, 3]
rows in stockinette st.
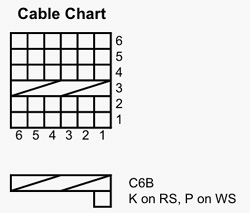
Raglan Decrease
Row [RS]: [K to 3 sts before marker,
k3tog tbl, yo, slip marker, work 6 sts of
Cable Chart, slip marker, yo, k3tog] 4 times,
k to end.
P 1 row.
Repeat these 2 rows 9[10, 11, 13, 14, 15,
16] times more.
After all neckline and
raglan decreases have been worked, 56[60,
66, 64, 68, 70, 74] sts remain. Excluding
cable sts between markers, each front has
2 sts, each sleeve has 6[6, 8, 6, 6, 6, 6]
sts, and the back has 16[20, 22, 24, 28, 30,
34] sts.
Next Row
[RS]: K2tog tbl, remove marker, work 6 sts
of Cable Chart, slip marker, yo, k3tog, [k
to 3 sts before marker, k3tog tbl, yo, slip
marker, work 6 sts of Cable Chart, slip marker,
yo, k3tog] twice, k to 3 sts before marker,
k3tog tbl, yo, slip marker, work 6 sts of
Cable Chart, remove marker, k2tog. 48[52,
58, 56, 60, 62, 66] sts.
P 1 row.
Next Row
[RS]: K2tog tbl, k5, remove marker, k2tog,
k0[0, 2, 0, 0, 0, 0], k2tog tbl, work 6 sts
of Cable Chart, slip marker, yo, k3tog, k
to 3 sts before marker, k3tog tbl, yo, slip
marker, work 6 sts of Cable Chart, k2tog,
k0[0, 2, 0, 0, 0, 0], k2tog tbl, k5, k2tog.
40[44, 50, 48, 52, 54, 58] sts.
P 1 row.
When working next row,
remove markers as you come to them.
Next Row [RS]:
BO 3[3, 4, 3, 4, 4, 5] sts, k2tog, k to marker,
k2tog, k4, yo, k3tog, k to 3 sts before marker,
k3tog tbl, yo, k4, ssk, k to last 6[6, 7,
6, 7, 7, 8] sts, ssk, k to end. 31[35, 40,
39, 42, 44, 47] sts.
Next Row [WS]:
BO 3[3, 4, 3, 4, 4, 5] sts, p to end. Leave
remaining 26[32, 36, 36, 38, 40, 42] sts on
hold on needle. Break yarn.
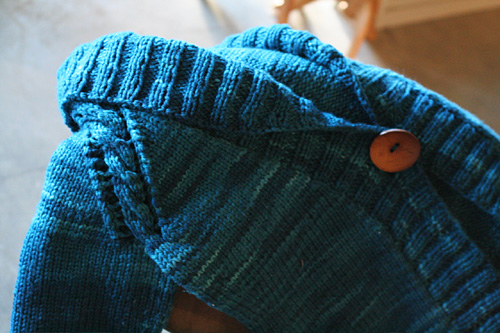
Collar and Button Band
Using longer circular needle, with
RS facing and beginning at lower corner of
right front edge, pick up and k 2 sts for
every 3 rows along right front edge, placing
a st marker at point indicated by safety pin
(beginning of neckline shaping), pick up and
k 1 st in each bound off st, k the 26[32,
36, 36, 38, 40, 42] held sts of back neck,
pick up and k 1 st in each bound off st, and
2 sts for every 3 rows along left front edge.
Note: It's very important
that you pick up the same number of stitches
on both front edges, and that stitches are
picked up as recommended, rather than that
you obtain an exact number of sts. Markers
will be used to keep track of your buttonhole
placement and short row collar shaping. To
obtain a rib that begins and ends with k2
at both front edges, make sure you pick up
a total of sts that's divisible by 4 sts,
plus 2. For example, for the L size, I picked
up 87 sts on each front plus the 36 across
the neck, for a total of 210 sts. If you don't
obtain a workable number of sts, increase
or decrease up to 2 sts when working the next
row, as needed.
Work 1 row in 2x2 Rib.
Next Row [RS]:
Work to marker, work 9 sts, place marker;
count the number of sts you have worked so
far in this row, and place a pin in your work
at this point on the left front edge; work
to this point, place marker, work to end.
There are 3 markers in your work: 1 at the
point where the neckline shaping began on
the right front edge, and one 9 sts (or approx.
14 rows) above that point, on both the right
and left front edges.
Work 5[5, 5, 7, 7, 7, 9]
more rows in 2x2 Rib.
Buttonhole Row
[RS]: Work to first marker, BO 5 sts, work
to end.
Next Row [WS]:
Work to bound-off sts, CO 5 sts using Backward
Loop method, remove marker, work to end. 2
markers remain; these will be referred to
as the right and left markers (right marker
on right front, etc.).
First Set of Short
Rows:
Work to left marker, w&t. Work to right
marker, w&t.
Work to 5 sts before left marker, w&t.
Work to 5 sts before right marker, w&t.
Work to 10 sts before left marker, w&t.
Work to 10 sts before right marker, w&t.
Work to 13 sts before left marker, w&t.
Work to 13 sts before right marker, w&t.
Work to 16 sts before left marker, w&t.
Work to 16 sts before right marker, w&t.
Work to end, working wraps together with wrapped
sts (see note in Pattern Notes, above).
Work 1 more row, working remaining wraps together
with wrapped sts.
Second Set of Short
Rows:
Work to 5 sts before left marker, w&t.
Work to 5 sts before right marker, w&t.
Work to 10 sts before left marker, w&t.
Work to 10 sts before right marker, w&t.
Work to 15 sts before left marker, w&t.
Work to 15 sts before right marker, w&t.
Work to 17 sts before left marker, w&t.
Work to 17 sts before right marker, w&t.
Work to 14 sts before left marker, w&t.
Work to 14 sts before right marker, w&t.
Work to end, working wraps together with wrapped
sts.
Work 1 more row, working remaining wraps together
with wrapped sts.
BO all sts loosely in 2x2
Rib.


 Working
Wraps Together with Wrapped Stitches:
Working
Wraps Together with Wrapped Stitches: