by Cassie Rovitti by Cassie Rovitti

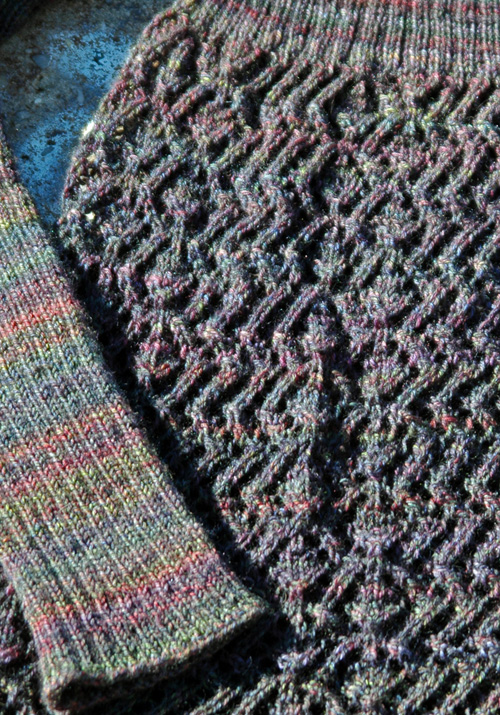
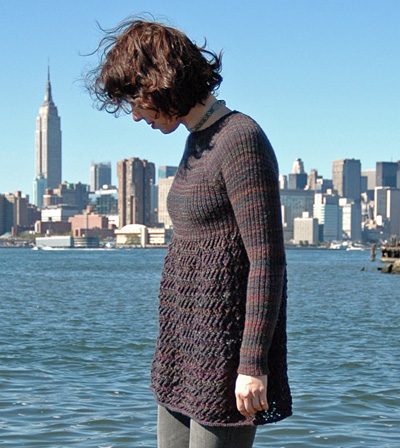
I don’t really knit sweaters. Sure, I want to wear sweaters, but I tend to knit socks or shawls. I don’t like seaming. I don’t like waiting till the very end to find out if something is going to fit or not. But, every now and then, I’ll get a hankering to knit something that isn’t an accessory. So, I set out to design another sweater that has no seams, that I could try on as I went along. My other goal was to design a lace pattern to be knit in the round without leaves or other botanical items, hence the name "Abotanicity".
It’s knit from the top down, and comes off the needles completely finished. I’m very comfortable with sock knitting methods, so the rib portion was done using two sets of circular needles, and I knit both sleeves at the same time.
Please, please try this on as you go. Everyone’s
shaped a little differently, and what works for me might not work for
you. This is especially important for length and for the placement of
the beginning of the lace. Having a lace "skirt" start
in the middle of your boobs really isn't attractive. And yes, before you ask, this is a sweater knit out of sock yarn. A size XS/S is equivalent to knitting 4 pairs of socks. You can do it. Just call me Yan. |
The
yoke and sleeves of this sweater are knit in the round using two
circular needles. If you’re not familiar with this technique,
you can use double-point needles to begin the yoke, then switch
to one circular needle when there are enough sts. Use st markers
to indicate the points where the the ends of the circular needles
are located in the pattern instructions.
Directions for working with two circular needles can be found here.
Lifeline
A lifeline is a length of smooth waste yarn which is inserted through
the sts of a row or round of knitting using a darning needle, usually
while working a complicated lace pattern. If you make an irreparable
error and need to rip back, the lifeline provides an easy point to
rip back to, and ensures that you will not lose any stitches.
In this pattern, a lifeline is recommended at the beginning of the lace skirt. Inserting a new lifeline at the end of each 12-row repeat of the lace pattern may also be helpful; the old lifeline can be removed each time you insert a new one.
M1p: Make 1 purl st. Insert left needle, from back to front, under thestrand of yarn which runs between the last stitch on left needle and the first stitch on right needle; purl this stitch through its front loop.
SK2P: Sl next st knitwise, k2tog, pass slipped st over [k2tog] just worked.
2x2 Rib (Worked in the round over a multiple of 4 sts):
Round 1: [K2, p2] to end.
Repeat this round for 2x2 Rib.
2x1 Rib (Worked in the round over a multiple of 3 sts):
Round 1: [K2, p1] to end.
Repeat this round for 2x1 Rib.
|
YOKE
Using US #3/3.25mm needle, CO 128[140, 164] sts.
Divide sts evenly
between needles so that there are 64[70, 82] sts on each
needle.
Join to begin working in the round,
being careful not to twist.
Using US #1/2.5mm needles, work 6 rounds in 2x2 Rib. Place
safety pin or split ring marker in work to indicate beginning
of round.
Set-up Round: Using first US #3/3.25mm needle, [k2, p1] 7[7,
8] times, k2, place marker, [k2, p1] 13[15, 18] times, k2;
work sts on second needle in the same way using second US #3/3.25mm
needle.
Work 1 round in pattern.
Increase Round: [K1, m1, work in pattern to 1 st before marker,
m1, k1, slip marker, k1, m1, work in pattern to last st on
needle, m1, k1] twice. 8 sts increased.
Repeat these 2 rounds 40[48, 54] times more, working new sts
in 2x1 Rib as set. When working increase rounds, if the increased
st will be a p st, work m1p instead of m1. If desired, move
all sts to one needle when there are enough sts to do so comfortably.
Place additional markers to indicate divisions between sections.
There will be 456[532, 604] sts when all Increase Rounds have
been worked.
There are 2 sections of 105[121, 136] sts each,
which will form the sleeves; and 2 sections of 123[145, 166]
sts each, which will form the front and back of the body.
Work 1 round in pattern.
Divide Body and Sleeves:
Note: When working next round, remove all markers except end-of-round
marker.
Next Round: Place first 105[121, 136] sts (all sts to first
marker) on hold on waste yarn, CO 3 sts, work 123[145, 166]
sts in pattern (to next marker or end of needle); repeat for
second half of sts. 252[296, 338] sts on needle.
 BODICE BODICE
Work in 2x1 Rib until work measures 2.5[3.25, 4] inches from
uderarm, or desired length.
Transfer sts to waste yarn and
try on piece to determine correct length; bodice should be
long enough to completely cover your bust, and to draw in to
hug your torso below your bust.This is critical for achieving
a flattering fit; if the lace skirt begins before the bodice
is allowed to reach and define this narrow part of your body,
the silhouette of the top will be disproportionately wide.
Next Round: Work in pattern, decreasing 0[2, 2] sts evenly.
252[294, 336] sts.
SKIRT
Using US #5/3.75mm needle, k 1 round. Insert a lifeline in
the sts of this round if desired (see pattern notes).
Work in chart pattern until skirt measures 16.5 inches or desired
length. Chart will be repeated 12[14, 16] times in each round.
Make note of the following:
- When beginning Round 7 of chart, remove marker, k first st, then replace marker to the left of this st before beginning round.
- At the end of Round 10, do not work last st; move marker to the right of this st before beginning Round 11.
Try on sweater again before finishing skirt to determine correct length.
When desired length is reached, hold two strands of yarn together and k 4 rounds using US #3/3.25mm needle.
BO all sts.
 SLEEVES SLEEVES
In preparation for working the first sleeve, transfer all held sts to one US #1/2.5mm needle, and use a safety pin or split ring marker to mark the center of the CO edge at the underarm.
Using one US #3/3.25mm needle, pick up and k 3 sts to the left of this marker, along the CO edge and in the gap between the CO sts and the beginning of the held sts; using the same needle and continuing from these sts, work the first 53[61, 68] sleeve sts in 2x1 Rib as set.
Using the second US #3/3.25mm needle, work the remaining 52[60,
68] sleeve sts, then pick up and k 3 sts between the end of
these sts and the underam marker. 111[127, 142] sts.
Work 1 round in pattern, working picked-up sts in 2x1 Rib as
established by other sleeve sts.
Decrease Round: Ssk, work in pattern to last
2 sts, k2tog.
Work 2 rounds in pattern.
Repeat these 3 rounds 12[16, 17] times more. 85[93, 106] sts.
Work Decrease Round.
Work 5 rounds in pattern.
Repeat these 6 rounds 6[7, 9] times more. 71[77, 86] sts.
Work Decrease Round.
Work 13 rounds in pattern.
Repeat these 14 rounds 3 times more. 63[69, 78] sts.
Continue in pattern until work measures 18.5[18.5, 19] inches
from underarm or desired length. BO all sts loosely in pattern.
Work second sleeve in the same way. |