Note: At the end of each
line of directions, the number of sts in the brim (garter
st section between marker and edge of work) will be indicated
in brackets.
All WS rows are worked using the same color as the preceding RS row.
Carry yarn not in use loosely along edge of work. Be sure to work first
st of each RS row loosely, so that lower edge of hat will stretch.
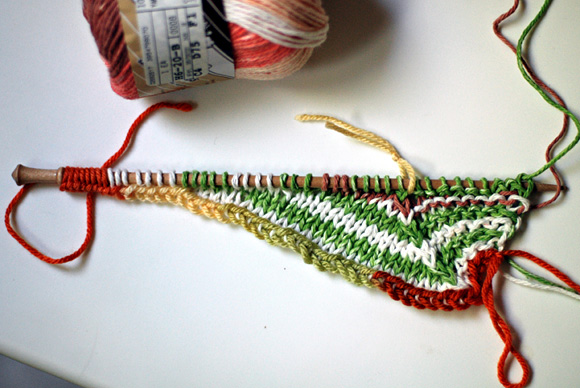
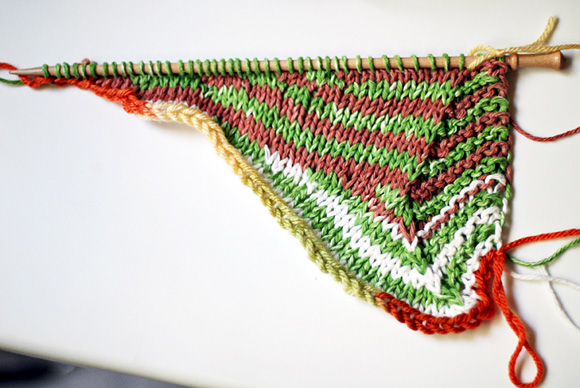
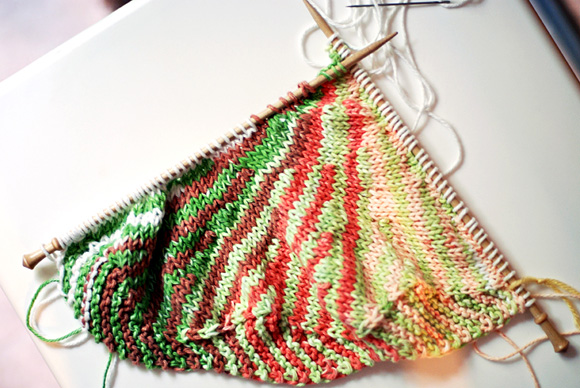
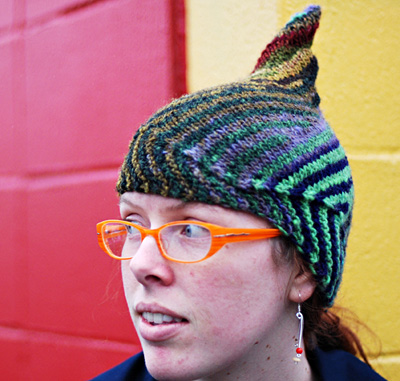
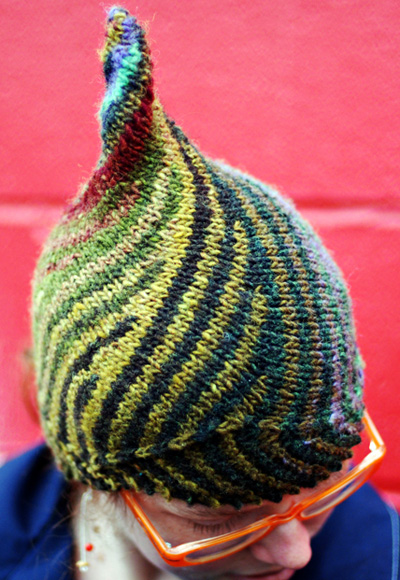
POINTED VERSION
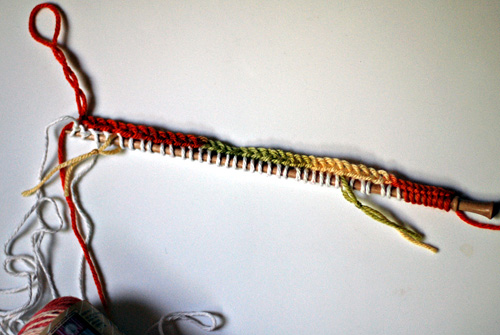
Using waste yarn and
provisional method indicated in Pattern Notes, CO 44[54]
sts.
First Wedge:
Row 1 [RS]: Using MC,
k4, place marker, k to last 8 sts. Turn work. [4 brim sts]
Row 2 [WS]: Sl 1, p6,
place marker, p to next
marker, k to end. [4
brim sts]
Row 3 [RS]: Using CC,
kfb, k to first marker,
sk2p, k to next marker,
remove marker, m1. Turn
work. [5 brim sts]
Row 4 [WS]: Sl 1, p4,
place marker, p to next marker, k to end. [5 brim sts]
Row 5 [RS]: Using MC,
work as for Row 3. [6 brim sts]
Row 6 [WS]: Sl 1, p3,
place marker, p to next marker, k to end. [6 brim sts]
Row 7 [RS]: Using CC,
work as for Row 3. [7 brim sts]
Row 8 [WS]: Sl 1, p2,
place marker, p to next marker, k to end. [7 brim sts]
Row 9 [RS]: Using MC,
work as for Row 3. [8 brim sts]
Row 10 [WS]: Sl 1, p2,
place marker, p to next marker, k to end. [8 brim sts]
Row 11 [RS]: Using CC,
work as for Row 3. [9 brim sts]
Adult Size Only:
Row 12 [WS]: Sl 1, p2,
place marker, p to next marker, k to end. [9 brim sts]
Row 13 [RS]: Using MC,
work as for Row 3. [10 brim sts]
Row 14 [WS]: Sl 1, p3,
place marker, p to next marker, k to end. [10 brim sts]
Row 15 [RS]: Using CC,
work as for Row 3. [11 brim sts]
All Sizes:
Next Row [WS]: Sl 1,
p to marker, k to end. [(9)11 brim sts]
Next Row [RS]: Using
MC, kfb, k to marker, k3tog, k to last 4 sts, kfb. Turn work.
Wedge is complete. [10(12) brim sts]
  Second Wedge:
Row 1 [WS]: Using MC,
sl 1, p4, place marker, p to next marker, remove marker,
k2, replace marker, k to end. [8(10) brim sts]
Row 2 [RS]: Using CC,
kfb, k to marker, k3tog, k to next marker, remove marker,
m1. Turn work. [9(11) brim sts]
Row 3 [WS]: Sl 1, p6,
place marker, p to next marker, remove marker, k2, replace
marker, k to end. [7(9) brim sts]
Row 4 [RS]: Using MC,
work as for Row 2. [8(10) brim sts]
Row 5 [WS]: Sl 1, p4,
place marker, p to next marker, remove marker, k2, replace
marker, k to end. [6(8) brim sts]
Row 6 [RS]: Using CC,
work as for Row 2. [7(9) brim sts]
Row 7 [WS]: Sl 1, p3,
place marker, p to next marker, remove marker, k2, replace
marker, k to end. [5(7) brim sts]
Row 8 [RS]: Using MC,
work as for Row 2. [6(8) brim sts]
Row 9 [WS]: Sl 1, p2,
place marker, p to next marker, remove marker, k2, replace
marker, k to end. [4(6) brim sts]
Row 10 [RS]: Using CC,
work as for Row 2. [5(7) brim sts]
Row 11 [WS]: Sl 1, p2,
place marker, p to next marker, remove marker, k2, replace
marker, k to end. [3(5) brim sts]
Row 12 [RS]: Using MC,
work as for Row 2. [4(6) brim sts]
Adult Size Only:
Row 13 [WS]: Sl 1, p2,
place marker, p to next marker, remove marker, k2, replace
marker, k to end. [4 brim sts]
Row 14 [RS]: Using CC,
work as for Row 2. [5 brim sts]
Row 15 [WS]: Sl 1, p3,
place marker, p to next marker, remove marker, k2, replace
marker, k to end. [3 brim sts]
Row 16 [RS]: Using MC,
work as for Row 2. [4 brim sts]
All Sizes:
Next Row [WS]: Sl 1,
p to marker, remove marker, k2, replace marker, k to end.
[2 brim sts]
Last Row of Wedge [RS]:
Using CC, kfb, k to marker, k3tog, k to last st, kfb. Wedge
is complete. [3 brim sts]
Third and Fifth Wedges:
Row 1 [WS]: Using CC,
sl 1, p7, place marker, p to next marker, k to end. [3
brim sts]
Row 2 [RS]: Using MC,
kfb, k to marker, sk2p, k to marker, remove marker, m1. Turn
work. [4 brim sts]
Rows 3 through 12[16]: Work as for Rows
2 through 11[15] of First Wedge.
All Sizes:
Next Row [WS]: Sl 1,
p to marker, k to end. [(9)11 brim sts]
Next Row [RS]: Using
MC, kfb, k to marker, k3tog, k to last 3 sts, m1. Turn work.
Wedge is complete. [10(12) brim sts]
Fourth and Sixth Wedges:
Work as for Second Wedge.

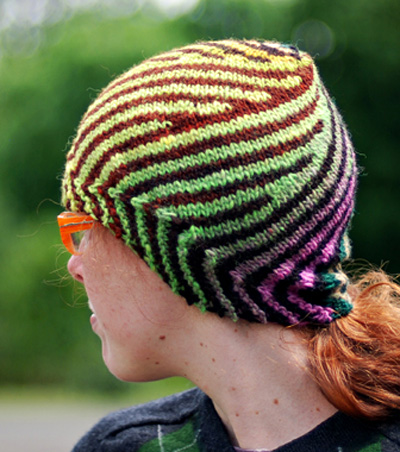
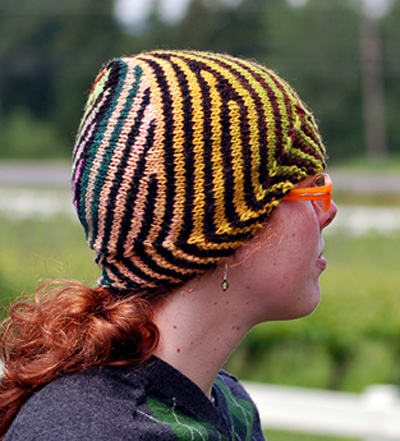
NO-POINT VERSION
Using waste yarn and provisional method indicated in Pattern
Notes, CO 40[50] sts.
First Wedge:
Row 1 [RS]: Using MC,
k4, place marker, k to last 3 sts. Turn work. [4 brim sts]
Row 2 [WS]: Sl 1, p2,
place marker, p to next marker, k to end. [4 brim sts]
Row 3 [RS]: Using CC,
kfb, k to marker, sk2p, k to next marker, remove marker,
m1. Turn work. [5 brim sts]
Row 4 [WS]: Work as for Row
2. [5 brim sts]
Row 5 [RS]: Using MC,
work as for Row 3. [6 brim sts]
Row 6 [WS]: Work as for
Row 2. [6 brim sts]
Row 7 [RS]: Using CC,
work as for Row 3. [7 brim sts]
Row 8 [WS]: Work as for Row
2. [7 brim sts]
Row 9 [RS]: Using MC,
work as for Row 3. [8 brim sts]
Row 10 [WS]: Work as
for Row 2. [8 brim sts]
Row 11 [RS]: Using CC,
work as for Row 3. [9 brim sts]
Adult Size Only:
Row 12 [WS]: Sl 1, p3,
place marker, p to next marker, k to end. [9 brim sts]
Row 13 [RS]: Using MC,
work as for Row 3. [10 brim sts]
Row 14 [WS]: Work as
for Row 12. [10 brim sts]
Row 15 [RS]: Using CC,
work as for Row 3. [11 brim sts]
All Sizes:
Next Row [WS]: Sl 1,
p to marker, k to end. [9(11) brim sts]
Next Row [RS]: Using
MC, kfb, k to marker, k3tog, k to last st, kfb. Turn work.
Wedge is complete. [10(12) brim sts]
 Second Wedge:
Row 1 [WS]: Using MC,
sl 1, p2, place marker, p to next marker, remove marker,
k2, replace marker, k to end. [8(10) brim sts]
Row 2 [RS]: Using CC,
kfb, k to marker, k3tog, k to next marker, remove marker,
m1. Turn work. [9(11) brim sts]
Row 3 [WS]: Sl 1, p2,
place marker, p to next marker, remove marker, k2, replace
marker, k to end. [7(9) brim sts]
Row 4 [RS]: Using MC,
work as for Row 2. [8(10) brim sts]
Row 5 [WS]: Sl 1, p2,
place marker, p to next marker, remove marker, k2, replace
marker, k to end. [6(8) brim sts]
Row 6 [RS]: Using CC,
work as for Row 2. [7(9) brim sts]
Row 7 [WS]: Sl 1, p2,
place marker, p to next marker, remove marker, k2, replace
marker, k to end. [5(7) brim sts]
Row 8 [RS]: Using MC,
work as for Row 2. [6(8) brim sts]
Row 9 [WS]: Sl 1, p2,
place marker, p to next marker, remove marker, k2, replace
marker, k to end. [4(6) brim sts]
Row 10 [RS]: Using CC,
work as for Row 2. [5(7) brim sts]
Row 11 [WS]: Sl 1, p2,
place marker, p to next marker, remove marker, k2, replace
marker, k to end. [3(5) brim sts]
Row 12 [RS]: Using MC,
work as for Row 2. [4(6) brim sts]
Adult Size Only:
Row 13 [WS]: Sl 1, p3,
place marker, p to next marker, remove marker, k2, replace
marker, k to end. [4 brim sts]
Row 14 [RS]: Using CC,
work as for Row 2. [5 brim sts]
Row 15 [WS]: Sl 1, p3,
place marker, p to next marker, remove marker, k2, replace
marker, k to end. [3 brim sts]
Row 16 [RS]: Using MC,
work as for Row 2. [4 brim sts]
All Sizes:
Next Row [WS]: Sl 1,
p to marker, remove marker, k2, replace marker, k to end.
[2 brim sts]
Next Row [RS]: Using
CC, kfb, k to marker, k3tog, k to last st, kfb. Wedge is
complete. [3 brim sts]
Third and Fifth Wedges:
Row 1 [WS]: Using CC,
sl 1, p2, place marker, p to next marker, k to end. [3
brim sts]
Row 2 [RS]: Using MC,
kfb, k to marker, sk2p, k to marker, remove marker, m1. Turn
work. [4 brim sts]
Rows 3 through 12[16]:
Work as for Rows 2 through 11[15] of First Wedge.
Work last two rows as
for First Wedge.
Fourth and Sixth Wedges:
Work as for Second Wedge.
|