Grandma Knitty Home
Knitty: little purls of wisdom
letter from the editorfeatured articlesKnitty's fabulous pattern selectionarchive of back issuestell us what you think of KnittyKnitty's favorite linkshelp knitty keep on keepin' onknitty's virtual sNbjoin the Knitty notifylistknitty's tiny little shopping malltake home something Knitty


Elann

the Knitty FAQ

submission guidelines for designers and writers

the obligatory legal statement

the rabbit

© Knitty 2002-2006. All rights reserved. Unauthorized reproduction prohibited. This means you.


Cool stuff! Techniques with Theresa Thinking beyond the pattern Travelling knitter
Patterns 102 Knitting is sexy Plant freak K vs B Sex & knitting

In the last issue, I promised to show you how to join two sets of live stitches without leaving a seam. Perfect for this particular issue of Knitty with its focus on garments to be worn ... hmm ... well, let's just say places you might not want a seam. It's also perfect for the toes of socks, the top of hoods and baby garments or anywhere else you don't want the thickness of bound-off edges sewn together. It's not, however, particularly well suited to shoulder seams on heavy sweaters or other places where you might want the stability of a bound-off edge to hold the shape of the garment.

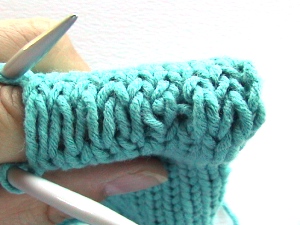
Grafting, also known as Kitchener stitch or weaving, joins two sets of stitches that are still on the needle (a.k.a. "live") by using a tapestry needle threaded with yarn to create a row that looks like knit stitches between them. I still find it a rather magical and mysterious process, even though I've gained some understanding of what's happening as I graft. If you haven't grafted before and have been feeling intimidated by the mere idea, all I can ask is that you take a leap of faith and give it a try. But it may be a smart idea to make a couple of small swatches in a nice plain sturdy yarn -- one that isn't slippery, lumpy or otherwise difficult to work with -- and follow these instructions a few times before trying it out on something you've spent days knitting. And you'll want to do this the first few times someplace quiet without the least possibility of interruption. If your attention gets pulled away from the process, it's not terribly easy to figure out where you left off. [I still have to be careful to finish one complete series of steps before stopping so that I can be certain of starting again at the proper point.] But before we get to step one there are a few preparations that have to be made.

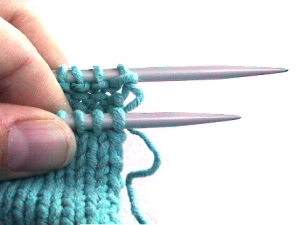
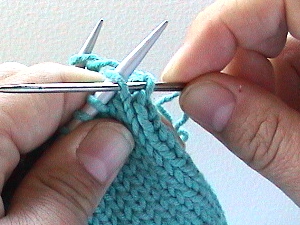
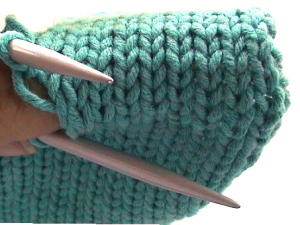
Before you can start grafting you must divide the stitches evenly onto two needles -- these can be straight, circular or double-pointed needles -- it's all the same, but if you're just learning you might want to start with straight needles so there's less chance of the stitches slithering around and confusing you. It is vital that you have the exact same number of stitches on the two needles. If you have 10 stitches on the first needle you have to have 10 stitches on the other. No way around this. Count the stitches at least twice to be absolutely positive. And while we're on the subject, I'll admit that I obsessively count the number of stitches remaining from time to time while in the process of grafting to be sure I'm not going to wind up with an extra stitch at the end of one of the needles -- also a good way to be sure you're doing it right. The number of stitches must be equal because there's simply nothing to do with any leftover stitches and they'll just be left hanging there to unravel, poor things. There's many a thing in knitting that can be fudged, but this isn't one of them.

A quick note: For this tutorial, I'm going to focus on grafting stockinette stitch together, with a note about grafting garter stitch at the end. Grafting more complicated stitch patterns are, to tell the truth, beyond my current scope of practice.

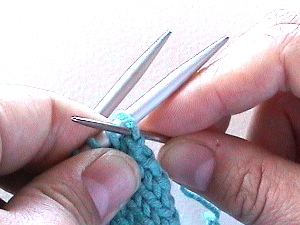
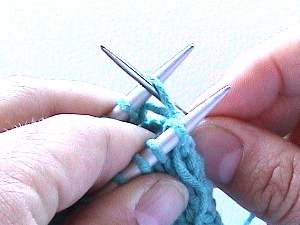
Okay. Sit down someplace quiet with a good light source, your knitting and a tapestry needle. You can thread the tapestry needle with a length of yarn that's not attached to the knitting and weave it in later, but ideally you will have left a tail on one of the pieces of knitting that's at least twice as long as the finished join will be. From experience, I've found that the results are best if the tail is coming from the piece on the needle furthest from me when I start.

Hold the needles parallel with the tips pointing in the same direction and the wrong (purl) sides facing inwards.

Now you'll need to "set up" for grafting by performing the following two steps one time:
Insert the threaded tapestry needle into the first stitch on the needle closest to you as if to purl and pull it through, leaving the stitch on the needle.


Then insert the needle into the first stitch on the back needle as if to knit, leaving the stitch on the needle. Pull the yarn through.

These first two steps are preparatory and are only done once.
Now let's get down to some serious kitchenering -- the following four steps are the ones you will repeat until you've worked every stitch on the needles. I usually chant to myself "knit, purl -- purl, knit" while grafting and you'll soon see why.

Step 1
Insert the needle into the first stitch on the front needle as if to knit, while slipping it off the end of the needle.

Step 2
Insert the needle into the next stitch on the front needle as if to purl, but this time, leave it on the needle. Gently pull the yarn through.

Step 3
Insert the needle into the first stitch on the back needle as if to purl, and slip it off the end of the needle.

Step 4
Insert the needle into the next stitch on the back needle as if to knit, and leave it on the needle. Pull the yarn through.

Repeat steps 1-4 over and over again. After you've worked a couple of inches, pause [being sure to complete step 4 so you'll know where to begin again] and tighten up the stitches using the end of the tapestry needle to tug at each loose loop in turn, working from the beginning of the join towards the last stitches worked. I find I get a nicer final result when I pull the yarn lightly through the stitches during the process of grafting and then adjust the tension on the yarn to match the gauge of the knitting as closely as possible afterwards.

So this...

becomes this.

Pure magic!
Keep repeating steps 1-4, pausing to tighten up the stitches now and then until all the stitches are worked. The last two stitches remaining on the needle will require you to perform step 1 then go directly to step 3.

Now a brief word about grafting garter stitch:

In order to create an invisible join on garter stitch, you'll have to be sure that the last row of stitches on the front piece have purl bumps snug up against the needle and the last row of stitches on the back piece have knit stitches up against the needle. For the preparatory steps, insert the needle into the first stitch on the front needle as if to purl and then into the first stitch on the back needle as if to purl again. Then, instead of working steps 1-4, simply repeat steps 1 and 2 with first the front needle and then the back needle. The chant in this case will be "knit, purl --knit, purl".

Remember to take deep breaths and keep chanting and soon you'll be able to graft without even referring to the instructions. Honest!


ABOUT THE AUTHOR

Right about now, Theresa is somewhere on the east coast of North America, waiting for her toes to thaw before returning home to Norway.