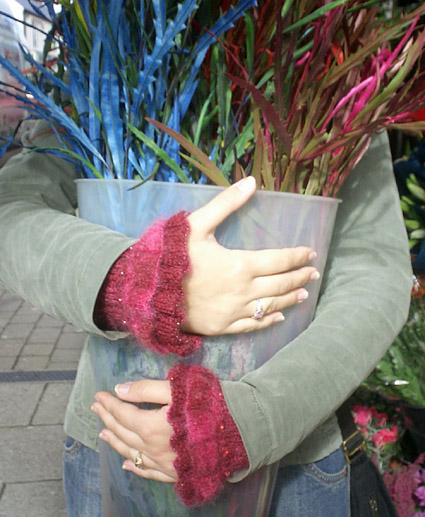
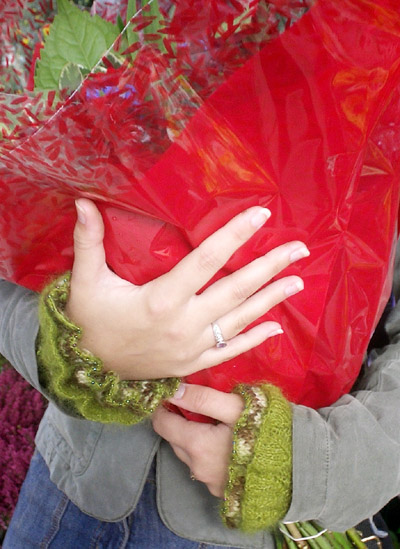
Grandma Knitty Home
Knitty: little purls of wisdom
letter from the editorfeatured articlesKnitty's fabulous pattern selectionarchive of back issuestell us what you think of KnittyKnitty's favorite linkshelp knitty keep on keepin' onknitty's virtual sNbjoin the Knitty notifylistknitty's tiny little shopping malltake home something Knitty


Elann

the Knitty FAQ

submission guidelines for designers and writers

the obligatory legal statement

the rabbit

© Knitty 2002-2006. All rights reserved. Unauthorized reproduction prohibited. This means you.


katecreaturesboogie timeknecklacebamboozellenamastebest friend
forecasttempting IIfestivetubeyblanche-neigebristowcheesy puffs
bobbliciouschaosblupomatomusthujamarleyspikedanica
urban rustic glovesreal stocking capmrs beeton
layersstarsky
earthfaire

Although not widely known outside of Britain, Mrs. Isabella Beeton can best be described as Victorian England's equivalent to Martha Stewart. Mrs. Beeton's massive Book of Household Management, published in 1861, offered its readers no-nonsense, practical advice on all aspects of housekeeping, cooking, child care, dealing with one's servants, managing one's poultry, and the ins and outs of properly addressing dinner invitations. Of paramount importance in learning to run one's Victorian home like a well-oiled machine, and second only to the Virtues of Cleanliness and Rising Early, were the twin Virtues of Economy and Frugality.

In these beaded Victorian-styled gauntlets, Mrs. Beeton's twin Virtues come fully into play. While they can be knit with just two small balls of purchased yarn (Economy), they are really designed to utilize those tiny little bits of leftover project yarn that invariably collect in a knitter's stash (Frugality). They are especially suited to little scraps -- 4 to 18 yards -- of luxury yarns that are too small for most projects, too dear to just toss away.

In the spirit of Victoriana, these little wrist warmers are the essence of romance, with soft ruffles that look ever-so charming under a jacket sleeve, and beads that catch the light and sparkle at your wrists. In the spirit of Mrs Beeton, they are quick to knit, make great low-cost gifts and, as they cover a pulse point on your wrist, they actually do keep you warm. Pretty. Practical. Frugal. Economical. Oh, how Mrs. Beeton would have smiled at that.

model: Laura Davis photos: Brenda Dayne, Helen Mears

SIZE
One
 
FINISHED MEASUREMENTS

Length: 5 inches
Wrist circumference: 6-7 inches


MATERIALS

[MC] Rowan Cashsoft DK [57% Extra Fine Merino, 33% Microfibre, 10% Cashmere; 142 yd/130m per 50g skein]; color: #521 Opulence; 1 skein
[CC] Rowan Kidsilk Spray [70% Super Kid Mohair, 30% Silk; 229yd/210m per 25g skein]; color: #576 Vino; 1 skein

1 set US #7/4.5mm double-point needles
1 set US #6/4mm double-point needle
108 Japanese seed beads, size 11/0
18 Czech glass beads, size 8/0
Dental floss threader or large-eye beading needle
Note: If neither of these threading implements is available, see Pattern Notes re. threading beads.

Tapestry needle

GAUGE

21 sts/30 rows = 4 inches in stockinette stitch using MC and larger needles
21sts/30 rows = 4 inches in stockinette stitch using CC and smaller needles

PATTERN NOTES

[Knitty's list of standard abbreviations can be found here]

Threading Beads
Beads must be threaded onto the working yarn before you begin to knit. Since it is not always possible to find a threading needle small enough to go through beads, and large enough to accommodate yarn, you will probably need to use a loop of auxiliary thread, threaded through a beading needle. The yarn is then passed through the loop of threa and folded, allowing you to pass the bead over the needle, down the auxiliary loop, and onto the working yarn.

PB: Place Bead
Slide bead up yarn until it sits snugly against needle. Proceed to cast on next st normally.

PBK: Place Bead in a Knit Stitch
Slide bead up yarn until it sits snugly against needle. Insert right needle as if to knit, wrap yarn around it. Push bead along yarn to front of stitch on left needle, and complete stitch.

Long-Tail Cast On and Cable Cast On:
If you are unfamiliar with these cast on methods, instructions can be found here:

Knitting from Stash:
To knit Mrs. Beeton from your own stash yarn, follow the yardage chart below. Amounts given are for a single gauntlet. If you want to knit two exactly the same, you will need to double the amounts given.

Pattern Section

Yardage

Yarn Weight


Beaded Cast-On:

4 yards

Fingering weight

Bottom Bell Edging:

18 yards

DK weight

Top Bell Edging:

18 yards

Fingering weight

Wrist ribbing:

16 yards

DK and fingering weight (each)

Picot bind-off:

3 yards

DK weight

Use DK weight yarn where pattern specifies "MC", and fingering weight yarn where pattern specifies "CC".

DIRECTIONS

Beaded Cast On
Thread 54 size 11/0 Japanese seed beads onto CC and push them about three yards along the yarn, leaving enough free yarn for a long tail CO.

Using larger needles and Long Tail method, CO 108 sts as follows:
CO 1 st, PB, [CO 2 sts, PB] 53 times, CO 1 st. 108 sts.

Distribute sts evenly between needles and join to begin working in the round, being careful not to twist.

Set-Up Round: [P3, k9] to end.
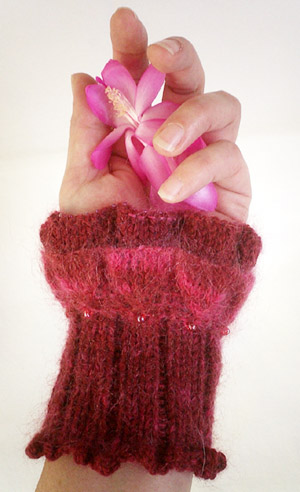
Bottom Bell Edging
Using MC, work as follows:

Rounds 1 & 2: [P3, k9] around.

Round 3: [P3, ssk, k5, k2tog] around. 90 sts rem.

Round 4: [P3, k7] around.

Round 5: [P3, ssk, k3, k2tog] around. 72 sts rem.

Round 6: [P3, k5] around.

Round 7: [P3, ssk, k1, k2tog] around. 54 sts rem.

Round 8: [P3, k3] around.

Round 9: [P3, sl 1, k2tog, psso] around. 36 sts rem.

Rounds 10 & 11: [P3, k1] around.

Do not break yarn. Set aside and work Top Bell Edging.

Top Bell Edging
Thread 9 size 8/0 Czech glass beads onto CC, and push them along the yarn. You will not need them for a little while, so push them a long way up the yarn.

Using smaller needles and Long Tail method, CO 108 sts.
Distribute sts evenly between needles and join to begin working in the round, being careful not to twist.
Continuing with CC, work Rounds 1-9 as for Bottom Bell Edging, then proceed as follows:

Round 10: [P3, PBK] to end.
Round 11: P all sts; each time you work a st that was beaded on the previous row, pull the bead up the stitch to sit on the bump formed by the new purl stitch.
Do not break yarn.

Join Bell Edgings
The technique known as the three-needle bind off is normally used to join two edges that have the same number of stitches. The technique used to join the Bell Edgings is similar; it differs only in that you will not actually be binding off stitches, just knitting two stitches together off two different needles.

Begin by centering the stitches of the Top Bell Edging along the needles, and spreading them out to create as large an opening through the needles as possible. Do the reverse to the stitches of the Bottom Bell Edging -- center them on the needles, and squish them together, as far as they will go. You will be passing the Bottom Bell Edging through the needles of the Top Bell Edging, so you want to compact the Bottom Bell Edging and make it as small as possible.

Next, making sure that the working yarn, and the beginnings of the rounds of both bell edgings are lined up, pass the Bottom Bell Edging down through the opening between the needles of the Top Bell Edging. Line up each needle of the Bottom Bell Edging with its corresponding needle from the Top Bell Edging. When they are properly aligned, each larger needle from the Bottom Bell Edging will sit directly behind a smaller needle from the Top Bell Edging. Align the first stitch of the round of each edging, so that the working yarn from each edging can be held together, ready to knit the first stitch.

To begin joining round, hold first needle of Bottom Edging together with first needle of Top Edging in left hand, and work with a needle in the larger size (size used for Bottom Edging). Work with strand of MC from Bottom Edging and strand of CC from Top Edging, held together.

Joining Round: [Insert working needle into first st on each needle, from front to back, as if to knit; k these sts together] until all sts have been worked. 36 sts on larger needles.

Wrist Ribbing
Using MC and CC held together, work as follows:
Next Round: K1, [p1, k3] to last 3 sts, p1, k3.
Repeat this round 19 times more. Break off CC.

Picot Bind Off
Using MC only, BO 1 st, [turn work and CO 2 sts using Cable Cast On, turn work and pass second st over first st, pass third st over second st (one st rem on right needle); BO 2 sts] to end.

 
FINISHING

Weave in ends, and your Mrs. Beetons are ready to wear. Blocking is not required, though a careful, gentle steam with an iron will help relax the ruffles a bit. Be sure to keep the iron well away from the glass beads, as they will crack if they get too hot.

ABOUT THE DESIGNER

A native Oregonian, Brenda Dayne has been living, writing and knitting in west Wales for five years, where the food is worse, but the accents are better.

More of her patterns can be found online at www.brendadayne.co.uk. She writes regularly for Interweave Knits Magazine, and hosts a knitting podcast.