Handspun in Nepal from the snipped
ends of saris, this wonderful silk yarn is popping
up all over in shops and on the web. Generally sold
by the ounce, every skein varies greatly in its colorway,
gauge, twist and texture; and this bag is designed
to capture the character and charm of each unique
skein.
The yarn starts out dirty and musty,
but handles washing well. Once finished this bag has
a lovely sheen, nice drape and wears like iron.
The scrappy nature of this yarn
makes fancy stitch work out of the question. So, the
sideways knitting of this pattern keeps it interesting.
It’s great for beginners and mindless knitting.
Finishing is very simple; no neat little stitches
necessary!
Rolling this yarn into a tight ball
by hand will help keep it from tangling and make it
more manageable. It will twist back on itself occasionally
as you knit; pull and tug as necessary.
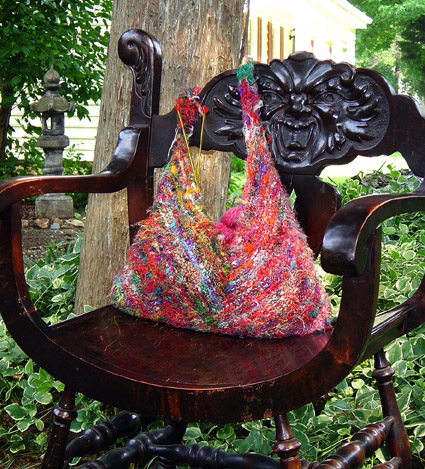
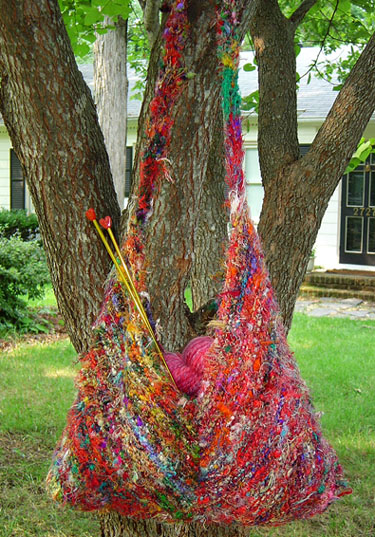
photos:Stephanie
Shiman
FINISHED MEASUREMENTS
Width: 15 inches
Length: 12.5 inches
MATERIALS
Recycled Silk Yarn from Nepal
[99% silk, 1% hay; approximately 17-22 yds per oz];
approximately 11 oz
1 set US #8/5mm needles
(or size needed to obtain desired fabric) 1 set US #7/4.5mm needles
(or 1 size smaller than main needle size) 3 large safety pins
or stitch holders 1 small safety pin
or marker to mark right side tapestry needle for
sewing in ends
[Knitty's list of standard
abbreviations can be found here]
GAUGE
14 sts/16 rows =
4" square in garter stitch
DIRECTIONS
Bag
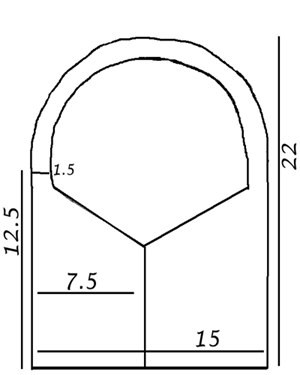
Piece [make 4]
CO 3 sts. K 1 row.
*Row 1(RS): Knit in front and back of first
stitch, knit to last stitch, knit in front and back
of last stitch. Use small safety pin to mark this
as the right side. Row 2 (WS): Knit.
Repeat from * until triangle measures 7.5; inches
on the along each side edge.
**Row 3 (RS): K2tog, knit to last stitch,
knit in front and back of last stitch. Row 4 (WS): Knit.
Repeat from ** until longest side measures 12.5.
Next row (RS): BO all
but last 5 sts. Transfer these sts to a stitch holder.
Remove safety pin. NOTE: The safety-pinned right sides mentioned
in Row 1 are only marked for the pupose
of keeping track of which side to work increases
and decreases on. Once pieces have been worked,
there is no longer a right or wrong side.) Now examine your pieces and decide which which
pieces look most appealing together.
The short side of each piece (formed by the decreases)
goes in the center of each side of the bag (see
photo).
Once you have your pieces paired, sew the center
seam of each side of the bag. Feel free to use your
favorite method for stitching; the yarn is already
so scrappy that no stitches – neat or messy—will
show.
Use a stitch that will allow the pieces to lay flat
and be sure that the top and bottom match up—
pull and tug as necessary.
After you have assembled the front and back stack
the pieces with your choses right sides facing.
Stitch up the sides and bottom. Pull your stitches
tight and keep them close together.
Turn bag right side out.
Strap
Remove both stitch holders from one side of the
bag and place all 10 sts on a needle.
Knit 2 rows tightly.
*Row 1: K2tog, k2, knit in front and back
of fifth stitch, knit in front and back of sixth
stitch, k2, k2tog. Row 2: Knit.
Repeat from * until strap measures 11 inches long,
or half of total desired strap length. The strap
will stretch with use, so make it a little shorter
than you would like it to end up.
Knit several rows straight, then place all sts on
a safety pin or stitch holder.
Repeat for the other side of the bag.
FINISHING
When strap halves
are desired length, graft or stitch the two ends together.
Use very sturdy, tight stitches. Weave in all ends,
or tie and leave as is for an extra scrappy look.
Hand wash in cold water, or machine wash on delicate
cycle. Roll in a towel to remove excess moisture.
Shape bag and leave flat to dry.
The bag will shed a little once
finished; you can air fluff it in the dryer after
it is dry to speed up the process.
ABOUT THE DESIGNER
Stephanie
is an at-home mom living in Richmond, Virginia, with
her husband and her favorite project: 3-year-old,
Adaylia. She enjoys knitting, spinning, sewing and
all fiber related ventures.