
  by
Trish Bloom by
Trish Bloom

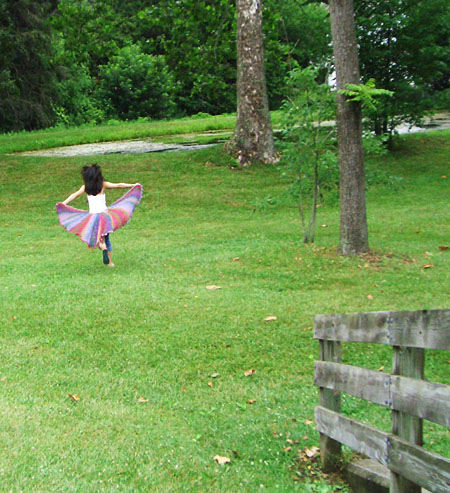
A perfect shawl for the cooler
days and nights of fall. Light and airy, just
enough to take the chill off when needed, or
to add a splash of color without being too heavy
or hot.
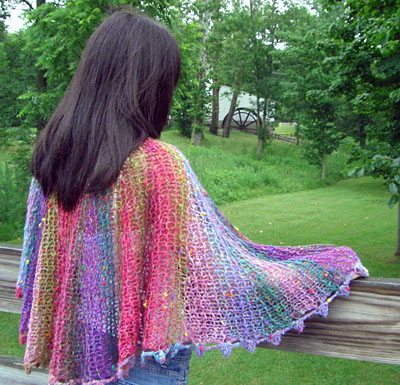
I chose Noro Blossom for this
shawl because it really shows off the short
row shaping with its self-striping qualities.
The wedges are defined by color changes. If
you don't want the color-block look, use a different
yarn such as Trendsetter Dune, or anything that
gives the same gauge.
|
|
 model:
Kaitlyn
photos:
Trish Bloom
model:
Kaitlyn
photos:
Trish Bloom
|
|
| one |
| |
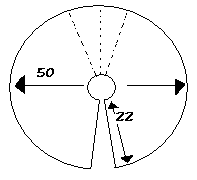
| 22 inches from neckline
to bottom edge.
|
| |
|
|
|
Noro Blossom [40% Wool, 30% Kid Mohair, 20%
Silk, 10% Nylon; 77 yds/69m per 40g skein]; color: #5; 5 skeins [6 skeins if doing flowers
or fringe]
Note: If substituting
yarn, the recommended gauge for this yarn is
16 sts =4 inches. For this project, it is knit
much more loosely than the recommended gauge.
1 set US 15/10mm needles
1 set US 17/12mm needles
US H/5mm crochet hook
Waste yarn
Safety pin
Tapestry needle
|
| |
| 10 sts/11 rows
= 4 inches in stockinette stitch on size 15 needles
|
|
|
[Knitty's list of standard
abbreviations can be found here]
Crochet
Cast On
Using waste yarn, work a crochet chain several
sts longer than the number of sts to be cast
on. Starting 1 or 2 sts in from end of chain
and using working yarn, pick up and k 1 st in
the back loop of each st until the required
number of sts have been worked. Later, the chain
will be unraveled and the resulting live sts
picked up.
Crochet
Abbreviations:
Sc: Single Crochet
Dc: Double Crochet
Tc: Treble Crochet
Ch: Chain
|
| |
 Using
Crochet Cast On, CO 33 sts onto smaller needles. Using
Crochet Cast On, CO 33 sts onto smaller needles.
K 1 row.
*K3, W&T, k to end. Place a safety pin
in your work at the end of this row.
K6, W&T, k to end.
K9, W&T, k to end.
K12, W&T, k to end.
K15, W&T, k to end.
K18, W&T, k to end.
K21, W&T, k to end.
K24, W&T, k to end.
K27, W&T, k to end.
K30, W&T, k to end.
K 2 rows across all sts.*
Repeat from * to * 8 times more; 9 wedges
have been worked.
BO very loosely using larger needles.
Remove crochet chain from Crochet Cast On
and place resulting live sts on needle, so
that point of needle is at end of work marked
by safety pin. (You may find that you have
only 32 sts on your needle; if this is the
case, increase 1 st in the first row.
Work from * to * 9 times.
BO very loosely using larger needles.
If you plan to work the crochet edging, do
not break yarn.
If you plan to work a fringe instead, break
yarn.
|
| |
| 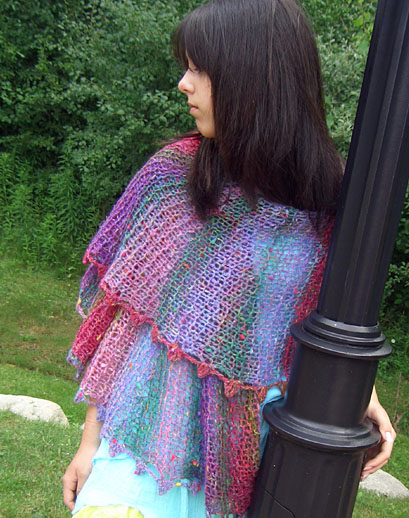 Crochet
Edging (Optional) Crochet
Edging (Optional)
Crochet edging is worked into the strands that
lie between the garter bumps at the lower edge
of the shawl; in the directions that follow,
the strand in each of these spaces will be denoted
as "space".
Beg at corner with yarn attached
and work along lower edge as follows:
Into first space, [sc, dc, tc, dc, sc, ch3].
*Skip 2 spaces, [sc, dc, tc, dc, sc, ch3] into
third space.
Repeat from * until last space has been worked.
Weave in ends.
Blocking
Fill a tub or sink with cool water and a little
squirt of wool wash, or baby shampoo. Place
shawl in the water and let it soak a few minutes.
Drain the water and gently squeeze out excess
water from shawl. Repeat using clean water and
rinse gently. Place in a towel and gently squeeze
again. If you don't have a blocking board, you
will want to fold the shawl in half (front edges
matching) so that you get a symmetrical shape
when blocking. Lay the shawl out onto the surface
that you are going to block it on. I usually
pin my shawls to the spare bed in the guest
room, or to the carpet, using T-pins. Place
a towel or sheet down first if you want. You
can play around with the shape of the shawl
a bit while it is damp. I like to really stretch
mine as far as it can safely be stretched, making
a very open, lacy look. The first time I did
this I was amazed how garter stitch could look
so lacy. I pin through the middle of each scallop
along the edge, and this gives each one a little
point as it dries.
 Finishing
Touches Finishing
Touches
Make this shawl your own! Try one of these embellishments
to personalize it a bit more:
- Hang a couple of beads from
each of the spaces between the scallops.
- Knit or crochet some flowers
to place randomly on the shawl. Maybe felt the
flowers. Put them on pin backs so they can be
removed or placed differently each time you
wear it.
Note: A pattern for knit flowers
can be found here.
A pattern for a crocheted flower can be found
here.
- Place a vintage brooch at
the neckline and let the shawl hang like a cape.
- Throw one end over your
shoulder and pin with a piece of great fused
glass.
- Use fringe instead of the
scalloped border. (If doing so, weave in tail
after binding off LOOSELY after your last wedge,
then add fringe.) If you are unfamiliar with
how to make fringe, directions can be found
here.
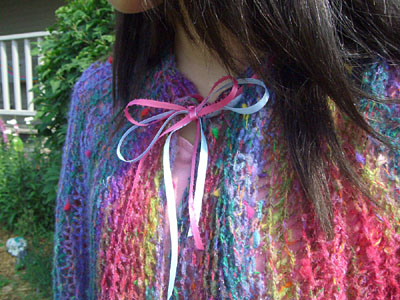
- Run a satiny ribbon through
the neckline and tie at the neck.
|
|  Trish
(a.k.a. The Bloomin' Knitiot) lives in Michigan
with her family. She recently designed, and
self-published her first knitting pattern. Trish
(a.k.a. The Bloomin' Knitiot) lives in Michigan
with her family. She recently designed, and
self-published her first knitting pattern.
"Bloom" is her second design. She
is looking forward to more designing in the
future. Trish works part time at a local yarn
store, and also teaches knitting classes there.
When not knitting (huh?) Trish likes to read,
spend time online, work on her
blog, and play poker.
|
| Pattern &
images © 2005 Trish Bloom. Contact Trish |
|


