by
Holli Yeoh by
Holli Yeoh

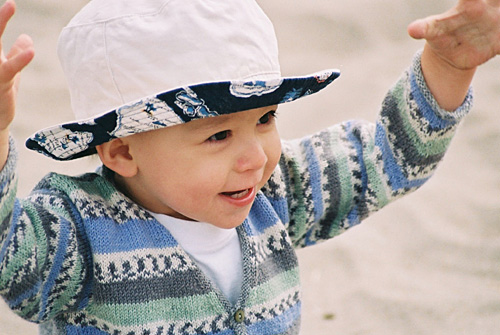
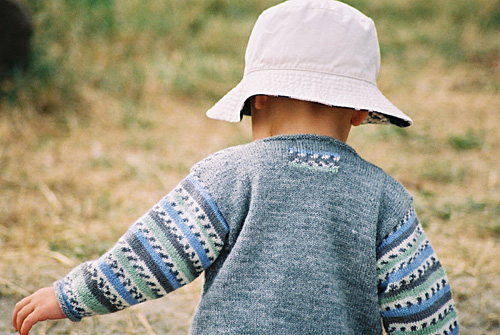
Check out this fun cardi
for the active child on your gift list. With its Fair
Isle-like front and sleeves it's great for spring
or fall. The small sizes showcase self-patterning
yarn to great effect. And even though the sweaters
are knit with fingering weight yarn, the tiny sizes
knit up quick.
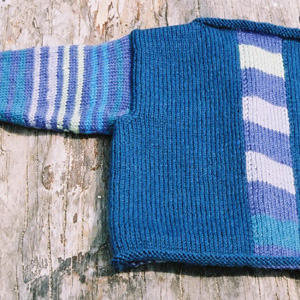
The back of this sweater
is knit in a co-ordinating solid color, but you can
throw in a little surprise designer detail if you
like. I've provided instructions for a small rectangle
inserted below the neckline, or a long stripe of pattern
up the solid color back. Choose one, or personalize
even more by designing your own variation.
The model shown is a size
1-2 years and although it was knit using DGB Confetti,
you can knit it with any of the other self-patterning
sock yarns around. So far, I've used a number of the
other yarns including Fortissima Mexiko, Regia, Lang
Jawoll Jacquard and Opal. They all look great.
Choose a coordinating solid
color in the same gauge for all the edgings and the
sweater back.
To
match the striping on the cardigan fronts and sleeves,
when joining MC start at the beginning of a solid
color in the patterning sequence. Use the same solid
color to start both fronts. Do the same for the sleeves,
although you may begin with a different solid color.
This will create some wastage but you will have plenty
of yarn to complete your sweater.
Another
trick to help match the striping on the cardigan fronts
is to start one front with a knit row and the other
front with a purl row. This makes the two fronts mirror
images of one another.
In order to maintain the
color patterning, when the ball runs out, be sure
to join self-patterning yarn in the same solid-colored
section of the pattern sequence.
|
|
 model: Devan
Yeoh
photo: Nigel
Pottle
model: Devan
Yeoh
photo: Nigel
Pottle
|
|
| 0-6 mo[6-12 mo, 1-2 yrs, 2-3 yrs] |
| |
|
Chest: 20.5[23.5, 26, 29] inches
Length: 10[12, 13.75, 15] inches
When measuring the length
from an edge with a rolled hem, allow a 0.5 inch at
the cast-on edge to roll out to the RS. Do not unroll
the edge completely before measuring.
|
|
|
|
|
|
[MC] DGB Confetti [75% superwash
wool & 25% nylon; 229 yd/210
m per 50 g skein];
color: 24001; 2[2, 2,
3] skeins
[CC] DGB Confetti [75%
superwash wool & 25% nylon; yd/229
yd/210 m per 50 g skein];
color: silver (9026); 1[1, 2, 2] skeins
|
|
|
|
30 sts/42 rows = 4" in stockinette
stitch
|
| |
|
LM1 -- left-slanting make
one increase - with the left-hand needle, pick up
the strand between the last st worked and the st on
your left-hand needle from the front to the back,
work into the back of the st to make an increase
RM1 - right-slanting make
one increase - with the left-hand needle, pick up
the strand between the last st worked and the st on
your left-hand needle from back to front, work into
the front of the st to make an increase
SM - slip marker
|
| |
Left Front
With
smaller needles and CC, CO 39[45, 49, 55] sts. Beg
with a K row, work even in st st for 6 rows.
Change to MC and work 2 more
rows.
Change to larger needles
and work even in st st until piece measures 5.5[7,
8.25, 9] inches from beg, ending with RS facing.
Shape armhole and neck
BO
3[5, 5, 5] sts at beg of next row, knit to last
4 sts, K2tog, K2.
Dec 1 st (use SSK on RS and
SSP on WS) at armhole edge (right-hand edge of garment)
of next 3[4, 4, 4] rows and, at the same time,
at neck edge dec 1 st (use
K2tog) EOR row 8[8, 5, 7] times; then every 4th
row 6[7, 10, 10] times. (18[20, 24, 28] sts).
Work even in st st until
armhole measures 4.5[5, 5.5, 6] inches, ending with
RS facing.
Place shoulder sts on a holder.
Break yarn, leaving a tail
14 inches long.
Right Front
With
smaller needles and CC, CO 39[45, 49, 55] sts. Beg
with a P row, work even in st st for 6 rows.
Change to MC and work 2 more
rows.
Change to larger needles
and work even in st st until piece measures 5.5[7,
8.25, 9] inches from beg, ending with WS facing.
Shape armhole and neck
BO
3[5, 5, 5] sts at beg of next row.
Dec 1 st (use K2tog on WS
and P2tog on WS) at armhole edge (left-hand edge
of garment) of next 3[4, 4, 4] rows and,at the same
time, at neck edge dec 1 st (use SSK) on
next and then EOR 8[8, 5, 7] times; then every 4th
row 6[7, 10, 10] times. (18[20, 24, 28] sts).
Work even in st st until
armhole measures 4.5[5, 5.5, 6] inches, ending with
WS facing.
Place shoulder sts on a holder.
Break yarn, leaving a tail
14 inches long.
Sleeves (make 2)
With smaller needles and
CC, CO 42[48, 48, 54] sts. Beg with a K row, work
even in st st for 6 rows.
Change to MC and work 2 more
rows.
Change to larger needles
and inc 1 st at each edge of next and then every
foll 4th row 7(7, 14, 4) times, (58(64,
78, 64) sts), then every foll 6th row
4 (6, 3, 13) times. (66[76, 84, 90] sts).
Work
even in st st until sleeve measures 6.5[7.5, 8.5,
10.5] inches from beg, ending with RS facing.
Sleeve cap
BO 3[5, 5, 5] sts at beg
of next 2 row
Dec 1 st at each edge of
next 3[4, 4, 4] rows. (54[58, 66, 72] sts).
BO.

Back -- stripe version
 With
smaller needles and CC, CO 78[90, 98, 110] sts. With
smaller needles and CC, CO 78[90, 98, 110] sts.
Beg with a K row, work even
in st st for 6 rows.
Next row: K33[39,
43, 49] sts, join a ball of MC and K 12 sts, join
a second ball of CC and K rem 33[39, 43, 49] sts.
Be sure to twist yarns MC and CC on WS when changing
colors to avoid forming holes.
P next row in color patt
as established.
Change to larger needles
and work even as established until piece measures
5.5[7, 8.25, 9] inches from beg, ending with RS
facing.
Shape armholes
BO 3[5, 5, 5] sts at beg
of next 2 rows. Dec 1 st at each edge of next 3[4,
4, 4] rows. (66[72, 80, 92] sts).
Work
even in st st until armhole measures 4.5[5, 5.5,
6] inches, ending with RS facing.
Shape neck and shoulders
K18[20, 24, 28] sts and place
these shoulder sts on a holder, BO 30[32, 32, 36]
sts, K to end and place these 18[20, 24, 28] sts
on a holder.
Back -- patch version
 This
detail works best with a jacquard self-striping
yarn. This
detail works best with a jacquard self-striping
yarn.
With smaller needles and
CC, CO 78[90, 98, 110] sts. Beg with a K row, work
even in st st for 8 rows.
Change to larger needles
and work even in st st until piece measures 5.5[7,
8.25, 9] inches from beg, ending with RS facing.
Shape armholes
BO 3[5, 5, 5] sts at
beg of next 2 rows. Dec 1 st at each end of next
3[4, 4, 4] rows. (66[72, 80, 92] sts).
Work
even in st st until armhole measures 2.75[3.25,
3.75, 4.25] inches, ending with a RS facing.
Patch detail
K25[28,
32, 38] sts, join a solid color from a ball of MC
and K16 sts, join a second ball of CC and K rem
25[28, 32, 38] sts. Be sure to twist yarns MC and
CC on WS when changing colors to avoid forming holes.
Next row: P in color
patt as established.
Next 8 rows: Work
as established, but use jacquard section of MC for
next 2 rows of rectangle (see photo), then 2 rows
of a different solid from MC, 2 rows jacquard and
a final 2 rows of a third solid color from MC. This
completes the rectangle.
Work even in st st with CC
only until armhole measures 4.5[5, 5.5, 6] inches,
ending with RS facing.
Shape neck and shoulders
K18[20, 24, 28] sts and place
these shoulder sts on a holder, BO 30[32, 32, 36]
sts, K to end and place these 18[20, 24, 28] sts
on a holder.
|
|
Block all pieces allowing
0.5 inch at CO edges to roll up to RS. Holding RSs
tog, join both shoulder seams using three-needle bind-off,
working from shoulder edge towards neck edge.
Front band
With RS facing, smaller needles
and CC, beginning and ending 4 rows up from lower
CO edge, pick up 41[53, 62, 68] sts up right front
opening to start of V-neck shaping, PM, pick up 1
st, PM, pick up 32[35, 40, 43] sts to right shoulder
seam, pick up 2 sts down back of right shoulder, K30[32,
32, 36] sts from back neck holder, pick up 2 sts up
back shoulder to left shoulder seam, pick up 32[35,
40, 43] sts to left V-neck shaping, PM, pick up 1
st, PM, pick up 41[53, 62, 68] sts down left front
opening edge. (182[214, 242, 264] sts).
1st row: (WS) K all
sts, slipping markers as you go.
2nd row:
For girl's sweater:
K1, P2[2, 3, 1], *YO, P2tog, P10[10, 12, 14]; rep
from * to last 2 sts before first marker, YO, P2tog,
SM, RM1, P1, LM1, SM, P to next marker, SM, RM1, P1,
LM1, SM, P to last st, K1.
For boy's sweater: K1,
*purl to first marker, SM, RM1, P1, LM1, SM; rep from
* once, **YO, P2tog, P10[10, 12, 14]; rep from **
to last 5[5, 6, 4] sts, YO, P2tog, P2[2, 3, 1], K1.
(4[5, 5, 5] buttonholes).
3rd row:
K all sts, slipping markers.
4th row:
K1, *P to first marker, RM1, P3, LM1 (removing markers
as you go); rep from *, P to last st, K1. (190[222,
250, 272] sts).
BO knitwise
(WS).
Use mattress st to sew sleeves
onto body, then sew side and sleeve seams allowing
0.5 inch at cast-on edges of body and sleeves to roll
up to RS. Use an edge-to-edge seam on the roll so
the seam lies flat. Sew on buttons to correspond with
buttonholes.
|
A
|
10.25[11.75, 13, 14.5] inches
|
E
|
5.5[6.5, 6.5, 7.25] inches
|
|
B
|
10[12, 13.75, 15] inches
|
F
|
6.5[7.5, 8.5, 10.5] inches
|
|
C
|
5.5[7, 8.25, 9] inches
|
G
|
8.75[10, 11.25, 12] inches
|
|
D
|
4.5[5, 5.5, 6] inches
|
|
|
|
|
 You
can see more of Holli's work soon at Bee's Knees Knits. You
can see more of Holli's work soon at Bee's Knees Knits.
|
|
Pattern & images ©
2004 Bee's Knees Knits ▪ 2181 W 12th
Ave #406 ▪ Vancouver ▪ BC ▪ V6K
4S8 604-738-5527. Contact Holli.
|
|