
  by
Stephanie Shiman by
Stephanie Shiman

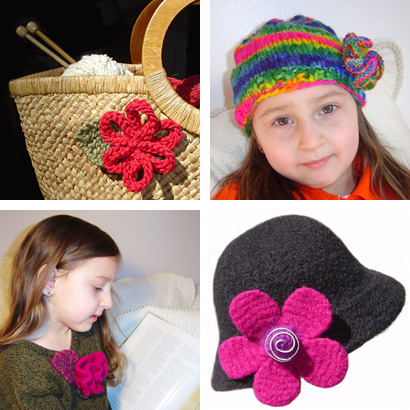
Flowers are fabulous fun to knit.
In a short amount of time, with a small amount of
yarn you can have instant gratification.
Beginning knitters can practice
their skills; more advanced knitters can enjoy a brief
interlude to break up the monotony of a large project.
Bring out your oddballs, your leftovers and rejects.
Knit, felt and embellish.
What will you do with them?
Since I've started knitting flowers, I catch
myself thinking: "Now that could use a
nice flower!" Embellish a knitted hat or
bag or blanket, add a few at the ends of a scarf,
put one on at collar of your sweater/coat/whatever,
knit a dozen to cover a throw pillow. They can
be chokers, wristlets, key chains, barrettes,
and scrunchies; embellish a collar for your
favorite furry friend. No green thumb required.
All flowers can be made smaller or larger by
using finer or thicker yarn and needles.
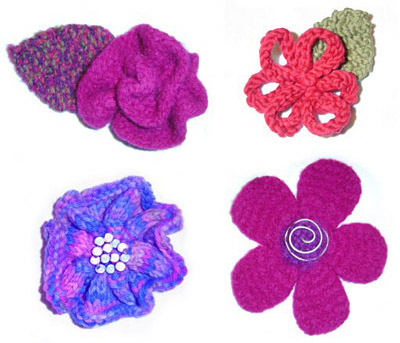
L-R, top down:
1: cast-on/cast-off
2: knit in the round
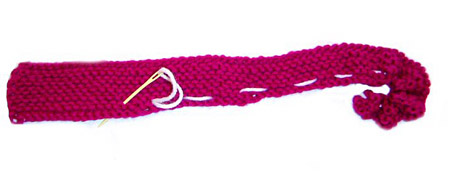
3: felted rose and leaf
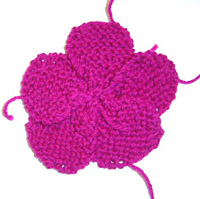
4: basic felted petal
|
|
 model: Adaylia
photos: Stephanie
Shiman
model: Adaylia
photos: Stephanie
Shiman
|
|
| Various |
| |
|
1. 3 by 3 inches
2. 3.25 by 3.25 inches
3. 3 by 3 inches after felting
4. 5 1/4 by 5 1/4; inches after felting
|
| |
| |
|
1. Debbie Bliss
Cotton Silk Aran [80% Cotton, 20% Silk; 70yds/63m
per 50g ball]
[MC] Color: 13507; 1 ball
[CC] Color: 13510; 1 ball
1 set US # 7/ 4.5mm needles
Tapestry needle
Removable stitch markers to equal number of petals
desired (Safety pins or 4-inch pieces of yarn work
great)

2.
I used bit of worsted weight handpainted wool
-- use anything!
16 inch US 8/5mm circular needle
An additional US size 8 circular needle or set of
8 double point needles
Tapestry needle
Beads, buttons, etc for center.
3.
[MC] Cascade 220 [100% Highland Peruvian Wool; 220yds/198m
per 100g skein]; Color: 7802; 1 skein
[CC] Cascade 220 Quatro [100% Highland Peruvian Wool;
220yds/198m per 100g skein];
Color: 9440; 1 skein
1 set US #10.5/6.5mm straight or circular needles
Tapestry needle
Rubber band
4.
Cascade 220 [100% Highland Peruvian Wool; 220
yds/198m per 100g skein]; Color: 7802; 1 skein
(Note: white and some light colors may not felt
well)
1 set US #10.5/6.5mm straight or circular needles
Tapestry needle
Leftover bit of nameless mohair or broach or beads,
etc for center
|
|
|
|
1. 18 sts/24 rows = 4"
in stockinette stitch
2. 20sts/28 rows = 4 inches in stockinette
stitch
3. 16-20 sts/28 rows = 4 inches in garter stitch
4. 16-20 sts/28 rows = 4 inches in garter stitch
|
|
|
|
[Knitty's list of standard abbreviations can be found here]
1. A super simple flower;
as the name says it is cast on and then cast off with
no other knitting required! This technique creates
sort of a lazy knitter's I-cord which can then be
shaped into any number of petals to create a lovely,
open flower. Note: Debbie
Bliss has discontinued the Cotton Silk Aran. Almost
any yarn can be used in its place. This flower works
well when knit with a heavier yarn to create nice
stiff petals that will hold their shape. A softer,
fuzzy yarn could also make a lovely flower when used
with the smaller petal formula. Try twelve petals
or more to create a peony type of flower.
2. Get out your 16"
circulars. Like a hat gone wrong; this flower is created
by knitting a few rows in the round and gathering
in the middle. Lovely with any yarn, knit smaller
versions to layer, or add buttons or beads to the
center.
3. This elegant rose is very
simple to make. Knit in one strip, it is then gathered
across the bottom, tacked into place and tossed in
the wash to felt.
4. This pattern is
for a basic petal which, like a building block,
can then be layered with varying numbers of
other petals to create different looks. The
example pictured is knit with worsted weight
wool then felted; use thinner yarn and needles
to create smaller petals. Instructions for a
more pointed tip petal are below. Try layering
petals knit with different colored and textured
yarns; use beads or buttons for a center, or
knitted bobbles.
Note: Because this pattern
is designed for felted petals the shape is very
round before felting. The petal will shrink
more in width than length.
|
1. Flower
Once
you've chosen your yarn, decide how many petals you'd
like your flower to have. For the example, I chose
six. My gauge was approximately 5 stitches to the
inch.
So, I took this number (5) and multiplied it by how
many petals I wanted (6), then multiplied this number
(30) by 3 (circumference of petal in inches for a
smaller petal - try 4 inches for a medium petal and
5 inches for large petal), to get 90.
So basically:
[Stitches per inch] x [Number of petals desired]
x [Circumference if each petal in inches] = Number
of sts to CO
The pattern for my
flower would read like this:
Using MC and leaving a 15-inch
tail, CO 90 sts, placing a removable marker every
15 stitches.
BO all sts.
Shape flower by bringing
together ends of piece and points designated by
markers, and stitching them together, shaping as
desired.
Leaf
Using CC, CO 5 stitches
Rows 1 & 2: K all sts.
Row 3: K1, kf&b, k1, kf&b,
k1. 7 sts
Rows 4 & 5: K all sts.
Row 6: Kf&b, K to last st, kf&b.
9 sts
Rows 7, 8 and 9: K all sts.
Row 10: K2tog, k to last 2 sts, k2tog.
7 sts
Row 11: K all sts.
Row 12: K2tog, k to last 2 sts, k2tog.
5 sts
Rows 13 & 14: K all sts.
Row 15: K1, sl 1, k2tog, psso, k1.
3 sts
Row 16: Sl1, k2tog, psso. Pull yarn
through loop to bind off, weave in ends.
Felted
Version
Knit worsted weight
wool on 10.5 needles to make a felted version of
the flower, just be sure to add 15-20% more CO stitches
to accommodate shrinkage.
For a felted leaf, use the pointy-tip variation
of the Basic Petal pattern (flower 4 below).
 2.
Main Flower 2.
Main Flower
CO 87 sts. Join to begin
working in the round, being careful not to twist.K
until work measures approx. 2 inches (about 1 inch
past the point where work stops curling).
Next Row: [P2tog,
p1] around, switching to two circulars or double
points as needed.
Cut yarn, leaving a 12-inch
tail. Draw yarn through all sts. Pull tail tight
to gather stitches and close center.
Using the same technique as above, smaller flowers
can be created to layer over the larger one.
Smaller Circle for Layering
Using double point needles
or two circulars, CO 66 sts. Join to begin working
in the round, being careful not to twist.
K until work measures approx.
1.5 inches (about 0.5 inch past the point where
work stops curling).
Next Row: P2tog around.
Cut yarn, leaving a 12-inch
tail. Draw yarn through all sts. Pull tail tight
to gather stitches and close center.
3. Flower
Using MC, CO 78 stitches.
Rows 1-4: K all sts.
Row 5: BO 12, k to end.
Row 6: K to last st, sl1.
Row 7: Sl 2, pass first slipped st
over second, BO 17 st, k to end.
Row 8: K to last st, sl1.
Row 9: Sl 2, pass first slipped st
over second, BO 23 st, k to end.
Rows 10 & 11: K all sts.
Row 12: K to last st, sl1.
Row 13: Sl 2, pass first slipped st
over second, BO rem 23 st, pull yarn through
last loop and break yarn, leaving a 15 inch
tail.
Leaf
Using CC, CO 1 st.
Row 1: Kf&b. 2 sts
Row 2: Kf&b, kf&b. 4 sts
Row 3: Kf&b, k2, kf&b. 6 sts
Row 4 and foll even-numbered rows, except
Rows 16 & 22: K all sts.
Row 5: Kf&b, k4, kf&b. 8 sts
Row 7: Kf&b, k6, kf&b. 10 sts
Row 9 & 11: K all sts.
Row 13: Kf&b, k8, kf&b. 12
sts
Row 15: Kf&b, k10, kf&b. 14
sts
Row 16: K2tog, k10, ktog. 12 sts
Row 17: K2tog, k8, k2tog. 10 sts
Row 19: K2tog, k6, k2tog. 8 sts
Row 21: K2tog, k4, k2tog. 6 sts
Row 22: K2tog, k2, k2tog. 4 sts
BO rem 4 sts.
4.
Petal (Make as
many as desired):
CO 7
stitches.
(This will be the outer edge of the petal.)
Rows 1, 2 & 4: K all sts.
Row 3: K1, kf&b, k3, kf&b,
k1.
Row 5: K1, kf&b, k5, kf&b, k1.
Rows 6-10: K all sts.
Row 11: [K2tog, k1] to last 2 sts, k1.
7 sts rem.
Rows 12, 13 & 14: K all sts.
Row 15: K2tog, sl 1 kwise, k2tog, psso,
k2tog. 3 sts rem.
Row 16: Sl 1 kwise, k1, psso, sl st on
right needle to left needle, pass last st
over this st.
Break yarn, draw yarn through loop and pull
tight.
Note: To create a petal with more pointed
tip, knit the following set up rows and continue
as above.
CO 1 st.
Row A: Kf&b. 2 sts
Row B: Kf&b, m1, kf&b. 5 sts
Row C: Kf&b, k3, kf&b. 7 sts
Cont as above, beg with Row 2.
|
|
1. Stitch flower
to leaf.
2. Sew layers
together st center. Shape folds to look like petals
and tack in place if desired. Add center if desired.
3. Thread tail
yarn from flower strip on darning needle. Starting
at the smaller end, use the needle to loosely stitch
in and out every inch or so along the BO edge of the
flower (see example). Pull yarn to gather half of
the strip tightly for the center, then very loosely
gather the remaining half to wrap around center. Shape
as desired and tack in place to hold folds. Sew on
leaf if desired.
Place inside of tied pillowcase or zipped lingerie
bag and toss into washer full of hot, soapy water.
Felt until desired size. Remove when desired and roll
in a towel to remove excess water. Shape and fold
petals and wrap tightly with rubber band to dry. Remove
rubber band when petal feels mostly dry and allow
to completely dry. (I cheated here and tossed mine,
rubber band and all, into the dryer on low for fifteen
minutes.)
4. Once
you have knit the desired number of petals,
arrange and layer them to achieve the look you
like best. Stitch them together, taking care
to sew the sides to each other about halfway
up the petals. If you planned a felted center,
add it now. Put the flower into a tied pillowcase
or zipped lingerie bag and toss it into a washer
full of hot, soapy water. Allow it to felt to
desired size, roll into a towel to remove excess
water, shape and allow to dry. Once dry, add
buttons, beads, knit bobbles, etc. The bobble
shown was actually a leaf knit in smaller gauge
mohair and sewn down to look round. Any bobble
technique will work. The spiral is wire that
is twisted into a spiral and "screwed"
into the bobble.
|
|
 Right
about now Stephanie and family are somewhere
between Richmond, Virginia (where they've been
for 4 years) and the Berkshires in Massachusetts
(where they hope they'll like it enough to stay
forever). Right
about now Stephanie and family are somewhere
between Richmond, Virginia (where they've been
for 4 years) and the Berkshires in Massachusetts
(where they hope they'll like it enough to stay
forever).
When she's not busy packing or chasing three-year-old
daughter Adaylia; she spends her time knitting, spinning,
sewing and dabbling in other fiber related activities.
Stephanie's newest fiber adventure is importing a
plethora of recycled silk yarn from Nepal; you can
read more about that at her
website.
|
| Pattern & images
© 2005 Stephanie Shiman. Contact Stephanie |
|


