Handpaint Your Own Yarn
Never dyed before? Here's
a guide to creating your own handpainted yarn.
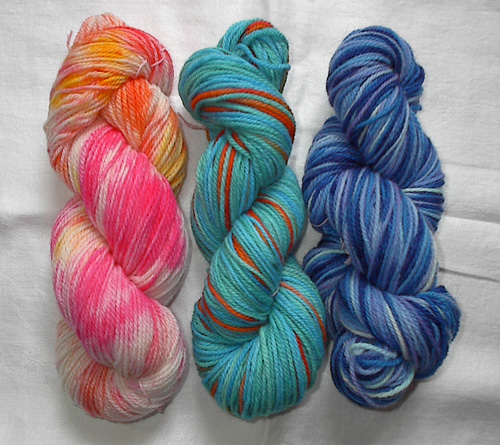
From the left, hot pour, cold pour, and dip-dye
methods.
Ever had a desire to
create your own variegated yarns? Mix exactly
the colors you want on exactly the yarn you
want, to create something uniquely your own?
You’ve come to the right place.
For years I thought it would be too messy,
too complicated, and too expensive to dye my
own yarns. I was wrong. What it is, is fun.
With a potential for mess, sure, but it’s
FUN! And did I mention, fairly inexpensive?
Below are three common
ways to make handpaint yarns; I’ve arranged them in order of
difficulty, though none of them are truly hard
to do. The only real dangers are making a mess,
felting the yarn (though that’s easily
avoided by using superwash), or making something
ugly. The yarn police won’t come after
you for making ugly yarn. Come on, give it
a try.
COMMON CONSIDERATIONS:
Regardless of what method you use, there are
some factors to consider.
Safety:
Using acid dyes developed specifically for
dyeing protein fibers can be dangerous. It’s
suggested you wear a filtration mask when
handling the powder to avoid breathing it,
avoid coming into contact with it, avoid
breathing the fumes when you heat it to set
the color, and you can’t use any utensils
you use when dyeing for anything else. The
dyes have to be special-ordered or purchased
from hard-to-find retailers, and used in
conjunction with other chemical additives
that are just as difficult to find and often
just as dangerous. Then there are the disposal
issues for whatever you don’t use.
Organic, plant-based dyes aren’t much
better; the plants themselves are often poisonous (pokeberry, anyone?),
and the mordants can be insanely toxic –arsenic and copper sulfide
are just a few of the more deadly chemicals you’ll play around
with. I have a toddler, and the idea of having anything like that near
her makes my blood run cold.
The answer? Food coloring. I know, I know.
It all seems so grade-school to dye your wool with food coloring, and
the colors are so candy-bright. But the safety considerations are just
about nil (you could DRINK the stuff if you didn’t mind multi-colored
innards) and you can use all your regular kitchen utensils to work with
it. Candy colors can be avoided with overdyes, clever mixing, or careful
regulation. Though I, for one, like bright colors. It’s one of
the reasons I started doing this; most handpaint yarns are done in bleeding
pastels or darks, which while nice, just aren’t my cup of tea.
To dye with food coloring
(well, to dye with anything, really, but
we’re sticking
to food coloring), you need five things:
-Yarn. FOOD COLORING AS A DYE ONLY WORKS ON
PROTEIN/ANIMAL FIBERS. For beginners, superwash
wool is your best bet. It’s unfeltable,
easy to find, and affordable. If you’re
looking for bright colors, get white (I have
produced neon colors with neon food coloring
on bright white yarn in the past). Cream is
good for normal colors and pastels, light gray
for pastels and neutrals. Cream is probably
best for starting off with. In these tutorials,
all yarn is Patons “Classic Wool” worsted
weight, in color ‘winter white’.
It’s not superwash, but it IS what I
had on hand when I decided to dye some yarn
for this article. Which is another great thing
about dyeing your own yarn – you can
transform what’s in your stash into something
new. You can even, gasp, dye light yarns in
solid colors with this method, but where’s
the fun in that?
-Colorant. In our case, food coloring. For
most of my dyeing I use Wilton’s paste
food coloring, but occasionally I will use
McCormick’s liquid food coloring (the
stuff with four colors in a box, with little
dripper bottles). For each dye job, I specify
which I used, but either one works. Both are
available on line. Wilton’s can also
be found at most craft stores that cater to
cake decorators and candy makers, and McCormick’s
is available in most grocery stores. Regardless
of what you use, you want to dissolve it in
boiling water before use, paste and dry or
granulated colors in particular. If you can’t
find the brand names mentioned here, get something
else. They’re all made with the same
dyes and chemicals, they just have different
names. To preview the color, dab a bit of your
dissolved color into a white paper towel.
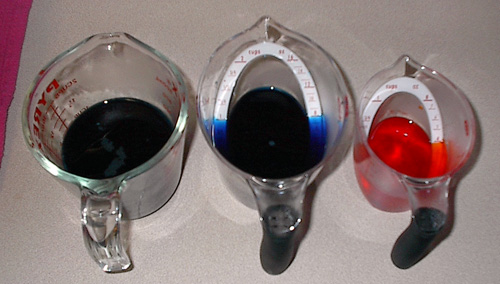
Food colorings dissolved in water and
ready to be used as dyes.
-An
acid. In our case,
vinegar. Safe, easily disposed of, and available
at the grocery store in one gallon jugs if
you want to buy in bulk. Acid opens up the
fibers, chemically speaking, and makes the
color stick. The more acid, the brighter
the color, and the faster the dye ‘hits’,
or takes up into the yarn. There also seems
to be some funky reaction going on between
the vinegar and food coloring; if you use more
than ¾ cup/175ml vinegar at a time,
it can make blues and purples take up red and
blue at different speeds. The best way to avoid
that is to soak the yarn in vinegar-water the
night before and then add a small amount of
vinegar to the dye pot, instead of just using
a whopping dose with the dye. For each dye
method, I specify how much vinegar went where.
You are welcome to experiment, and do it your
own way. There’s no wrong way to do this.
-Water. Seems like a no-brainer, but depending
on the chemicals and minerals dissolved in
your water, your dyes won’t necessarily
look the same as mine do. If you know there’s
a lot of chlorine or iron in your water, you
may want to consider using filtered, or picking
up a couple gallons of spring water at the
grocery store. I used tap water, but the water
in my city is fairly clean.
-Heat. You can get it from a crock-pot, a boiling
pot of water on the stove, steam, the oven,
or even your
dishwasher,
but you’ve got to get the yarn as close
as possible to boiling without going over,
for about fifteen minutes, to set the dye and
make it colorfast. I used a crock-pot for two
of these dye methods, but with careful heat
management you could do the same thing on the
stove with a large pot.
Notice you can buy
all your supplies but the yarn at the grocery
store? Yep. Safety is our middle name. (Well.
Really our middle name is ‘cheap’,
but we like safety too. Cheap and safe at
the same time? Bliss.)
SKEINING YARN:
I never thought to
include directions on this, until someone
asked me how to do it. Then I realized it
really isn’t something everybody
knows. So here you go.
If the yarn is in a
ball, wind it off onto a niddy-noddy (if
you have one), or a handy piece of furniture
that’s nice and sturdy.
I regularly use my kitchen table to wind off
longish skeins. The advantage to winding it
on your table is, it’s automatically
the right size to spread out on the same table
later, if you’re doing cold-pour dyeing.
If the yarn is already in a skein, you can
leave it as-is, or wind it off onto a longer
or shorter skein, as desired. If you leave
it as-is, make sure it has enough wrap-ties
to keep it from tangling in the dye pot and
wash.

The length of the skein
determines the length of the pattern repeat.
If you have something specific in mind in
terms of self-striping yarns, you need to
knit up an example, unravel it and figure
out how much of each length you need, and
figure out how to arrange your living room
furniture to wind it into the proper length
skein (around the recliner, over the coffee
table, around the couch…). Me, I just
wind it off as the fit takes me and see how
it knits up later. Longer pattern repeats I
do on my kitchen table, shorter pattern repeats
I do on my niddy-noddy. If I ever decide to
try a really long pattern repeat, I’ll
probably use the living room furniture.
Tie the beginning of
the yarn to the end, and trim as needed.
You don’t want long
ends hanging out. By tying the two ends together,
you ensure that the yarn doesn’t tie
itself into knots, and when you find one end
later, you’ll have both of them.
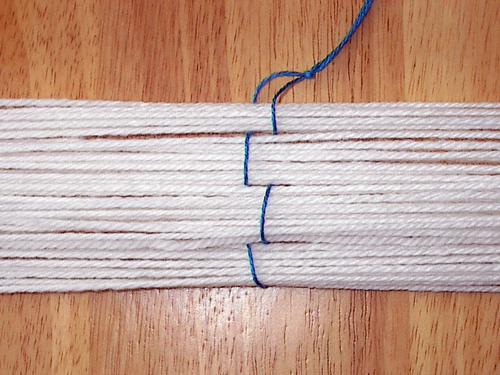
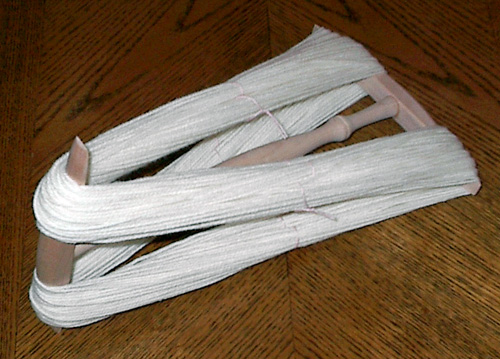
Get some waste yarn
(nice smooth cotton in a light color is ideal)
and weave it through the yarn; up and over
a few times, wrap it around, and come back
the other direction, like in the photo. Knot
the ends together. (I used the blue thread
in the photo so you could see what I was
doing. It did, indeed, bleed onto the yarn
later and turn it light blue. Stupid, stupid,
stupid.) Put one of these wraps every foot
and a half/half meter or so. They keep the
yarn from tangling. Don’t
make them so tight you accidentally tie-dye
your yarn.
Ready to try something? Here we go.
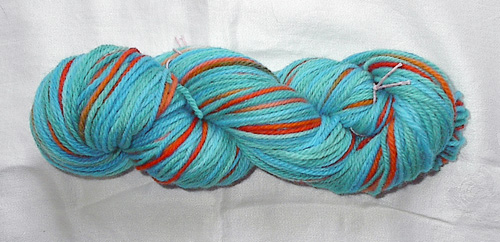
HOT POUR DYE METHOD:
This is the easiest
and least-messy of the three dye methods;
essentially you put your yarn in a crock
pot and pour dye over it. There are some
finicky details, but that’s
really all there is to it. Keep in mind that
the more dye you use, the more they mix together
when poured into the pot. Ditto, the more colors
you use, the more they mix. So for this method
it’s best to use related colors (like
blue/purple, or in this case, yellow/orange/pink)
or colors that mix into something pleasant
(blue/yellow/green). Avoid complimentary colors
(blue/orange, red/green, yellow/purple) because
they look like mud when they mix. Unless you
want mud.
I skeined up the yarn
on my niddy-noddy and soaked it overnight
with ¾ cup/175ml
vinegar mixed in, because I wanted the dye
to stick to the yarn quickly when it was poured
into the pot. (If you want yarn that is murkier
with the colors more blended, don’t use
any vinegar in the overnight soak.) In the
morning I drained off the soak water (and with
it, any vinegar left) and put it in the crock
pot with enough water to cover and ½ cup/125ml
vinegar. The amount of water to use in this
case is tricky; the more water you use, the
more the dye will spread when it is poured
in later. You need enough water to cover the
yarn, but after that, the amount is up to you.
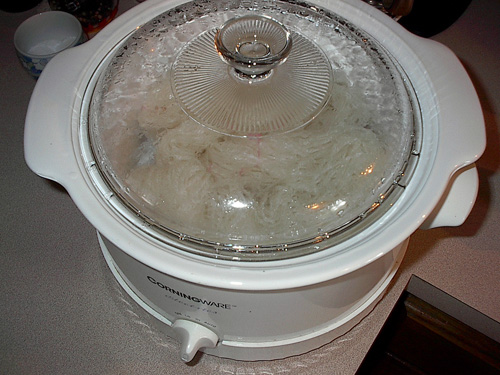
I put the crock-pot on high (with no dye yet)
until I could see steam rising off the water;
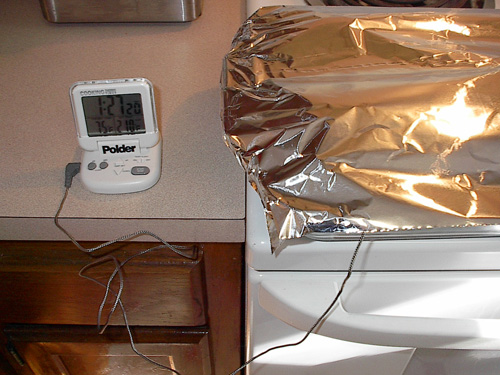
that took about two hours for my crock-pot.
If you’ve got any meat or candy thermometers
around, you can pop one of those into the crock-pot
to monitor your progress (remember, all this
stuff is food safe, so you aren’t destroying
the thermometer OR the crock-pot).
While my yarn was heating,
I mixed up some dyes. I put three drops of
McCormick yellow in 1/3 cup/75ml water, and
dissolved 1/16 teaspoon/.2ml of Wilton’s paste food coloring, colors
rose and creamy peach, each in their own ½ cup/125ml
boiling water. There were three colors, total;
yellow, rose, and peach. I used liquid measuring
pitchers, one for each color, to make them
easy to pour later. (Paste food coloring HAS
to be dissolved in boiling water, with a lot
of stirring.) If you wanted to mix colors,
this would be the time, when the colorants
are dissolved in water. Add a little yellow
to make a green pop, put some blue in the rose
to make magenta, that kind of thing.
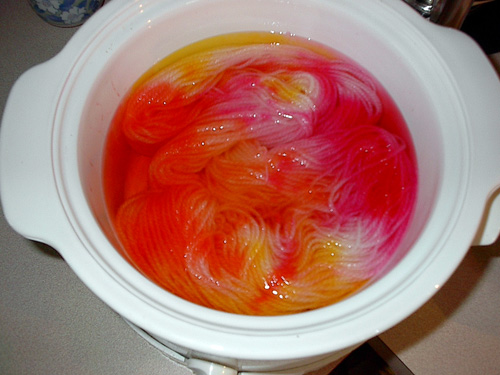
Once the yarn was hot,
I poured in the dye; peach on one side, pink
on the other, then blops of yellow in any
empty spaces. I clapped on the lid and left
it alone for an hour. When I came back, the
dye pot had ‘exhausted’ (meaning
the water was clear, and all the dye had stuck
to the wool), so I turned off the crock-pot
and let it cool for a couple hours, lid off.
When the yarn was back to room temperature,
I gave it a careful wash until the water ran
clear, ran it through the spin cycle of my
washing machine to get out any excess water,
and then hung it up to dry.
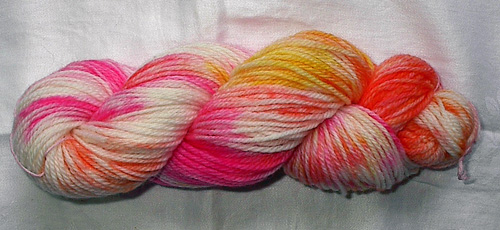
You can see from the
photo there were a good many places where
dye didn’t reach the
yarn. You can fix that by pouring in more dye,
though that will lead to more color mixing.
Or, you can wait until the dye pot exhausts,
stir the yarn around, and pour in more color,
leaving it to heat-set again before cooling
and washing. If I’d been using superwash
wool, I’d have done the stir-and-dye-more
method, but I didn’t want to felt the
yarn, so out it came with no stirring.
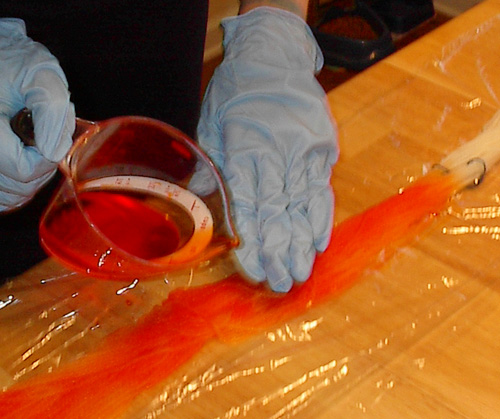
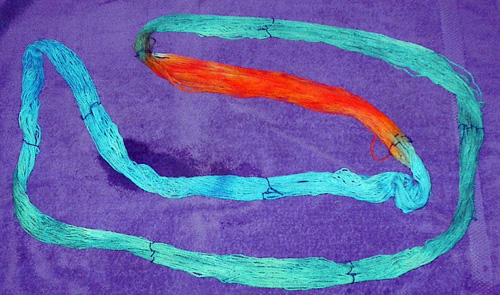
COLD POUR METHOD:
This one’s a lot more labor-intensive,
but you can pinpoint exactly where you want
your colors and run much less risk of mixing
them together. As you can see from the example,
I put compliments next to each other (blue/orange)
and pulled it off with minimal mixing between
them. You’ve got a much larger potential
for mess on this one, too. MUCH larger. For
small spills I suggest using bleach wipes to
clean up. For large spills, well, I’ve
been lucky so far, but mop them up and then
get the jug of bleach and a rag and have at
it.
You’ll need good-quality plastic wrap,
an oven, a baking dish of some kind, aluminum
foil, and I suggest rubber gloves. You don’t
NEED the rubber gloves, but you run the risk
of turning your hands and fingernails wonky
colors without them. There’s no real
danger in handling the colors, though, just
destruction of your manicure. Up to you.
Skein up your yarn
(I wrapped mine on the kitchen table) and
soak it with ¾ cup/175ml
vinegar overnight. Again, you want the dye
to stick to the yarn pretty quickly, so vinegar
in the soak water.
In the morning, preheat
your oven to 250F/120C and mix up your dyes.
I used ¼ teaspoon/1ml
creamy peach in ½ cup/125ml water, and ½ teaspoon/2ml
each teal and sky blue in 1 cup/225ml water,
to make three dyes, peach, teal, and sky blue.
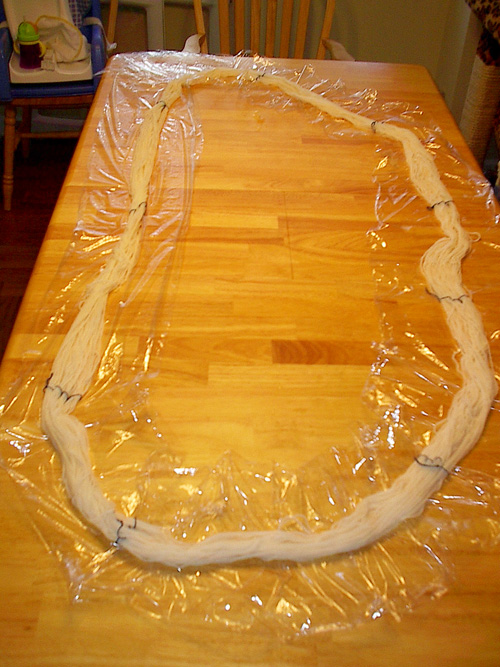
Spread plastic wrap
out on your work table in a circle. Drain
your yarn (you want it dry enough that it’ll take up your dyes and
not drip, but not bone dry) and place it on
the plastic wrap, adjusting carefully so everything’s
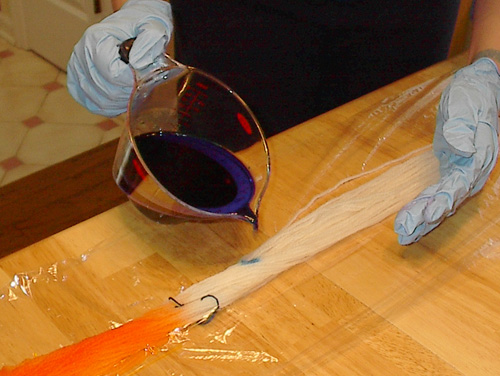
positioned right. Then pour your dye onto your
yarn where you want it, squishing it into the
yarn as you go so you have even coverage. I
suggest starting a small distance away from
where colors meet and squishing the dye up
to where the two colors join, instead of pouring
directly onto a color join. That helps keep
the colors distinct. (If you want them to blend,
why, then, squish them together. You get the
idea.) When you’ve got dye squished into
the yarn where you want it, wrap it all up
in the plastic wrap and carefully transfer
it to a baking dish. Keep any light colors
at the top of the yarn pile so that the other
dyes don’t run down into it and muddy
it up.
Cover the whole thing
with foil to hold the steam in, and pop your
baking dish into the oven for a couple hours.
If you’ve got
a meat thermometer laying around your kitchen,
tuck it in between the layers of yarn (since
it’s all food-grade dye, you can use
your meat thermometer on your pot roast again,
even if it turns colors, which it shouldn’t).
You want the yarn to stay just below the boiling
point for at least fifteen minutes. The thermometer
makes it easy to tell what’s going on
without lifting the foil and letting out all
the heat you’re trying to accumulate.

Once the yarn’s been heated, take it
out, remove the foil, and let it cool; that
will take several hours. When it’s room
temperature, take it to the sink, cut it out
of the plastic wrap (be careful not to cut
the yarn when removing the plastic wrap – one
lesson learned the hard way), and give it a
wash. Be careful to keep the light colors away
from the dark until any leaking dye has been
removed from the plastic wrap, and everything’s
been given a quick rinse; again, that’s
to avoid muddying up the lighter colors. I
have heard tell of permanently melting plastic
wrap to yarn with this method; that’s
why I suggest getting good-quality plastic
wrap and not cheaping out on the generic stuff,
just this once.
When the yarn’s
been washed until the water runs clear, give
it a spin through the washer (or roll it
up in a towel and stand on it) to remove
the excess water, then hang it up to dry.
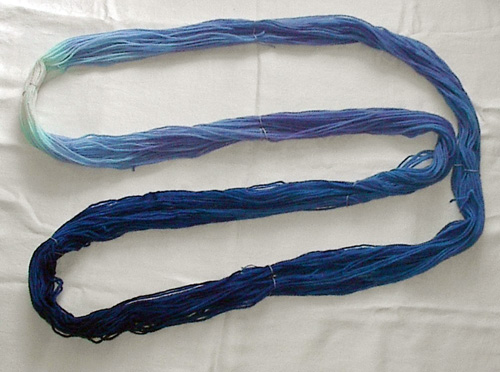
DIP-DYE METHOD:
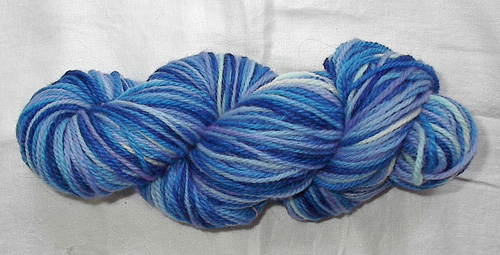
The main reason I used
this method was to show the wide potential
for color variation with food color dyes.
All colors on the skein were done with unmixed
royal blue color from Wilton’s. Of all three methods shown
in this article, I think this one has the most
potential for disaster. The technique isn’t
difficult – none of them are – but
this one involves handling the yarn a lot,
exposing it to a lot of dye, a lot of heat,
and a lot of vinegar. Plus there’s a
lot of mad scientist mixing and pouring and
stirring going on, so if you’re ever
going to pour dark blue dye over your kitchen
floor, it’s most likely going to happen
during this method.
I created a long skein on my kitchen table
again, about two yards/two meters long when
held up from one point and allowed to hang,
maybe four yards/four meters in total circumference.
I put in a lot of loop ties to prevent tangling,
because I knew this yarn would be handled a
lot. Then I soaked it overnight in plain water
with no vinegar. With a dip-dye, you want the
dye to soak in slowly, over a period of time,
not stick the instant you dunk the yarn. So
no vinegar this time around.
The next morning I
filled the crock-pot with 8 cups/2 liters
of water and ¾ cup/175ml
vinegar. In one cup/225ml boiling water, I
dissolved an entire teaspoon/5ml of royal blue
coloring. (That’s a lot of dye. Wait.
It gets crazier.) I waited until there was
steam rising from the crock-pot, and stirred
in the dye. It was so dark I couldn’t
see the bottom of the pot.
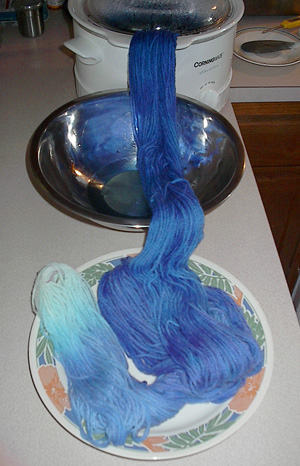
I drained the water off the skein, found an
end (with it folded in half), and carefully
lowered all but a handful of yarn into the
brew, swished it around, and immediately pulled
four inches/ten cm back out of the pot. Leaving
that to hang down the side of the crock-pot
into a bowl, I put the lid back on and let
the yarn stew for ten minutes. Then I pulled
another four inches of yarn out of the crock
pot, put the lid back on, and let it go for
twenty minutes. As the yarn that had been pulled
out cooled, I would squeeze the water and dye
out into the bowl it was hanging over, and
then move it on to a plate. Note that the very
end of the yarn skein never met the dye; the
very light blue was created by dye wicking
up the fibers from the parts that were dipped.
I continued this for
most of the afternoon; each time I pulled
out four inches/ten cm of yarn, I would lengthen
the time the rest was left in. After the
twenty minute pause, I left the next round
in for half an hour and pulled another four
inches; then forty-five minutes and pulled
another four inches. Whenever the dye pot
started to exhaust (I could see the bottom
of the crock-pot and the water was noticeably
lighter blue), I would top it off with another ½ teaspoon/2ml
of royal blue dissolved in ¾ cup/175ml
boiling water and give it a careful stir. By
the time I pulled the final bit (the very dark,
navy blue) out of the pot, it had been in there
approximately four hours, and I had topped
off the pot with dye three times. (It’s
a miracle I didn’t felt it into one solid
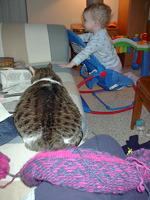
mass; I strongly suggest using superwash if
you ever try this. And lock the cat out of
the kitchen or wherever you’re mixing
the dye.)
Most of the skein was
already cool when I pulled the last bit from
the crock-pot, so it didn’t take too long to reach room
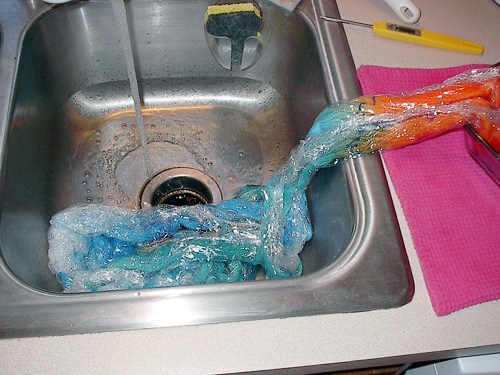
temperature. As always, I gave it a wash. Of
the three dye methods I’ve discussed,
this one bled the most during the wash and
required four or five rinses; it’s heat
that sets the color, and the first sections
dyed – the pastels – didn’t
spend much time at all in the heat, so the
dye washes right back out again. Make sure
to get it all.
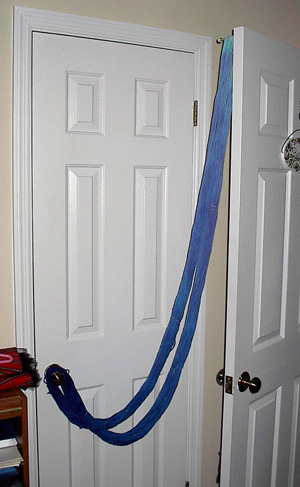  Then I hung it up to
dry – away from
the baby and the cat, that’s always tricky – and
then put it in a more workable skein size on
my niddy-noddy the next day. Amazingly, the
yarn was not tangled and wound up easily. I
can only attribute it to luck and lots of woven
ties. Then I hung it up to
dry – away from
the baby and the cat, that’s always tricky – and
then put it in a more workable skein size on
my niddy-noddy the next day. Amazingly, the
yarn was not tangled and wound up easily. I
can only attribute it to luck and lots of woven
ties.
There you have it.
Three totally different looks, all created
with some food coloring and stuff most people
have laying around their kitchens. It really
is this easy; the hardest part for me was
not spilling dye all over the place and wrangling
my toddler during the entire afternoon it
took to do the dip-dye. (The other dye methods
I did while she was napping.) For cleanup,
I washed out my crock-pot with bleach (it
did turn a nice shade of blue-lavender during
the dip-dye), wash it out again with soap
and water, and it was bright white and good
as new. If you have a choice between glass
or metal utensils, glass stains less and cleans
up more easily, but even stained, the utensils
are still safe to cook with – I made
soup the other night with a bright pink wooden
spoon.
Dig through your stash,
find something you’ll
never knit up as-is, and experiment! It brings
out all kinds of happy kindergarten finger-painting
memories.
NOTES:
Food coloring available at www.wilton.com and
your local grocery store. www.mccormick.com contains
information about liquid food colorants.
There were some books I found helpful when
learning to dye. In order of usefulness to
me, they are:
“The Twisted Sisters Sock Workbook” by Lynne Vogel, which
contains a great deal of information about dyeing and spinning as well
as socks.
“Dyeing to Knit” by Elaine Eskesen.
“Yarns to Dye for” by Kathleen Taylor.
“Wild Color” by Jenny Dean with Karen Diadick Casselman.
This covers plant dyes and their mordants. Very educational and kind
of scary if you know hazardous materials. (Mix up copper sulfide in the
comfort of your own home! Eeek.)
For food coloring dye jobs, I found The
Dye Pot very educational.
There is a fine imperial/metric
conversion chart available here. By
using it, you can see the amounts I give aren’t
exact. Exactness doesn’t really matter
unless you’re trying to duplicate something
you've already done; otherwise, a few milliliters
either way won’t make much difference.
For details of mixing
colors and explanations on why complimentary
colors look like mud when mixed (among other
things), “Color” by
Betty Edwards is helpful, though it’s
a book mainly slanted toward painters and mixing
paint.
All photos by the author or The Husbeast.
|