An exposition on everybody's favorite dirty word
Gauge.
Sometimes you might feel that gauge should be a four-letter
word.*
Thanks to personal
knitting techniques, achieving a designer's
intended gauge can be practically impossible,
if not downright uncomfortable -- even
when using the very yarn indicated by
the instructions. Some knitters can
find themselves dropping down to tiny,
tiny needles in an attempt to compress
an aran-weight yarn to fit the tight
gauge recited in the pattern. Others
tear their hair out because their stitch
gauge is right on the money, but they
can never get the row gauge to match.
Gauge can be synonymous with frustration,
agony, and throwing needles across a
room.
And sometimes, gauge
feels the same way about you. From time
to time, advice is offered to a knitter
who wants to tweak the sizing of a pattern:
"just knit it at a tighter/looser gauge
to make it smaller/bigger." While it's
true that altering the gauge of a knitted
fabric will alter the size of the finished
piece, it doesn't always mean that you'll
get a finished garment that will fit
-- or feel -- as expected. Some people
get the relationship between "tighter"
and "looser" and increased or decreased
stitches per inch mixed up. Others assume
that gauge is the answer to all yarn
substitutions: if it matches, it must
be all right. And a bigger gauge (fewer
stitches per inch) doesn't always mean
easier to knit. Gauge might be a frustrating
concept, but it's also misunderstood.
 |
| Knit (and purl) stitches
aren't square, they're rectangular. But
you knew that already. |
What gauge wants
you to know
Gauge, and knitted fabric generally, is an anisotropic phenomenon. It behaves differently along its horizontal and vertical directions. Just as knitted fabric stretches differently lengthwise and crosswise, when you change needle size to change your stitch gauge, it does not automatically mean that your row gauge will change proportionally.
And of course, as you've probably already noticed, knit stitches are not square. Viewed from the right side, stockinette can be abstracted to an array of rectangles that are longer than they are tall. This means that adding four stitches and four rows does not add the same amount of width or length to a piece.
There are some cases where knitting does turn out to be roughly square. It could be the choice of a stitch pattern that either compresses the stitch width or elongates the row length, or the use of stranded colorwork techniques, or it could even be the nature of the yarn itself: the knitted fabric might stretch vertically when worn to the point that the length of a single row is equal to the width of a single stitch. But those are exceptions to the general rule that knit stitches aren't square.
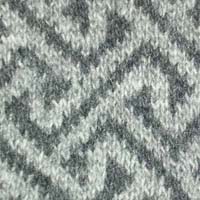 |
When knitting two or more colors in a stranded or woven technique, such as Fair Isle, the rows tend to elongate with respect to the stitch width. Fair Isle gauges are therefore roughly square. In this swatch, the gauge is roughly 7.5 stitches and 7.5 rows per inch. Had a single strand of this yarn been knit in plain stockinette, these numbers wouldn't have been equal. |
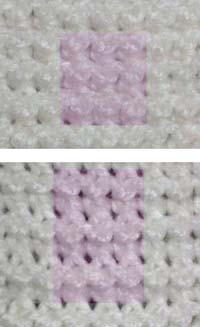 |
In a relaxed state, this chunky yarn knit on 6 mm (US10) needles yields conventionally "square" garter stitch.
But when under the influence of gravity, for example when worn vertically, the garter stitch rows s-t-r-e-t-c-h. If you're thinking of knitting a heavy garter stitch jacket, this could happen to you. |
Now, there is some conventional wisdom about garter stitch (knitting or purling every row when knitting flat; knitting and purling alternate rows when knitting in the round) that an equal number of stitches and "ridges" creates a perfect square, making garter stitch a popular vehicle for modular knitting. Because of the alternation of knit and purl rows (when viewed from one side), garter stitch fabric tends to squish the rows together, forming a ridge; each ridge seen on one side of the fabric is actually the result of two rows of knitting. In theory, each ridge, being formed of two rows, occupies a space measuring something between one and two rows of normal stockinette that coincidentally makes the length of each ridge span the same width as a single knit stitch.
This conventional wisdom
is true for many; however, there are plenty
of knitters who don't experience this phenomenon,
and who wind up with a rectangle when they
knit an equal number of stitches and ridges.
Plus, depending on the yarn, if the knitting
is meant to be used vertically (for example,
worn on the body), garter stitch will likely
stretch downward...so in fact, it becomes
even less square. In tiny units,
such as in modular knitting, most knitters
can achieve or coax their garter stitch into
square proportions and keep those proportions
by picking up and adding additional modules
knit in different directions.
Gauge varies from knitter to knitter. It's not a failing of either the pattern or the individual knitter if the knitter can't achieve the right gauge to match the pattern. It's not uncommon to be able to match a pattern's required stitch gauge spot-on, but to never get the row gauge quite right, or vice versa.
There are a couple of factors that affect knitted gauge. First, there's the degree of tension that is exerted on the yarn as it is looped around the needles. The amount of force varies among individual knitters, and depends on the way the working yarn is tensioned between the fingers, around the hand, around back of the neck, through a safety pin, or however the working yarn end is managed. It also depends on the knitter's state of mind at the time. You may have heard, or discovered for yourself, that your gauge can tighten up when you're feeling tense or upset. It's true; it's also possible that with experience and time, your own individual tension will increase or decrease, or that the tension you exert on the yarn will depend on its composition: you may inadvertently exert more (or less) tension on a spongy wool yarn than on an inelastic cotton yarn.
The other factor is the
method of knitting: how you hold your needles
and how you wrap your yarn around the needles,
and whether you form your stitches on the
points of the needles or not. If you work
your stitches at the very points of the needle,
the stitches formed will be tighter than if
the stitches are formed on the needle shaft.
If you regularly experience difficulty sliding
your newly made stitches along the needle,
this may be the reason.
Just because the yarn label states a particular gauge doesn't mean it's the best choice for that yarn. Your own experience may have told you that some yarns, such as bulky twisted singles of wool, pill rather quickly when worn unless knit tightly. Or that knitting a yarn to the gauge stated on the label results in a rather floppy fabric, when you'd prefer a firmer feel.
Designers may take a bit
of licence in setting gauge. It's possible
that they may simply use the gauge chosen
by the manufacturer, and then design on paper
based on those numbers. Then, when the sample
is knitted up, the sample or test knitter
needs to match that gauge. It's also possible
that the designer -- especially if his or
her process involves creating the prototypes
or swatches herself -- will simply knit to
whatever gauge is pleasing or suitable to
him or her, which will not necessarily match
the label gauge. In those cases, you'll often
find that the pattern gauge is different from
the label gauge. However, the label gauge
is may still be given in the pattern as a
guideline for selecting yarn for knitting
the design, because it helps the knitter find
suitable substitutes.
Gauge is not permanent, except
in special circumstances.
Take a swatch or other piece of knitting,
grasp it at the side edges, and pull. The
fabric gets shorter vertically, the more you
pull horizontally. Grasp it at the top and
bottom edges, and pull again. The fabric narrows
as you increase tension. As you probably know
by now, when you take your knitted fabric
off the needles, it often doesn't match the
required finished dimensions until it's been
subjected to blocking.
However, blocking is only a formal application of heat and/or moisture plus tension, potentially resulting in a change in gauge. Heat, moisture, and tension are also applied to your garments as you're wearing them. Ever notice that knitted elbows start to bag? Or that a cotton or rayon knitted top starts out at a hip-grazing length in the morning, but reaches your knees by the end of the day? You can't always assume that once you've set the knitted fabric by blocking, it won't change. As a general rule, the less resilient and the more inelastic the yarn is, the more likely it is to sag and droop with wear.
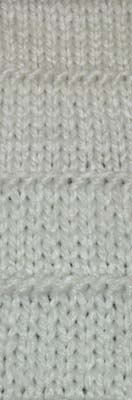 |
| Same yarn,
different needle sizes. But the stitch
and row count does not change proportionately
with a change in needle diameter. |
Increasing the yarn thickness or needle size does not automatically increase the stitch and row gauge proportionally. And simply changing needle size does not mean that the dimension of each stitch will change proportionally. If you increase the needle size used to knit a swatch, it doesn't automatically mean that a 10% change in the width of the swatch will result in a 10% change in the height of the swatch. Because knitting more tightly or loosely can alter the drape of the fabric, when the swatch is blocked or when the knitted fabric is worn, the fabric itself can behave differently. For example, when knit loosely, the fabric may stretch more in the vertical direction than it would have when knit might tightly.
In the photograph at right, the same yarn was knit (from top to bottom) using 2.75, 3.75, 5, and 6 mm (US2, 5, 8, and 10) needles. With 2.75 mm needles, the gauge started out at 5.5 stitches and 8.5 rows per inch; upon switching to 3.75 mm needles, the gauge became approximately 5 stitches and 7 rows per inch. In other words, the stitch gauge changed by 10%, and the row gauge changed by 17%. Upon switching to 5 mm needles, the gauge changed to 4.25 stitches and 5.5 rows per inch: a change from the 3.75 mm needle gauge of 15% in the stitch gauge and 21% in the row gauge. Finally, on 6 mm needles, the gauge became 4 stitches and 5 rows per inch, or a change in stitch and row gauge of 6% and 9%, respectively. With each needle size change, the stitch gauge and row gauge changed by different amounts.
And in the same vein, angles of increases and decreases are not necessarily preserved when you change your gauge. Some other conventional wisdom about resizing a pattern is to change the gauge: if a sweater knit at 5.5 stitches per inch is a little too tight, bumping the gauge up to 5 or 5.25 stitches per inch might give the right amount of breathing room. Right?
The general rule is true, because it's simply math: if you have a fixed number of stitches, and you make each stitch bigger, then the result will be bigger than the original.
But there are other potential
consequences to be considered. If you're changing
your stitch gauge, chances are your row gauge
will change as well. You'll need to compensate
for the change in length that will result,
which is easy enough for rectangular shapes
-- for example, if the body of a sweater is
to be worked until it measures 14 inches from
hem to underarm, 14 inches is 14 inches. However,
the curves and corners that you create by
decreasing and increasing (for example, at
armscyes, sleeve caps, and necklines) may
wind up being a different shape than originally
intended.
Let's say that your pattern
instructions direct you to create a sloped
edge by decreasing 1 stitch every row over
10 rows, 10 times: a total of 10 stitches
decreased over 10 rows. When knit at 5.5 stitches
and 7.5 rows per inch, that's 1.8 inches difference
horizontally, and 1.33 inches vertically,
or a length of 2.25 inches forming an angle
of 36.26 degrees with the horizontal.
But if you decided to resize your pattern by changing your gauge to 4.5 stitches and 6 rows per inch, you'd wind up with 2.2 inches horizontally and 1.6 inches vertically, or a length of 2.72 inches forming an angle of 53 degrees.
This difference may have an impact on the way your garment is put together, causing seams to not fit together correctly, or altering the pitch of the sleeves when they're joined to the garment. The difference may not be significant, and thanks to the stretch of knit fabric, you might be able to fudge it; but there are circumstances where changing the stitch gauge and not altering the pattern can potentially result in a misfitting garment.
Dealing with
the stress of tension
Knowing just how uncertain and variable gauge can be, from yarn to yarn or knitter to knitter, what do you do to ensure that your finished knitted product is up to the pattern specs?
Dress your swatches in the appropriate manner. (Yes, this implies that you've knit a gauge swatch. You've been lectured before, so we won't reprise that lecture here.) Because gauge isn't permanent and can even change with wear, simply whipping up a gauge swatch and measuring it straight off the needles won't prevent unwelcome surprises. Even steam- or wet-blocking your swatch on a flat surface will not guarantee that the finished fabric will keep your measured dimensions.
A solution to this problem
is to not only launder and dry your swatch
in the manner that the finished garment will
be treated, but also to "dress" the swatch
by allowing it to hang vertically with additional
weight suspended from it, the way that swatch
would be treated if it formed part of the
fabric hanging from the wearer's body. Think
about it this way: if you had knit a 6-inch
square (15 cm square) swatch, it might block
(flat) to a 6-inch length. But if that piece
of fabric were actually located somewhere
near your shoulder in a sweater that measured
21 inches (53 cm) in length, there would be
effectively another two-and-a-half swatches
hanging below your swatch. Not only would
your 6-inch swatch, in real life, be subject
to the effects of gravity on itself, but it
would also be expected to support the weight
of another 15 inches (38 cm) of knitting below
it. If you simulated the effect of gravity
and the additional weight on your swatch,
you'd have a more accurate prediction of how
the fabric will behave with normal use.
If you want to try dressing
your swatches vertically, first launder and
dry a generously-sized swatch they way you
would the finished article (you'd probably
let it dry flat). Weave a thin knitting needle
through the stitches along the top edge and
bottom edges of the swatch. Clip or tie the
needle at the top edge to a clothes hanger,
and hang it up. From the needle along the
bottom edge of the swatch, suspend the rest
of the ball of yarn that you had used to knit
your swatch (a good enough approximation of
weight -- you don't need to be obsessive about
calculating the amount of weight to be suspended).
You can hang your remaining yarn by threading
a piece of waste yarn through the middle of
the ball, and tying the waste yarn to either
end of the bottom needle. Let the whole assembly
hang freely for a day, then measure the gauge
again.
You'll likely find that fabrics knit from slippery and non-elastic yarns, like ribbon yarns, cottons, and silks, are more likely to experience a gauge change, as well as fabrics knit in stitch patterns that stretch easily in the vertical direction (like garter stitch). Swatches in rougher or more elastic yarns, like wool yarns, are less likely to change gauge when dressed.
Yes, physics dictates that
if the fabric representing your swatch was
located at the hem of the garment, it wouldn't
be stretched out so much because it didn't
have to support any other fabric. A complete
model of how the fabric would behave under
realistic conditions is really better suited
to a second-year university physics course,
so we'll just leave that for now. The point
to take away is this: if you replicate the
actual conditions under which the fabric will
be used, you won't be taken by surprise when
the garment stretches out to a different shape.
If
you can never seem to match the row (or stitch)
gauge, try changing your knitting tools or
technique to change your gauge...
First, assuming you've knit and dressed your
gauge swatches as appropriate, but were still
unable to meet both stitch and row gauge,
your first Plan B to try to make gauge is
to switch needles. Yes, you likely tried a
number of different needle sizes in an attempt
to match the pattern gauge -- but did you
try the same needle size in different brands
or materials? Just because you've got two
pairs of needles that are labeled
to be the same size doesn't mean that they
are the same size, particularly if
they're made by different companies. If your
gauge is slightly off using Brand A, size
X, you might just luck out using Brand B,
size X.
Also, some yarns and/or fibers are a lot easier to handle with bamboo needles, while others slide better along plastic or nickel; and some yarns and stitch patterns benefit from a higher coefficient of friction between the fiber and the needle, keeping the stitches in place while you execute tricky maneuvers. Switching from metal to plastic to wood when swatching may affect your gauge as well.
If you're primed for adventure
or you're just keen to learn new techniques,
you may be able to alter your row gauge by
changing your knitting technique. For some
knitters, there may be a natural gauge difference
between knitting flat (back and forth) and
knitting in the round. For others, learning
to wrap the yarn around the needles in a different
direction -- for example, by switching from
the combination knitting technique to the
western style -- may do it. Alternatively,
it may simply be a matter of the tension that's
being exerted on the working yarn. You may
be able to change your row gauge not by switching
needle sizes, but by switching the way you
wrap the working yarn around your fingers
or hand to control the tension.
If you're knitting stranded colorwork (Fair Isle), you might be able to alter your gauge slightly by changing the way you're dealing with the non-working color on the wrong side of the fabric. If you normally leave floats of the unused color on the wrong side, try weaving the unused yarn on the wrong side instead.
... or adapt by matching the stitch gauge, then recalculating the number of rows you need to knit. Simply accept that you won't get both stitch gauge and row gauge to match the pattern, and deal with it accordingly. For most designs, it's preferable to match the stitch gauge, since garments are usually knit in the vertical direction (bottom-up or top-down), meaning that the garment width is defined by the number of stitches worked. In a bottom-up or top-down design, length is often a secondary consideration in the garment design and can be altered more easily than width.
In the easiest case, you're knitting a piece (or part of a piece) that's rectangular, such as the torso of a sweater, and the pattern gives instructions to knit to a specific length expressed in inches or centimetres. Calculating the number of rows to knit can be done in one step.
For example, let's say the pattern expects a row gauge of 7 rows per inch (2.5 cm) and you're knitting at 7.5 rows per inch (2.5 cm), and the instructions for the body of the sweater expect you to knit 14 inches (35 cm). To figure out how many rows you need to knit at your own gauge of 7.5 rows per inch, simply multiply the pattern-specified length by your personal row gauge: 7.5 rows per inch x 14 inches = 105 rows (round it up to 106 rows if it makes following the next step of the pattern easier).
In the next-to-easiest case, again you're knitting a piece that's rectangular, but the pattern gives instructions to knit to a specific row count rather than a measured length. That row count, of course, will be premised on the row gauge given in the pattern, which you're not matching, so one more calculation step will be involved.
Let's say the pattern calls for a row gauge of 6.25 rows per inch (2.5 cm), and the pattern reads "work 78 rows even", but your own row gauge is actually 5.75 rows per inch (2.5 cm). First, calculate the length of this part of the work, according to the pattern: 78 rows divided by 6.25 rows per inch yields 12.48 inches (31.7 cm). Then, using this length, figure out how many rows you need to knit: 12.48 inches x 5.75 rows per inch = 71.8 rows, so round up to 72 rows. In other words, since you're knitting fewer rows per inch than the pattern expects, you'll need to knit fewer rows to match the length required by the pattern.
Naturally, this process becomes more difficult when there is shaping that alters the width of the piece, such as waist shaping or armhole shaping. Typically this shaping requires a set number of decreases (or increases) spaced by a fixed number of rows; of course, if your row gauge is off, then your decreases and increases will not be spaced by the same absolute measurement. In these situations, you can either embark on a brute-force recalculation of all the instructions by sketching out the garment piece, calculating everything in terms of inches (or centimeters), then converting back to your real knitting gauge (if you did the sort of detailed preparation described here or had designed at least part of the garment yourself, as in this article, you'd be halfway done); or, you can use an easier approximation trick to make sure that your increases or decreases are spaced more or less the same way as in the original pattern.
First, for instructions that call for you to bind off a set amount of stitches at the beginning of each row a number of times, it's unlikely that there will be any need to alter the pattern instructions unless your row gauge is really, really off the pattern gauge (we're probably talking about more than 20% off the pattern's row gauge). Bind off instructions typically occur at the bottom of the armscye or at the shoulder, and typically don't take more than about 2 or 4 rows (in the case of armscye shaping) or 6 or 8 rows (in the case of shoulder shaping).
Similarly, for one-off shaping
instructions, where increases or decreases
are worked over one or two rows but not repeated,
it's also unlikely that there will be a need
to alter the pattern instructions. For example,
when switching from the ribbing at the bottom
of a sweater to the body pattern, the instructions
may call for a number of increases spaced
across the very next row. This step isn't
repeated, so there's no need to make a row
adjustment just for this increase row.
With instructions that call for increases or decreases reoccurring every X rows, the shaping takes place over a greater length of the garment, so adjusting the number of rows becomes more important. The general process will be:
- For this block
of instructions, figure out how many
rows the pattern instructions cover.
- Calculate the corresponding
length (in inches or centimeters)
according to the pattern.
- Convert this to
the number of rows in your own row
gauge and calculate how many more
(or fewer) rows you'll need to knit.
- Sneak in (or subtract)
these rows in the original instructions.
For example, you may have waist shaping that instructs you to "decrease 1 stitch each side on next row, and every following 8 rows 4 times" in a pattern gauge of 7 rows per inch (2.5 cm), when your own pattern gauge is 8 rows per inch (2.5 cm).
- For this block
of instructions, figure out how many
rows the pattern instructions cover:
these instructions cover 1 row + 8
x 4 rows, or 33 rows total (there
are five decrease rows).
- Calculate the
corresponding length (in inches or
centimeters) according to the pattern:
according to the pattern gauge, this
works out to 4.7 inches (12 cm).
- Convert this
to the number of rows in your own
row gauge and calculate how many more
(or fewer) rows you'll need to knit:
at your own gauge of 8 rows per inch,
4.7 inches works out to 37.7 rows
(round this up to 38 rows); that's
an additional five rows of knitting
that you need to add in.
- Sneak in (or
subtract) these rows in the original
instructions: "sneak" these rows
in by adding an extra row or two to
the stretches of knitting that are
worked evenly between decrease rows.
In this case, in an initial
attempt you could try rewriting the instructions
to read "decrease 1 stitch each side on next
row, and every following 9
rows 4 times". That's not quite right, because
you'll have added only four extra rows, not
5 as you've calculated. If you don't think
the missing row will affect your overall length
too much, you might leave it at that. If you
want to make sure the extra row is included,
then for just one of those repeats,
work 10 rows rather than
9.
 |
| If your row gauge
calls for more rows per inch than
the original pattern, slip in extra
rows between decreases or increases
(the rows in darker red) so that
you'll wind up decreasing or increasing
the same number of stitches over
an equivalent vertical distance.
This technique of slipping in extra
rows is analogous to the method
you'd use to tweak a cross-stitch
chart for use in intarsia. |
Let's say, for the same
example, that your row gauge is actually looser
-- meaning, you're knitting fewer
rows per inch than the pattern calls for.
In that case, you'd need to subtract rows.
Going back to the example where the waist
shaping instructions read "decrease 1 stitch
each side on next row, and every following
8 rows 4 times" in a pattern gauge of 7 rows
per inch (2.5 cm), assume that your own row
gauge is 6 rows per inch (2.5 cm):
- For this block
of instructions, figure out how many
rows the pattern instructions cover:
these instructions cover 1 row + 8
x 4 rows, or 33 rows total (there
are five decrease rows).
- Calculate the
corresponding length (in inches or
centimeters) according to the pattern:
according to the pattern gauge, this
works out to 4.7 inches (12 cm).
- Convert this
to the number of rows in your own
row gauge and calculate how many more
(or fewer) rows you'll need to knit:
at your own gauge of 6 rows per inch,
4.7 inches works out to 28.3 rows
(round this down to 28 rows); that's
five fewer rows of knitting
that you need to work.
- Sneak in (or
subtract) these rows in the original
instructions: subtract these
rows by omitting a row of knitting
between decrease rows.
So, as a first try, you could try rewriting the instructions to read "decrease 1 stitch each side on next row, and every following seven rows 4 times". That will result in 29 rows of knitting, not the 28 you calculated. If that extra row doesn't matter to you, you're done; but if you want to subtract that extra row, then for just one of those repeats, work six rows rather than seven.
A couple of wrinkles: you may have realized that patterns are often engineered so that shaping stitches (increases and decreases) always occur on one side (right or wrong, public or private) of the garment. That's simply a matter of convenience for the pattern author, because some knitters find it easier to work these shaping stitches (especially if they're worked in mirror images) on the right side of the fabric. When you make this type of row gauge adjustment, you will likely respace your increases or decreases so that some of them have to be worked on the opposite side of the fabric. Also, If you're working with a stitch pattern that requires a set number of rows to complete a repeat, such as a vertical cable or color repeat, altering the number of rows to be knit may require a little more planning so that the repeat begins and/or ends at a pleasing location.
* Some people believe it is. Those are the people who spell it incorrectly, omitting the "u". Others who remember the "u" sometimes put it in the wrong place. Remember, "a" before "u" when they follow a "g", unless of course you are writing about guano or guarana. If you have this much trouble spelling "gauge," consider using the term "tension" instead.