|   Lining Lining
Use yardstick and pencil to measure and trace
a rectangle measuring 30 by 40 inches on the
lining fabric. Add 0.5 inches to each edge for
seam allowances, and cut out lining.
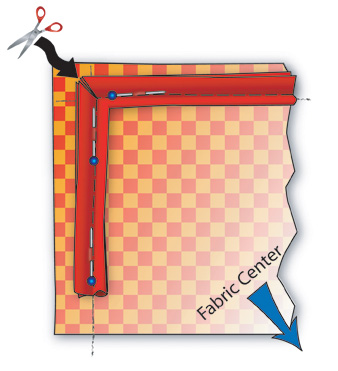
Pin Maxi Piping to right side
of fabric, with piping side facing toward center
of fabric piece, so that stitching of piping
lays along pencil line (see diagram). Sew piping
to lining, clipping the corners as shown.
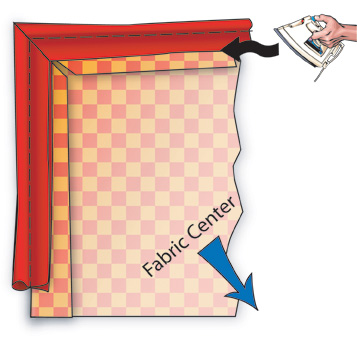
Place fabric on ironing board
wrong side up, fold over seam allowances as
shown, and press. This will make the piping
stick out just past the edges of the lining
on the right side.
Assemble blanket
Mark center of each side of fabric lining with
a pin. Mark center of each side of knitted blanket
with a stitch marker. Lay lining on table, wrong
side up, and place knitted piece on top, right
side up. Pin together, matching center points
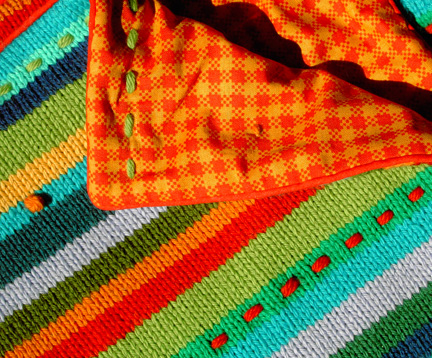
and corners on each side, using gingham checks
to align stripes on either side and ensure that
the blanket is sitting straight on the lining.
Slip stitch blanket to lining, concealing stitches
in seam between fabric and piping on lining.
 Embroidery Embroidery
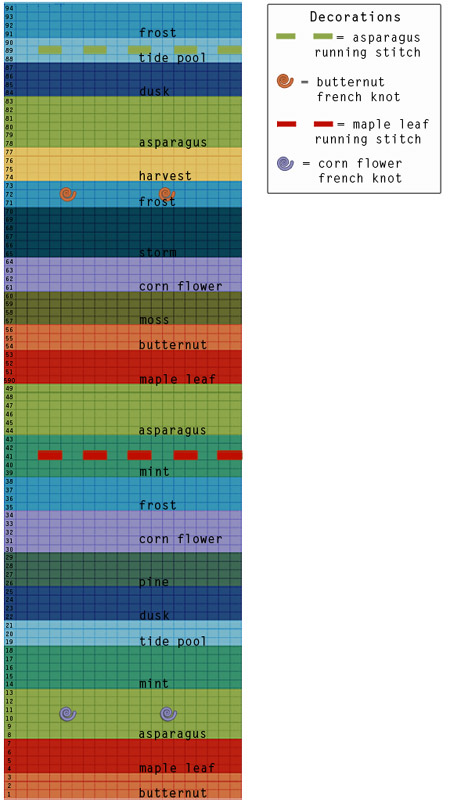
Work embroidery as indicated on stripe pattern
chart. See directions below if you are unfamiliar
with these embroidery stitches.
For running stitch
Use large embroidery needle and a doubled strand
of yarn. Tie a knot at the yarn end, and, on
right-hand side of blanket, insert the needle
into the center of a stitch several stitches
away from the beginning of the row. Bring the
needle out at the beginning of the row, and
pull the yarn through and allow the knot to
slip to the inside of the blanket by passing
through the center of the first stitch. Working
right to left, sew over two stitches and then
under two stitches, passing through both knitted
and fabric portion of blanket and aligning stitches
on back with gingham checks to ensure that sewing
is straight. At end of row, pull yarn taught,
make knot in end and pass knot through to inside
of blanket. Clip yarn, and pull ends to inside.
For French knot
Use large embroidery needle and a doubled strand
of yarn. Tie a knot at the yarn end, and insert
the needle into the center of a stitch close
to the beginning of the row. Bring the needle
out on blanket top between the sixth and seventh
stitches, and pull the yarn through and allow
the knot to slip to the inside of the blanket.
Now you will make a stitch to secure the fabric
backing to the blanket front, and then you will
make a French knot over the securing stitch.
To make the securing stitch, Pass needle over
the top of stitch seven, and insert from top
of blanket between stitches seven and eight,
passing through both knitted and fabric layer
of blanket. Pull yarn all of the way through
blanket. Loop needle back and insert again from
bottom of blanket between stitches six and seven
again, and pull yarn through. In this way, you
secure the fabric backing to the blanket. Make
French knot over securing stitch by looping
yarn around needle twice (starting with the
blanket end of the yarn wrapped around the eye
end of the needle) and then inserting needle
between stitch seven and eight; this time, however,
do not penetrate the fabric backing, rather,
run yarn through inside of blanket, passing
under the next 8 stitches. Bring it out eight
stitches later at between the eighth and ninth
stitches to make the next securing stitch and
French knot. Make a new securing stitch and
French knot in the same way every nine stitches
(you will have eight un-used stitches between
each knot). At end of row, pull yarn taught,
make knot in end and pass knot through to inside
of blanket. Clip yarn, and pull ends to inside.
|
|
 As a child, Kristin Goedert spent much of her
time making stuff, from hats for soft-boiled
eggs to sock monkeys, doll clothes to pot holders.
Now that she is a grown up (or so they say)
she puts her creative talents to good use as
a graphic designer and owner of Kristin
Goedert Design.
As a child, Kristin Goedert spent much of her
time making stuff, from hats for soft-boiled
eggs to sock monkeys, doll clothes to pot holders.
Now that she is a grown up (or so they say)
she puts her creative talents to good use as
a graphic designer and owner of Kristin
Goedert Design.
Kristin lives in the San Francisco Bay area
with her husband and cats and spends as much
of her free time as she can knitting, spinning,
and behaving wildly.
|