Plagued by a distinct lack
of knitting needles on airlines these days?
Kids driving you crazy
on road trips? Well, I've got just the solution
for those needless times: finger knitting.
What, might you ask, is
finger knitting? Why simply knitting with
one's own fingers in place of the traditional
knitting needles. Whether you are searching
for a new fiber experience, or stuck in a
needle-free-zone, finger knitting is for you.
The process is amazingly simple, and the only
supplies required are some yarn of your choosing
and your own fingers. Finger knitting is a
great, kid-friendly project (read: cheap and
easy) that anyone can do. Follow my fingers
and you'll be knitting right along in just
a snap!
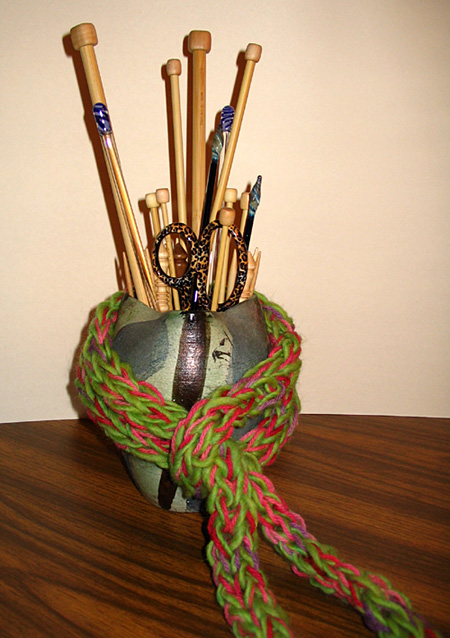
Finger knitting produces
a long, thin strip of stockinette stitch.
The resulting thin strip may not seem like
much, but think of the possibilities...scarves
with single or double strips, three strips
braided together, handles, straps, ties, sew
many together for a throw blanket, all without
needles. This is the ultimate on-the-go, take-it-anywhere,
super-simple knitting project.
For this project, you can
use absolutely any type (and mixture) of yarns
imaginable. I recommend using a bulky weight
yarn or working with two or three lighter
weight yarns together at the same time. Play
with novelty yarns, different textures, or
crazy color combos. Finger knitting is a great
way to experiment with putting different yarns
together without a serious commitment. Mix
it up and have fun!
I chose to work with two
wools held together -- both from Kraemer Yarns,
Naturally Nazareth Aran in Summer and Mauch
Chunky in Kiwi.
Casting On
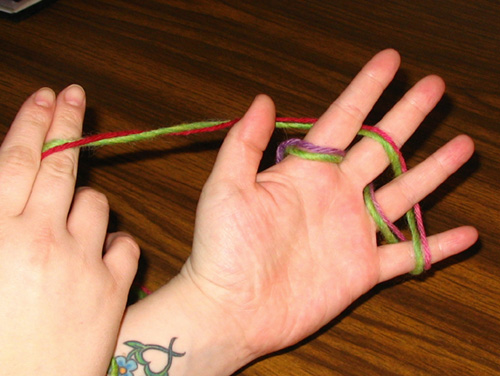
Begin with your left hand
facing you (assuming you are right handed.
For lefties, begin with the right hand facing
you). The tail of your yarn(s) should be placed
in the area between your left thumb and index
finger. Begin casting on by wrapping the working
yarn over the index finger, behind the middle
finger, over the ring finger, etc. Once you
wrap around the pinkie, continue back the
other direction until your reach the index
finger once again. Go around the index finger
a second time and wrap all fingers in the
same manner slightly above the wraps from
the first pass. Try to maintain loose wraps.
You not only need to be able to work the stitches,
you also don't want your lovely fingers to
turn blue.
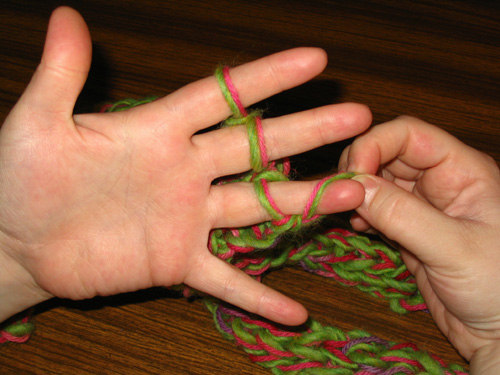
The First Row
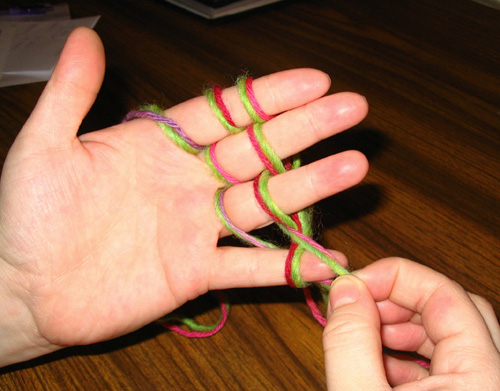
Beginning at
the pinkie, lift the wrapped yarn on the bottom
(nearest your palm) up and over the tip of
the finger, keeping the top wrap on the finger
as you pass the lower wrap over and off. Remember
that in these photos, I'm using two strands
held together as one. Continue this process
along the hand until your reach the index
finger. Be careful as you lift the stitch
on the index finger since the bottom wrap
is actually the tail of your yarn. (Just don't
let it get away from you!)
All Following Rows
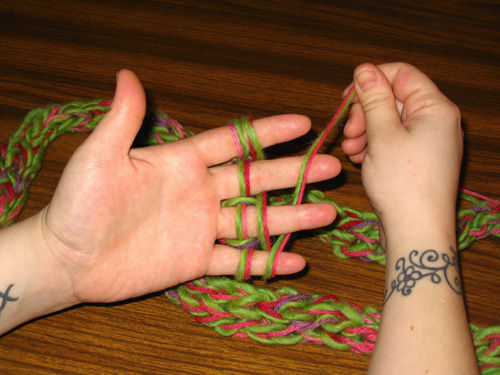
For the next
row, and every other row, begin by once again
wrapping the working yarn around all four
fingers as in step one. Next, each lower stitch
is passed over the upper stitch and lifted
off the finger as in step two. This two-step
process continues until the work is the desired
length. When making scarves, I like to knit
about eight to ten feet of finger knitting
and double-up the strips around the neck.
Should you need to put down your finger knitting
sometime during construction, I recommend
sliding the working stitches onto a ballpoint
pen and hooking them under the paper-clippie
thing at the top. (This is a needle-free area,
remember?) When ready to begin again, place
the working stitches back onto the fingers
with the stockinette side of the work facing
the back of your hand.
Binding Off
Once the chosen length is
reached, the knitter must bind off the working
stitches. On this last row, do not wrap the
fingers. Each finger should have only one
loop on it. Lift off the loop on the pinkie
finger and place it onto the ring finger.
On the ring finger, lift the bottom loop up
and over the top loop and off the finger.
Next, place the remaining loop from the ring
finger onto the middle finger and repeat the
lifting off/moving over step until one loop
remains on the index finger. To finish, simply
cut a tail and pass it through the remaining
loop, pulling it tight.
TA DA!!! A fantastic bit
of knitting magic with not a needle in sight!
Give you ingenious little fingers a pat on
the back.