  Do
you love vintage clothing, but never seem
to find exactly what you want? Knitting from
vintage patterns might be just the ticket. Do
you love vintage clothing, but never seem
to find exactly what you want? Knitting from
vintage patterns might be just the ticket.
Using vintage patterns can be fun and enormously
rewarding. By making your own pieces, you
can vamp up your wardrobe with retro looks
without spending a fortune. Rather than searching
endlessly for the perfect 1950s sweater or
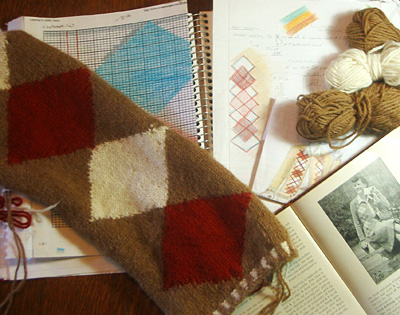
a classic argyle sock pattern, try knitting
the perfect facsimile -- in your favorite
color and custom-tailored to fit you like
a glove. Knitting from old patterns can be
especially useful for those who have a hard
time finding vintage knits in their size,
making classic looks available to those of
us who can't fit into the teeny clothes of
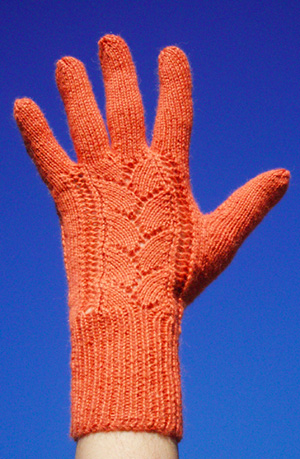
earlier times. If you've ever tried to shoehorn
yourself into a vintage sweater, or tried
on vintage gloves that seem to have been knitted
for a Chihuahua rather than a full-grown human,
you'll love knitting your own "vintage" items
to suit you.
Knitting from vintage patterns is also a
great way to connect to the way women lived
in other times -- both through reading pattern
books and in the process of actually knitting
from one. And even if you don't intend to
knit every one, vintage patterns can be fun
to collect as artifacts -- with beautiful
fashion photography and quaint and sometimes
hilarious depictions of life in a bygone era.
Finding a Vintage Pattern
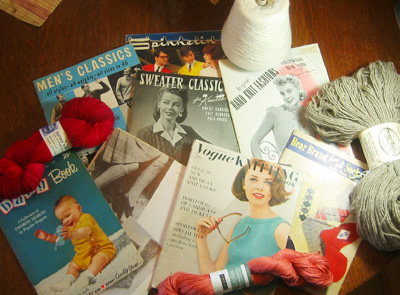
First, you need a pattern source. If you're
not the type to spend hours upending musty
boxes in church rummage bins and estate sales,
don't despair -- eBay
and other online auction sites present a great
opportunity to stock up. These sources can
offer an extremely wide selection to choose
from at the click of a button, but the patterns
will invariably cost more than if you come
across a treasure trove. Used booksellers
also frequently offer old knitting books for
pennies, listing them under the knitting or
sewing sections of online stores. Try using
eBay as a resource to find the names of vintage
books, and then hunt for them at cheaper prices
from various online booksellers.
 Perhaps
the best resources are vintage pattern websites.
Many blogs and free pattern websites also
offer great copyright-free vintage patterns.
Commercial websites offer a wealth of patterns
at reasonable prices, originally published
between the 1800s and the 1960s. Perhaps
the best resources are vintage pattern websites.
Many blogs and free pattern websites also
offer great copyright-free vintage patterns.
Commercial websites offer a wealth of patterns
at reasonable prices, originally published
between the 1800s and the 1960s.
Choosing a Pattern
Much of the time, if you are ordering online,
you may only see a picture of the design and
won't have an opportunity to read through
a pattern beforehand. If you do get lucky,
consider it the same way you would a modern
pattern. Is it complete? How detailed are
the instructions? Does it include charts or
(more rarely) schematics? In the photograph,
is the model contorted into some weird position,
or can you see that the garment hangs properly?
Using Vintage Patterns
Vintage knitting patterns are easy to convert
to modern use with a little planning and forethought.
If you can make minor adjustments to a modern
pattern for fit and style, you can make virtually
any vintage pattern. Here are some considerations
when making new garments from vintage patterns:
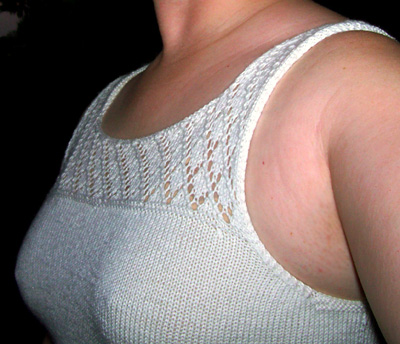
Original Intended Use:
Don't be limited by the original use for a
pattern - many vintage patterns can be adapted
or used as is to create a garment that suits
more modern needs. For example, this 1940s
camisole pattern was originally intended as
lingerie, but while the demand for knitted
skivvies is relatively low, it also works
as a sexy tank:
 Instructions:
Thankfully,
most twentieth century vintage patterns use
the same language and abbreviations used in
knitting parlance today. Only minor differences
exist -- for instance, extra double-pointed
needles and bits of waste yarn replace cable
needles and stitch holders. If you like to
work from charts or use schematics, consider
making your own -- they rarely appear in vintage
books and leaflets. Instructions:
Thankfully,
most twentieth century vintage patterns use
the same language and abbreviations used in
knitting parlance today. Only minor differences
exist -- for instance, extra double-pointed
needles and bits of waste yarn replace cable
needles and stitch holders. If you like to
work from charts or use schematics, consider
making your own -- they rarely appear in vintage
books and leaflets.
Gauge: The
first thing that people notice is the wee
gauges in which so many vintage patterns are
written. Most people's initial reaction is:
"How on earth and WHY did women knit at such
impossibly fine gauges?" With some practice,
however, knitting at a fine gauge is eminently
do-able. A finer knit garment is both more
flattering and more durable -- qualities necessary
for a time when garments were hard to come
by and frugality was an important virtue.
The finer the gauge, the lighter and more
flattering the garment can be -- subtracting
as much as an inch from your waistline as
compared to a heavy sweater, and gracefully
following your curves. Small gauges also hide
mistakes well -- the smaller the stitches,
the smaller the mistake looks. And, with small-gauge
knitting, you can use superwash sock yarn
-- letting you chuck your garment into the
washer with impunity. I strongly encourage
you to try -- it takes less time than you
think and the results are worth it!
If you need to alter the gauge of a garment,
don't despair. Simply divide the number of
stitches originally called for by the number
of stitches cast on -- for example:
Old Gauge = 8 sts/inch
Number of Stitches Called for = 120
Width at cast on = 15 inches
Then multiply your new gauge by the number
of inches called for to determine how many
stitches to cast on:
New intended Gauge = 6 sts/inch
x 15 inches = cast on 90 stitches
You can do the same quick calculation for
bust, waist, hip and armhole measurements.
For a more detailed explanation of how to
change gauge sizes, please check out this
Knitty article.
Sizing: Sizing
has changed considerably over the course of
the twentieth century. To make matters more
complicated, vintage sizing was not quite
as standard as it is today.
- size
12 = 30" bust in 1930, 32" bust 1930s -- 1960s,
34" bust post-1968
- size 14 = 32" bust in 1930, 34" bust 1930s
-- 1960s, 36" bust post-1968
- size 16 = 34" bust in 1930, 36" bust 1930s
-- 1960s, 38" bust post-1968
-
size 18 = 36" bust in
1930, 38" bust 1930s -- 1960s, 40" bust
post-1968
-
size 20 = 38" bust in
1930, 40" bust 1930s -- 1960s, 42" bust
post-1968
Go by the measurements of the garment rather
than the pattern size. In cases where no measurement
is specified, you can easily choose the correct
size by dividing the number of stitches at
the bustline by the number of stitches to
the inch. (For more information on sizing,
refer to this
Knitty article)
 Fit
and Style:
Most vintage patterns were made to fit different
expectations about style and fit. Some salient
points to remember: Fit
and Style:
Most vintage patterns were made to fit different
expectations about style and fit. Some salient
points to remember:
-
At various points in history,
women wore heavy-duty foundation garments
to cinch in their waists, to amplify their
busts, or to give themselves the 1950s equivalent
of a J-Lo butt -- so garments were made
accordingly. For example, a 1955 pattern
would be designed with the expectation that
you'd be wearing a bullet bra and a girdle
every day. To deal with this, know your
waist, bust, and armhole measurements, and
multiply the gauge by the number of stitches
at that point in the garment to determine
what needs to be adjusted for your size.
-
Not only were women generally
smaller and thinner, they were shorter,
and they wore their skirts and pants much
higher up on their natural waists rather
than the hip-hugging waistline of today.
Consequently length is something you should
at least consider before deciding whether
to alter a vintage pattern. Adjust length
as necessary by adding or subtracting from
the number of inches knit.
-
As
fashions have changed, so have ideas about
ease. Ease is the difference between your
measurements and the measurements of the
garment. Just as you couldn't fit two boxes
of exactly the same size inside one another
-- one would have to be bigger -- you need
room inside a garment to get into it and
to move around comfortably. Typically garments
have 1-4" of ease, that is, additional space
inside the garment so that you can actually
fit inside it. Many sweaters have "negative
ease" -- meaning that they are smaller than
the intended wearer and are intended to
stretch for that Sweater Girl effect. Ease
is crucial to understanding whether and
how a particular garment will fit you. Generally,
pre-1960 clothes fit more closely than clothes
do today, especially around the waist and
arms, with sweaters having as much as 2"
negative ease. In the 1920s and 1930s, however,
clothing typically had more ease than do
today's garments. Determine how much ease
you want by looking at the bust size of
the original pattern vs. the number of inches
(determined by gauge) and by measuring garments
you own with a similar fit to the one you'd
like to emulate.
 A
word of caution: when altering vintage patterns,
keep in mind that with each adjustment you
will also change the look of the finished
product. Radically changing the shape of the
garment may ruin its vintage look altogether.
Try to find the balance between a garment
you'll be comfortable in and a garment that
reflects the original designer's intent. A
word of caution: when altering vintage patterns,
keep in mind that with each adjustment you
will also change the look of the finished
product. Radically changing the shape of the
garment may ruin its vintage look altogether.
Try to find the balance between a garment
you'll be comfortable in and a garment that
reflects the original designer's intent.
Yarn: You will probably need to make a yarn substitution.
Substituting for vintage yarns is more art
than science. Try to determine the weight
& yardage of the yarn originally called
for by using online charts -- one such good
chart is at http://www.vintageknits.com. If
you can't find stats for the vintage yarn,
go by gauge and choose a yarn that will yield
a similar gauge on the called-for size of
needles.
You should also consider the texture of the
yarn you're choosing. Is it a traditional
yarn (for example, a worsted yarn) or is it
woolen or fluffy? Is the content similar to
the original? Is it plied (which would have
been more likely in earlier times), cabled
or is it a single? In the picture, is the
garment hairy or fuzzy or smooth? Asking these
questions can help you to choose the best
yarn for your project. Keep in mind that few
synthetics or novelty yarns were used in pre-1960
patterns, save the occasional nylon yarn for
stockings and baby items. Your items will
look best if you stick with natural materials
similar to the yarn for which you're trying
to substitute.
Finally, color plays an important role. Is
the color appropriate for the era you're looking
to emulate? For ideas on color schemes popular
in different eras, look at design books, magazines,
and even at eBay auctions of similar vintage
clothes from the same era.
Just take these details into account when
you choose your pattern, and in no time at
all you'll be proud to wear your beautiful
new "vintage" clothing.
|


