Stephanie Pearl-McPhee,
At
Knit's End: Meditations for Women Who Knit Too
Much.
Last
issue I promised
to continue with more ways to cast on, so let's
just get right to it. The provisional and a tubular
cast on described below are a bit more advanced
than the ones I wrote about last time so if this
is the first time you've picked up a pair of needles,
you might want to start with one of those.
Open, a.k.a. provisional,
cast on
This method of casting
on uses a length of waste yarn that is removed
later to reveal "live" stitches, which
are then placed back on the needle and knit in
the opposite direction. This can be useful for
hems or for making an object that's closed at
both ends -- like a knitted, stuffed toy. With
a provisional cast on you can even start a scarf
in the middle and work a chart that looks right
on both ends. It can also be a type of insurance
when you're not entirely sure you have enough
yarn to complete a project. You can use the open
cast on, knit the feet of both socks, divide your
yarn in half and make the cuffs as long as your
remaining yarn will allow.
To work this open cast
on you'll need one needle a couple of sizes larger
than the needles you'll be using to knit with
(or alternately, two needles held together) and
a spare length of sturdy yarn, several times longer
than the length of the finished cast on.
Make a slip knot with
the working yarn and place it on the needle. For
this cast on you only need to leave a short tail
-- you'll be working with the yarn coming from
the skein. Hold the needle and one end of the
waste yarn in your right hand.
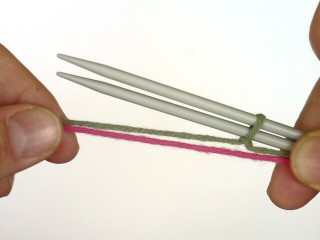
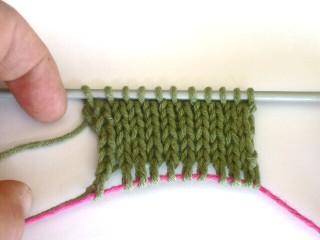
*Move the working yarn
in front of and under the waste yarn...
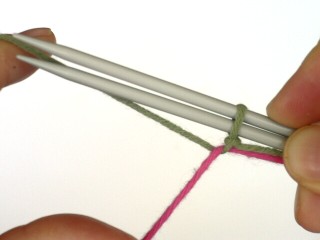
...then in front of and
over the needle.*
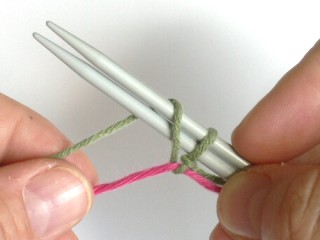
Repeat from * to * until
you have the required number of loops of working
yarn on the needle. End by moving the working
yarn in front of and under the waste yarn. Make
sure you have an equal number of stitches around
the waste yarn as you have on the needle.
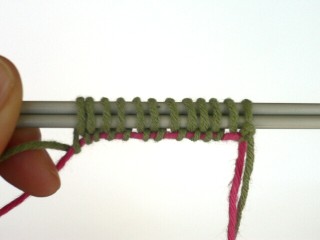
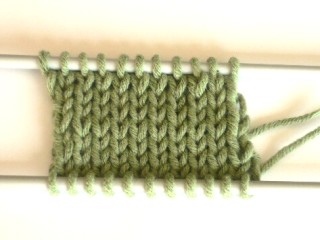
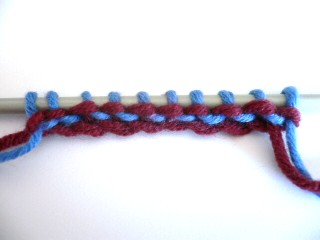
Here is what it will
look like after you've removed the needle(s) and
worked a few rows...
I realize that the loops
around the waste yarn look impossibly large and
sloppy, but after you replace them on the needles
and work a row or two in the opposite direction
you'll see that it actually doesn't show at all...
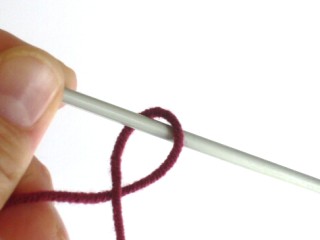
Backwards loop cast on
Also known as the "single
cast on" this is the simpliest cast on of
all. It can be used for casting on stitches in
the middle of a row (as for a buttonhole) but
it is all too often quite sloppy and loose. If
you need to cast on in the middle or at the end
of a row, it's often better to do so by knitting
on (see last
issue). I'm including it now because the tubular
cast on that I'll be talking about next uses it
as its base.
To work this cast on,
simply make a backwards loop and place it on the
needle.
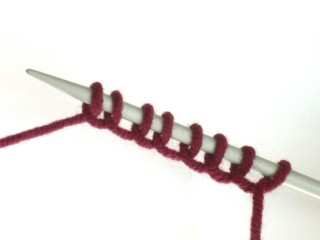
Repeat until you have
as many stitches as you require.
Tubular cast on
The tubular cast on is,
to put it mildly, a gorgeous way to cast on for
working ribbing and has been praised for its loveliness
all over the knitting blogosphere. Using a spare
piece of yarn cast on half the number of stitches
you need using the backwards loop cast on. (If
you don't know what that is then you're not reading
the entire article. Go back one technique.) Then,
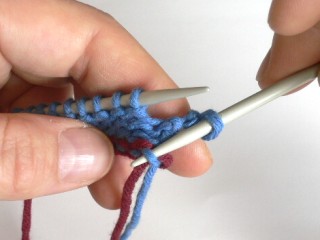
using the working yarn, purl one row. Now take
a minute to look at what we've just done. Notice
that there are purl bumps of the blue working
yarn peeking out from between the loops of the
wine colored waste yarn. We'll be using those
bumps in a couple of minutes, so remember what
they look like.
Then work 3 more rows
in stockingette stitch (knit one row, purl one
row, knit one row) and turn the work so the purl
side is facing you for the following bit.
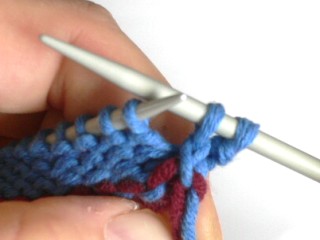
Purl the first
stitch. Next insert the right needle
into the first purl bump way back down
on that first row you purled -- the ones
were were just inspecting.
Slip the loop onto the
left hand needle and knit it through the back
loop.
Continue across the row,
purling 1 stitch, then picking up and knitting
tbl the next purl bump until you come to the last
stitch. Purl the last stitch, the pick up the
loop at the selvedge edge and knit through the
back loop.
Turn and work ribbing,
knitting the knit stitches and purling the purl
stitches. Remove the waste yarn by cutting between
some of the stitches and tugging to remove lengths
of yarn.