


Pattern: PATTERN NAME
INTRODUCTION
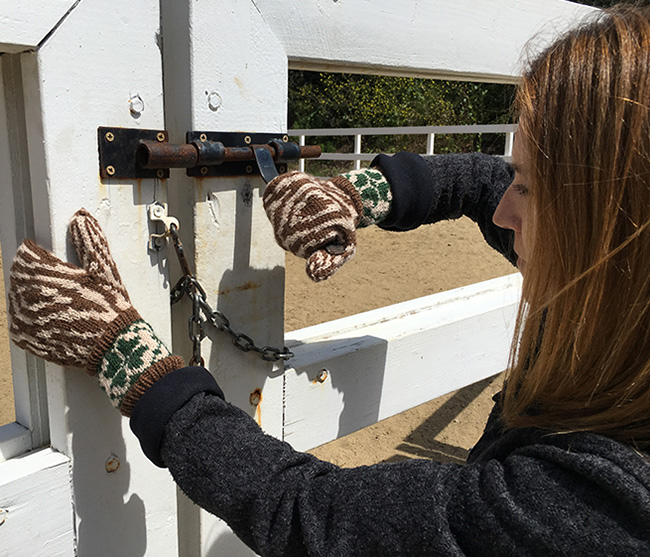
Superstition
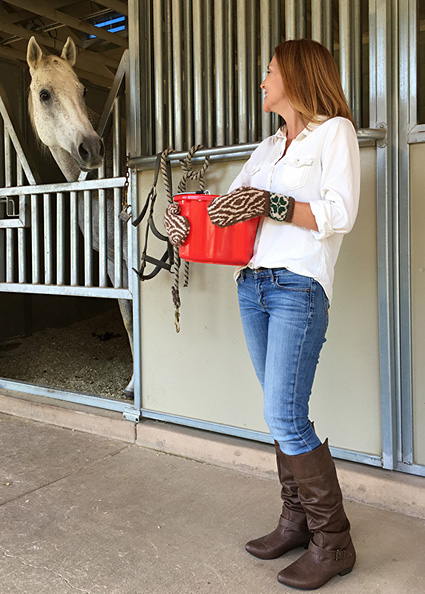

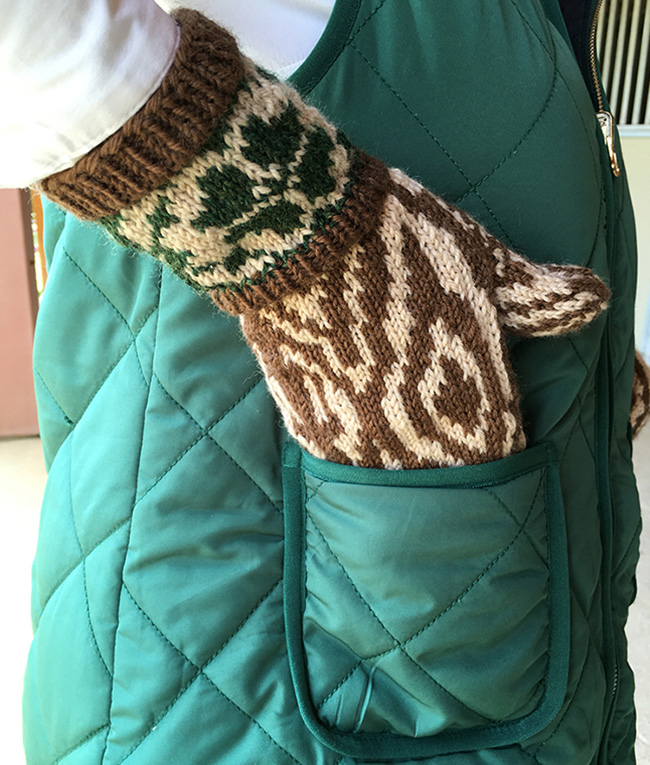
Some people have all the luck. And their hands are toasty warm, too. Perhaps these mittens are to blame! When you wear a pair of Superstition mittens, you have the freedom to “knock on wood” wherever you may be. No trees required, just close your fist and tap these wood grain mitts on the nearest surface to summon your own personal woodland sprite. Not confident that that will do the trick? Give the set of four-leaf clovers on your wrists a pluck for that extra boost of good fortune.
Whatever the situation, knit these up and good luck is sure to follow. Fingers crossed!
 model: Lynn Dubenko, Susan Vogel
photos: Kate Scalzo
SIZE
S[M, L]
FINISHED MEASUREMENTS
Hand circumference: 7[8, 9] inches
Length of the mittens: 9.5[10.75, 12] inches
Choose a size as close as possible to your actual hand circumference
MATERIALS
Yarn
Knit Picks Wool of the Andes Sport [100% wool; 137yd/m per 50g skein]
![]() [MC] Chestnut; 1 skein
[MC] Chestnut; 1 skein
![]() [CC1] Oyster Heather; 1 skein
[CC1] Oyster Heather; 1 skein
![]() [CC2] Forest Heather; 1 skein
[CC2] Forest Heather; 1 skein
Recommended needle size
[always use a needle size that gives you the gauge listed below - every knitter's gauge is unique]
![]() US #2/2.75mm needles for working small circumference in the round
US #2/2.75mm needles for working small circumference in the round
Notions
![]() yarn needle
yarn needle
![]() stitch markers
stitch markers
![]() scrap yarn – about 12 inches/30cm, smooth, in a contrasting color
scrap yarn – about 12 inches/30cm, smooth, in a contrasting color
GAUGE
30 sts/32 rounds = 4 inches/10cm in stranded colorwork
28.5 sts/36.5 rounds = 4 inches/10cm is stockinette stitch
PATTERN NOTES
[Knitty's list of standard abbreviations and techniques can be found here.]
Stranding: As with all stranded colorwork, be mindful of your floats in the back. You want your fabric to be smooth and to avoid awkward pulling from too-short floats. If I have a float that is longer than 5 sts, I like to twist my working yarns about halfway through the float to keep them close together. This results in a much neater fabric and reduces the possibility of fingers or jewelry snagging the yarn when donning the mitten. If you’re finished knitting and still have concerns about snagging your fingers on color work floats when putting the mittens on, you may sew particularly long floats down on the wrong side using waste yarn or a yarn end that you’re currently sewing into your mitten anyway.
Kitchener Stitch:
Instructions for grafting can be found here.
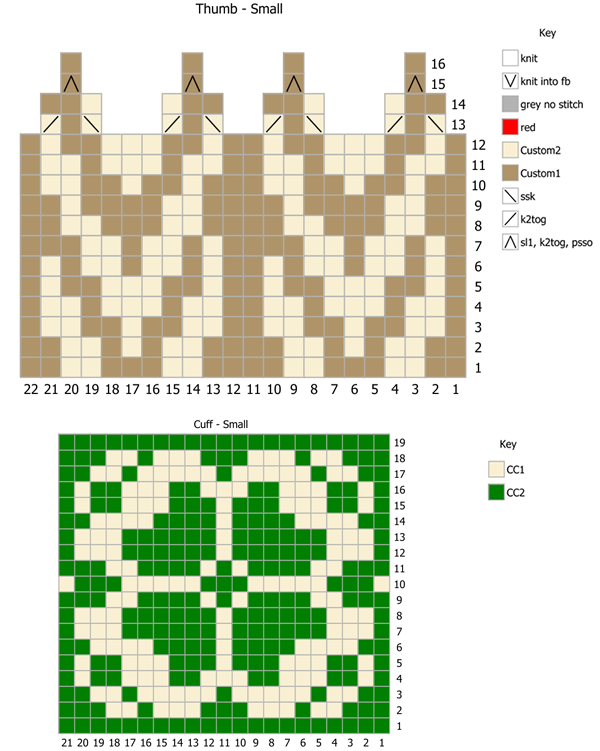
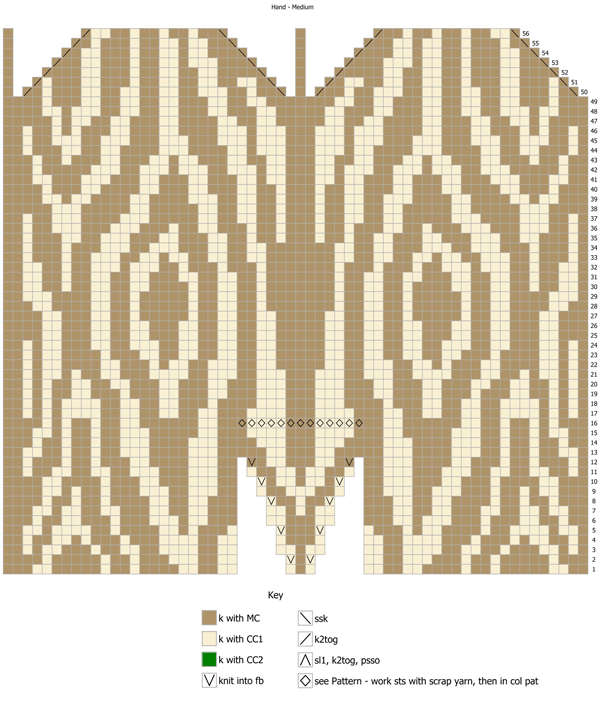
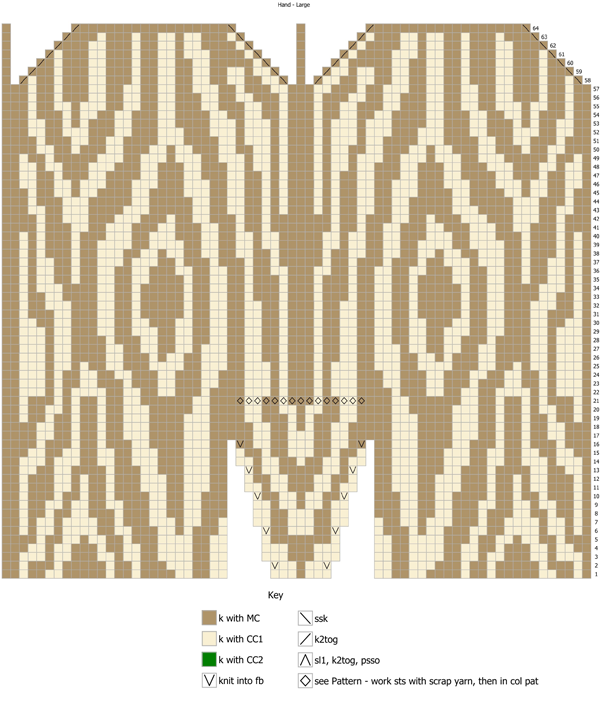
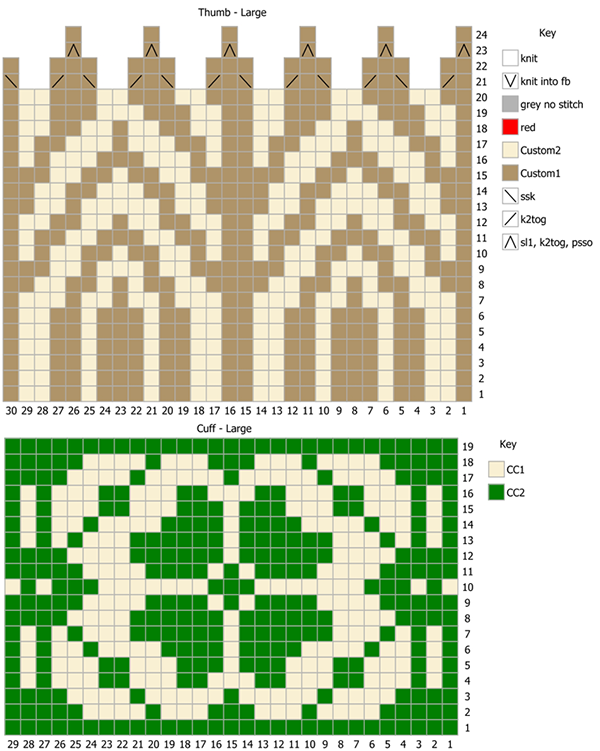
CHARTS
Sm Hand | Sm Cuff/Thumb | Med Hand | Med Cuff/Thumb | Lg Hand | Lg Cuff/ Thumb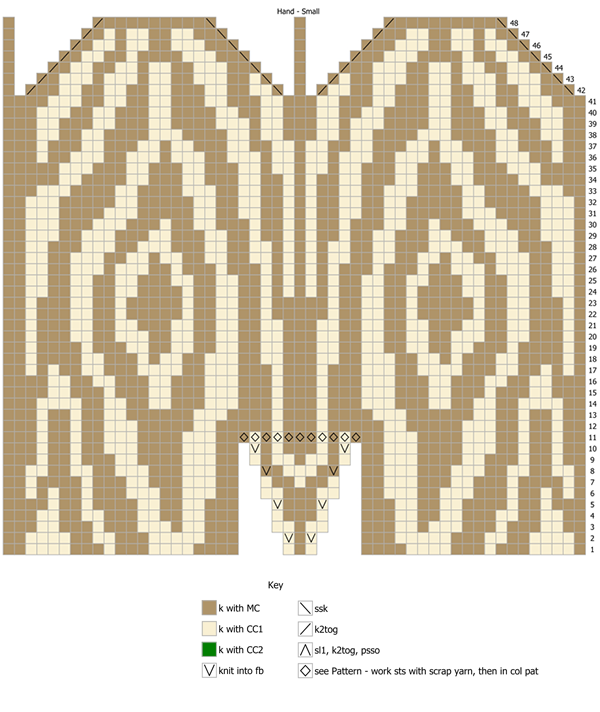
DIRECTIONS
Using MC, CO 42[50, 58] sts. Distribute sts across needle as you prefer and join for working in the round.
Ribbing round: [K1, p1] around.
Work ribbing as set for 4[6, 8] rounds total.
Join CC2 and knit 1 round.
Join CC1 and work appropriate size Cuff chart twice around.
Work as set until Cuff chart complete.
Using MC only, work Ribbing as before for 4[6, 8] rounds.
Work appropriate size Hand Chart across, working increases as indicated. On round 11[16, 21] ,
work the red stitches in waste yarn, slip them back to the left needle and work them again in pattern as per chart. This will be the hole for your thumb.
When Hand Chart complete, 24[32, 40] sts rem. Place first 12[16, 20] sts on one needle and the remaining 12[16, 20] sts on another. Cut yarn, leaving a 12 inch/30cm tail. Graft closed.
Thumb
Carefully remove scrap yarn, placing exposed stitches both above and below on your needles. 11[13, 15] stitches exposed, so there should be 22[26, 30] sts total on your needles.
Note: After picking up the stitches for the thumb and removing the waste yarn, you may experience some frustration with unruly stitches that originated from floated strands of yarn. This is likely to occur on the top set of stitches, as opposed to the bottom. I suggest twisting those stitches before working them in the round. Take an empty needle and slip the top set onto to the empty needle. When you reach one of the loose stitches, slip your needle around the back of the stitch and bring it through to the front to twist it, then slip off the left hand needle. Repeat until you have successfully adjusted the top set of thumb stitches. See this video for a demonstration.
Distribute sts across needles as you prefer, noting that start of round is at the first stitch on the lower side. Rejoin MC and CC1.
Work Thumb chart around.
When Thumb chart complete, 4[6, 6] sts rem.
Cut yarn, leaving a 12 inch/30cm tail, thread onto yarn tail and draw through final sts to close.
FINISHING
Block and weave in ends.
ABOUT THE DESIGNER
 Kate is an east coaster in southern California, knitting her way to sanity while raising two young gentlemen still in diapers. Formerly a museum collections specialist and exhibit designer with degrees in anthropology, Kate likes her knitting to have both function and personality.
You can find her here.
Pattern & images © 2016 Kate Scalzo. Contact Kate