


Vinculum, a free knitting pattern from Knitty.com. Free knitting pattern for a top-down richly cabled sock.
INTRODUCTION
Vinculum

Vinculum
noun, plural vincula
1. a bond signifying union or unity; tie.
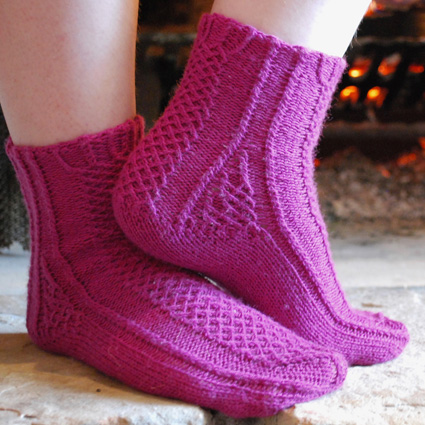
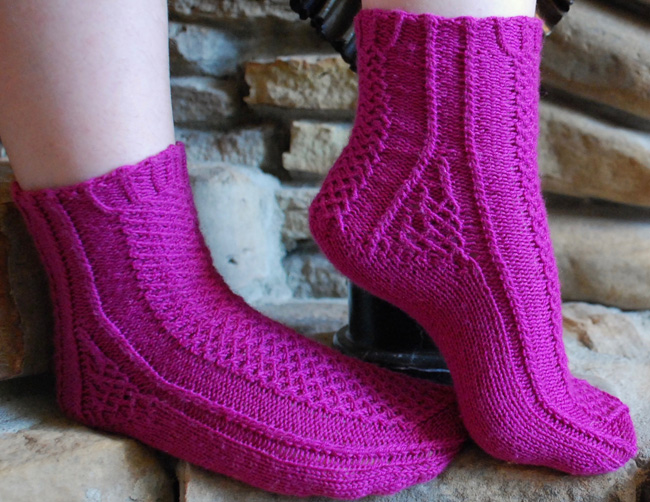
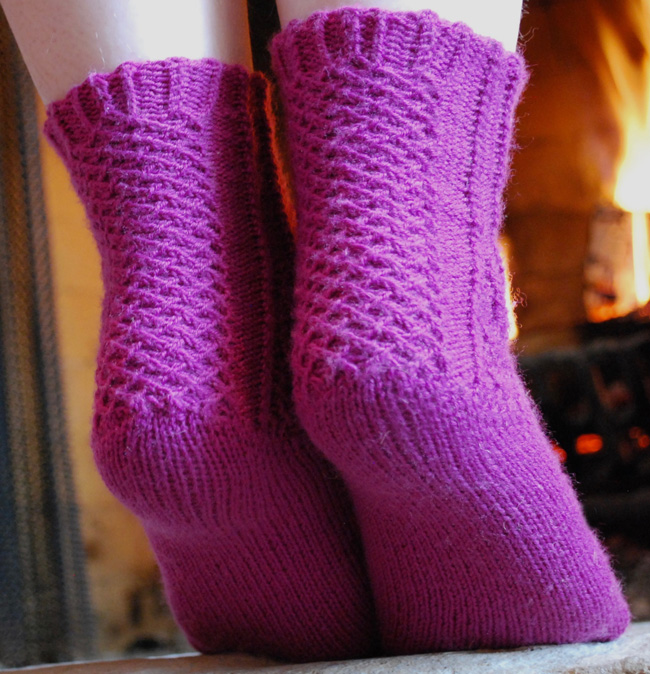
Sometimes you just need cables in your life — hundreds and hundreds of teeny, tiny, twisty cables. If you too sometimes feel a need to twist and tie stitches together, these are the socks for you.
Vinculum are knit top down with a strong heel. The strong heel allows you to carry the cables all the way down to the heel turn without ever having to cable on the wrong side of your knitting. It also allows for a rather nifty cabled gusset.
 photos: Suzanne Menzel


SIZE
Women’s XS[S, M, L, XL]
shown in size M
FINISHED MEASUREMENTS
Foot circumference: 6.5[7, 7.5, 8, 8.5] inches/ 7[7.5, 8, 8.5, 9] inches/ 17[18, 19, 20, 22] cm
Choose a size with about half an inch/1cm of negative ease.
MATERIALS
Yarn
![]() Cascade Yarns Heritage Solids [75% Merino, 25% Nylon; 437 yd/400m per 3.53 oz/100 g skein]; color: Raspberry; 1 skein
Cascade Yarns Heritage Solids [75% Merino, 25% Nylon; 437 yd/400m per 3.53 oz/100 g skein]; color: Raspberry; 1 skein
Recommended needle size
[always use a needle size that gives you the gauge listed below - every knitter's gauge is unique]
![]() US#1.5/2.5mm needles for small circumference in the round – DPNs, 1 long circular or 2 short circulars
US#1.5/2.5mm needles for small circumference in the round – DPNs, 1 long circular or 2 short circulars
Notions
![]() markers
markers
![]() cable needle
cable needle
![]() yarn needle
yarn needle
GAUGE
36 sts/52 rounds = 4 inches/10cm in stockinette stitch
PATTERN NOTES
[Knitty's list of standard abbreviations and techniques can be found here.]
Instructions for Kitchener stitch/grafting can be found here.
1/1LT: Slip 1 st to cable needle and hold in front of work, k1tbl, then k1tbl from cable needle
1/1RT: Slip 1 st to cable needle and hold in back of work, k1tbl, then k1tbl from cable needle
1/1LPT: Slip 1 st to cable needle and hold in front of work, p1, then k1tbl from cable needle
1/1RPT: Slip 1 st to cable needle and hold in back of work, k1tbl, then p1 from cable needle
M1: Insert left needle, from front to back, under the horizontal strand which lies between the stitch just knit, and the following stitch; then knit into the back of this loop. 1 stitch increased.
M1p: Insert left needle, from front to back, under the horizontal strand which lies between the stitch just knit, and the following stitch; then purl into the back of this loop. 1 stitch increased.
CHARTS
All charts
All charts updated June 20/17
DIRECTIONS
Cuff
CO 56[56, 60, 64, 68] sts. Distribute sts across needles as you prefer and join for working in the round.
Cuff Round: Work Cuff chart twice around.
Leg
Leg round: Work Main chart for appropriate size twice around. Work as set until leg is desired length.
Gusset
Work as set until you have completed row 24[26, 28, 30, 32] of the Gusset charts. 80[86, 92, 98, 104] stitches total – 12[13, 14, 15, 16] gusset sts on each side.
Heel Turn (both socks):
Heel Turn (All Sizes):
Row 1 [RS]: K 27[29, 31, 33, 35] , ssk, k1, turn.
Row 2 [WS]: Sl 1, p3, p2tog, p1, turn.
Row 3 [RS]: Sl 1, k4, ssk, k1, turn.
Row 4 [WS]: Sl 1, p5, p2tog, p1, turn.
Row 5 [RS]: Sl 1, k6, ssk, k1, turn.
Row 6 [WS]: Sl 1, p7, p2tog, p1, turn.
Row 7 [RS]: Sl 1, k8, ssk, k1, turn.
Row 8 [WS]: Sl 1, p9, p2tog, p1, turn.
Row 9 [RS]: Sl 1, k10, ssk, k1, turn.
Row 10 [WS]: Sl 1, p11, p2tog, p1, turn.
Row 11 [RS]: Sl 1, k12, ssk, k1, turn.
Row 12 [WS]: Sl 1, p13, p2tog, p1, turn.
Row 13 [RS]: Sl 1, k14, ssk, k1, turn.
Row 14 [WS]: Sl 1, p15, p2tog, p1, turn.
Row 15 [RS]: Sl 1, k16, ssk, k1, turn.
Row 16 [WS]: Sl 1, p17, p2tog, p1, turn.
Row 17 [RS]: Sl 1, k18, ssk, k1, turn.
Row 18 [WS]: Sl 1, p19, p2tog, p1, turn.
Row 19 [RS]: Sl 1, k20, ssk, k1, turn.
Row 20 [WS]: Sl 1, p21, p2tog, p1, turn.
Row 21 [RS]: Sl 1, k22, ssk, k1, turn.
Row 22 [WS]: Sl 1, p23, p2tog, p1, turn.
Row 23 [RS]: Sl 1, k24, ssk, k1, turn.
Row 24 [WS]: Sl 1, p25, p2tog, p1, turn.
Size XS stop here. 28 sts rem on heel.
Row 25 [RS]: Sl 1, k26, ssk, k1, turn.
Row 26 [WS]: Sl 1, p27, p2tog, p1, turn.
Size S stop here. 30 sts rem on heel.
Row 27 [RS]: Sl 1, k28, ssk, k1, turn.
Row 28 [WS]: Sl 1, p29, p2tog, p1, turn.
Size M stop here. 32 sts rem on heel.
Row 29 [RS]: Sl 1, k30, ssk, k1, turn.
Row 30 [WS]: Sl 1, p31, p2tog, p1, turn.
Size L stop here. 34 sts rem on heel.
Row 31 [RS]: Sl 1, k32, ssk, k1, turn.
Row 32 [WS]: Sl 1, p33, p2tog, p1, turn.
Size XL stop here. 36 sts rem on heel.
All sizes:
Final heel turn row [RS]: Sl1, k2tog, 22[24, 26, 28, 30] sts, ssk, k1. 54[58, 62, 66, 70] sts. 28[30, 32, 34, 36] sts on instep, 26[28, 30, 32, 34] sts on sole.
At this point you will resume working in the round.
Foot
Foot round: Work Main chart as set across first 28[30, 32, 34, 36] sts of round; k to end of round.
Work as set until sock foot is 2 inches short of desired finished length, ending with Row 3 of the main chart.
Toe
Toe round 1: Work Toe Chart 1 across instep; k1, ssk, k to 3 sts before end of round, k2tog, k1. 4 sts decreased.
Toe round 2: Work Toe Chart 1 across instep; k to end of round.
Work as set until you have complete 8 rows of Toe Chart 1. 38[42, 46, 46, 50] sts rem.
Next round: Work Toe Chart 1 across instep; k1, ssk, k to 3 sts before end of round, k2tog, k1. 4 sts decreased.
Continue as set, working decreases on sole every round, until Toe chart row 12 is complete. 22[26, 30, 34, 38] sts rem.
Sizes XS, M, XL only:
Next round: Work Toe Chart 2A across instep starting at round 5[-, 3, -, 1]; k1, ssk, k to 3 sts before end of round, k2tog, k1. 4 sts decreased.
Sizes S, L only:
Next round: Work Toe Chart 2B across instep starting at round -[3, -, 1, -]; k1, ssk, k to 3 sts before end of round, k2tog, k1. 4 sts decreased.
Both sizes: Work as set until Toe Chart 2A/B is complete. 12 sts rem.
FINISHING
Close toe with Kitchener stitch. Block and weave in ends.
ABOUT THE DESIGNER
 Maggie Menzel sometimes has a hard time believing that people allow her to make animated films and write knitting patterns for a living. Her dream is to one day combine the two into a wooly cinematic adventure.
Find her here.
Pattern & images © 2017 Maggie Menzel. Contact Maggie