  by
Lizzi Jennings by
Lizzi Jennings 
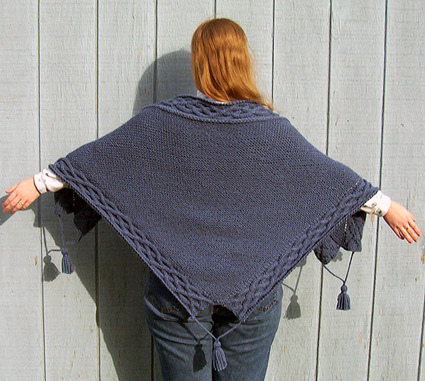
This is what happened when I felt
like knitting an aran and a shawl at the same time!
The shawl is knit from the bottom
up, doing the two side borders along with the body,
then the third border is sideways-knit across the
top.
The corners are tasselled both because
I like the look and because I'm terrible at charting
out mitered corners! |
|  model: Lizzi
Jennings
photo: Martha
Jennings
model: Lizzi
Jennings
photo: Martha
Jennings |
|
| One |
| |
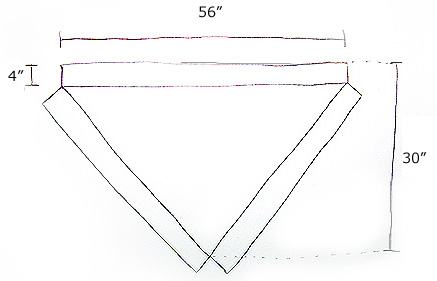
Width [across
top cable border]: 56 inches/142cm
Depth [not including tassel]: 30 inches/76cm
Border width: 4 inches/10cm |
| |
| |
|
[MC] Caron Simply Soft [100% acrylic; 330 yds/6oz.
skein]; color: 9710; 3 skeins
1 29-inch [or longer] US #9/5.5mm circular needle
Cable needle
One crochet hook, size G |
| |
| 14 sts and 28 rows
= 4" in garter stitch
Notes on yarn substitution:
If you substitute wool or some other natural fiber
for acrylic, it is important that you match the gauge
with a washed and blocked swatch if you want precisely
these proportions, as wool tends to grow in the washing
process while acrylic does not. If you match the gauge
without washing your swatch first, then your finished
shawl will likely be somewhat larger than the given
measurements. |
| |
SPECIAL ABBREVIATIONS
C2L [cross 2 left]: slip 2 sts onto
cable needle [cn], hold in front of work, p1, k2 from
cn.
C2R [cross 2 right]: slip 1 st onto
cn, hold in back of work, k2, p1 from cn.
FC4 [front cross 4]: slip 2 sts
onto cn, hold in front of work, k2, k2 from cn.
BC4 [back cross 4]: slips 2 sts
onto cn, hold in back of work, k2, k2 from cn.
CABLE PATTERN [over 18 sts]
Row 1 [RS]: p1, k2, p4, BC4, p4,
k2, p1.
Row 2 and all other WS rows: k all knit sts and p
all purl sts.
Row 3: p1, C2L, p2, C2R, C2L, p2, C2R, p1.
Row 5: p2, C2L, C2R, p2, C2L, C2R, p2.
Row 7: p3, FC4, p4, BC4, p3.
Row 9: p2, C2R, C2L, p2, C2R, C2L, p2.
Row 11: p1, C2R, p2, C2L, C2R, p2, C2L, p1.
Row 13: p1, k2, p4, FC4, p4, k2, p1.
Row 15: as row 3.
Row 17: as row 5.
Row 19: p3, BC4, p4, FC4, p3.
Row 21: as row 9.
Row 23: as row 11.
Row 24: k all knit sts and p all purl sts.
Repeat Rows 1-24 for pattern. |
CO 33 sts.
K 4 rows.
Foundation row [RS]: k2, *p1,
inc 1 by knitting into front
and back of next st, p4, inc 1 twice, p4, inc 1,
p1,* YO, k1, YO, rep * to *, end k2.
Next row [WS]: k2, *k1, p2, k4,
p4, k4, p2, k1*, k3, rep * to *, end k2.
Begin cable pattern [cab patt]
row [RS]: k2, work row 1 of cab patt, YO, k3, YO,
work row 1 of cab patt again, end k2.
Next row [WS]: k2, work row 2
of cab patt, k5, work row 2 of cab patt again, end
k2.
Continue working outside 2 sts
for garter st selvedge on both edges. Inside that,
work the 18 st cab patt rows in sequence as described
above.
Between the 20 stitch wide borders
on either side, increase 2 sts on every RS row.
[eg. k2, work 18 sts in cab patt, YO, k across to
last 20 sts, YO, work 18 sts in cab patt, k2]. Work
borders in cab patt on WS rows, but knit
across central triangular panel without making increases.
Work until you have completed
rows 1-24 of the cab patt a total of 7 times, then
work rows 1 and 2 once more. RS should be facing
for next row [171 sts in central panel; 211 total
sts]. If you're off by a few stitches, increase
or decrease as necessary in next row.
Next row [RS]: k2, *k1, k2tog,
k4, k2tog twice, k4, k2tog, k1*, k across center
section [171 stitches], rep * to *, end k2.
K 1 row.
End Cable Bands
Row 1: BO 16, k across rem sts.
Row 2: BO 16, k across rem sts,
DO NOT TURN.
Begin Top Cable Border
Without breaking yarn, CO 19 sts.
Turn.
Foundation Row 1 [RS]: k19; turn,
leaving rem sts unworked.
Foundation Row 2 [WS]: k19.
Foundation Row 3 [RS]: k2, p1,
m1, p4, m1 twice, p4, ml, p1, YO, ssk, knit rem
border st tog with 1 st from the body of the shawl
[k2tog].
Foundation row 4 [WS]: sl 1, p2,
work row 24 of cab patt across next 18 sts, end
k2.
Double Dec Row[RS]: k2, work row
1 of cab patt, YO, ssk, k rem border st tog with
2 sts from shawl body [k3tog].
Border Row 1, and all other WS
rows: sl 1, p2, work row 2 [or appropriate row]
of cab patt, end k2.
Border Row 2 [Dec Row]: k2, work
row 3 [or appropriate row] of cab patt, YO, ssk,
k2tog [1 border st and 1 shawl body st].
Continue working Work these 24
border rows a total of 13 times, always working
Border Rows 1 & 2 across shawl. Every 24th row,
Work the Double Dec Row [k3tog] instead of Border
Row 2 [k2tog]. There are 25 sts remaining [2 body
sts, 23 border sts]. Work Border Row 2 once more
[1 body st remaining].
Next row [WS]: sl 1, k3, k2tog,
k4, k2tog twice, k4, k2tog, k3.
Next row [RS]: k17, k2tog [all
body sts bound off by border].
K 1 row. BO all sts, leaving a
6 inch-tail. There will be a small gap where the
final BO row doesn't attach to the body, because
there are no sts left to work together Ü Eliminate
this gap by running the tail through the top of
the last bound-off st of the left cable band, then
back again through the final bound-off st of the
top border, before weaving the end in.
|
|
Note: If substituting
wool or another natural fiber for acrylic, I recommend
blocking the shawl before making and attaching the
tassels, as blocking the piece with the tassels in
place may alter the hang of the tassels.
Tassels
I wound the yarn 15 times lengthwise
around a videocassette, then cut it at both ends to
get 30 strands, which I folded in half to make one
tassel. If you prefer longer or shorter tassels, adjust
the length of the strands accordingly; if you want
a thinner or fatter tassel, use fewer or more strands.
Attaching tassels
This is a matter of judgment and
your crochet tension, so don°t be afraid to undo your
work and try again if the tassel doesn°t hang well.
Lower point: Join yarn to one of
the outer corners of the bands, chain for 4 inches,
work one sc around the yarn holding the top of the
tassel together, chain for 4 inches, join with an
sc to opposite outer corner.
Left and right points: work the
same as lower point, but for 4.5 inches instead of
4 inches.
Weave in all ends.
|
 Lizzi
is just beginning to dip her toes in the realm of
designing, after being inspired by patterns from her
fellow bloggers and knitting-forum members. Lizzi
is just beginning to dip her toes in the realm of
designing, after being inspired by patterns from her
fellow bloggers and knitting-forum members.
She currently lives in Michigan,
where the winter cold has had her knitting since the
age of eight.
You can visit her at her weblog,
where she chronicles her addiction to knitting, her
constant frustration with working in the fast-food
industry - which she hopes to get out of soon! - and
her love of sci-fi/fantasy books and movies. But mostly
the addiction to knitting.
|
| Pattern & images
© 2003 Elizabeth Jennings. Contact Lizzi. |
|