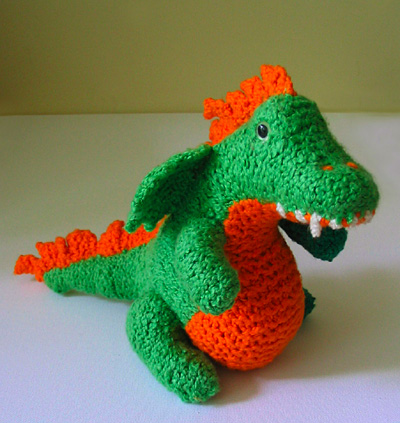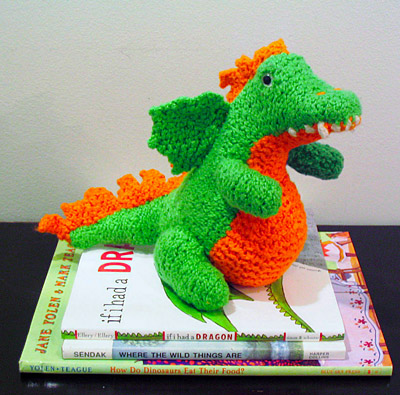
 This
project is worked with 2 strands of yarn held
together throughout.
Tail, Back, and Head
Note: While this piece and the front
and hind legs are being worked, the smooth,
knit side of the stockinette st fabric will
be considered the RS. When sewing the pieces
together, this will become the WS, and the
bumpy, purl side of the fabric will face out.
Tail
Using two strands of MC held together, CO
6 sts.
Rows 1-5: Beginning with a p row,
work 5 rows in stockinette st.
Row 6 [RS]: [K1, kfb] 3 times.
9 sts.
Rows 7-11: Work in stockinette
st.
Row 12 [RS]: [K2, kfb] 3 times.
12 sts.
Rows 13-15: Work in stockinette
st.
Row 16 [RS]: [K3, kfb] 3 times. 15 sts.
Rows 17-19: Work in stockinette st.
Row 20 [RS]: [K4, kfb] 3 times. 18 sts.
Rows 21-23: Work in stockinette st.
Row 24 [RS]: [K5, kfb] 3 times. 21 sts.
Row
25 [WS]: P all sts.
Shape Hip
Row 26: K4, w&t. P to end.
Row 27: K6, w&t. P to end.
Row 28: K8, w&t. P to end.
Row 29 [RS]: K all sts
Row 30: P4, w&t. K to end
Row 31: P6, w&t. K to end
Row 32: P8, w&t. K to end
Row 33 [WS]: P all sts.
Back
Rows 34-43: work in stockinette st.
Decrease for Neck
Row 44 [RS]: K2, ssk, k13, k2tog,
k2. 19 sts
Rows 45-49: Work in stockinette st
Row 50 [RS]: K2, ssk, k11, k2tog,
k2. 17 sts
Rows 51-53: Work in stockinette st
Row 54 [RS]: K2, ssk, k9, k2tog,
k2. 15 sts
Row 55 [WS]: P all sts.
Shape Neck
Row 56: K9, w&t; p3, w&t;
k5, w&t; p7, w&t; k9, w&t; p11,
w&t. K to end
Row 57 [WS]: P all sts

 Head
Head
Row 58 [RS]: K5, kfb, k3, kfb, k5.
17 sts
Row 59 [WS]: P5, [pfb] twice, p3,
[pfb] twice, p5. 21 sts
Row 60: K12, w&t; p3, w&t;
k5, w&t; p7, w&t; k9, w&t; p11,
w&t. K to end
Row 61 [WS]: P all sts
Row 62 [RS]: K5, ssk, k2tog, k3,
ssk, k2tog, k5. 17 sts
Rows 63-65: Work in stockinette st
Row 66 [RS]: K2, ssk, k9, k2tog,
k2. 15 sts
Row 67 [WS]: P all sts
Row 68 [RS]: K2, ssk, k7, k2tog,
k2. 13 sts
Row 69 [WS]: P all sts
Row 70 [RS]: [K1, k2tog] 4 times,
k1. 9 sts
Row 71 [WS]: [P1, p2tog] 3 times.
6 sts
Row 72 [RS]: [Sl 1, k2tog, psso]
twice. 2 sts
Break yarn, leaving a long tail; draw through
remaining 2 sts and pull tight
Belly and Chest
This piece and the wings are worked in
garter st, and as such have no RS or WS. However,
to help keep track of your place in the work,
a RS and WS have been designated. If desired,
use a safety pin to indicate the RS of your
work
Underside
Using 2 strands of CC held together, CO 3
sts
Row 1 [WS]: K all sts
Row 2 [RS]: K1, kfb, k1. 4 sts
Row 3 [WS]: K all sts
Row 4 [RS]: K1, [kfb] twice, k1.
6 sts
Row 5 [WS]: K all sts
Row 6 [RS]: K1, [kfb] 4 times, k1.
10 sts
Rows 7-9: K all sts
Row 10 [RS]: K4, kfb, k5. 11 sts
Row 11 [WS]: K all sts
Row 12 [RS]: [K1, kfb] twice, k3,
[k1, kfb] twice. 15 sts
Rows 13-15: K all sts
Row 16: K9, w&t; k3, w&t;
k5, w&t; k7, w&t. K to end
Row 17 [WS]: K all sts
Row 18 [RS]: K2, kfb, k9, kfb, k2.
17 sts
Row 19 [WS]: K all sts
Shape Belly
Row 20: K10, w&t; k3, w&t;
k5, w&t; k7, w&t. K to end
Row 21 [WS]: K all sts
Row 22: K10, w&t; k3, w&t;
k5, w&t; k7, w&t. K to end
Rows 23-29: K all sts
Row 30: K10, w&t; k3, w&t;
k5, w&t; k7, w&t. K to end
Row 31 [WS]: K all sts
Row 32 [RS]: K2, ssk, k9, k2tog,
k2. 15 sts
Row 33 [WS]: K all sts
Row 34 [RS]: K2, ssk, k7, k2tog,
k2. 13 sts
Row 35 [WS]: K all sts
Row 36 [RS]: K2, ssk, k5, k2tog,
k2. 11 sts
Row 37 [WS]: K all sts
Row 38 [RS]: K2, ssk, k3, k2tog,
k2. 9 sts
Row 39 [WS]: K all sts
Row 40 [RS]: K2, ssk, k1, k2tog,
k2. 7 sts
Row 41 [WS]: K all sts
Rows 42-57: K all sts
Row 58 [RS]: K2, sl 1, k2tog, psso,
k2. 5 sts
Rows 59-61: K all sts
Row 62 [RS]: [K1, kfb] twice, k1.
7 sts
Row 63-73: K all sts
Row 74 [RS]: K2, sl 1, k2tog, psso,
k2. 5 sts
Row 75 [WS]: K1, sl 1, k2tog, psso,
k1
BO remaining 3 sts.
Spines
Using 2 strands of CC held together, CO 2
sts
Small Spine
Row 1 [RS]: K2, CO 2 sts. 4 sts
Row 2 [WS]: K all sts
Row 3 [RS]: K4, CO 1 st. 5 sts
Row 4 [WS]: BO 3 sts, k to end. 2
sts
Rows 5-12: Work Rows 1-4
twice more. Total of 3 small spines made
Large Spine
Row 13 [RS]: K2, CO 2 sts. 4 sts
Row 14 [WS]: K all sts
Row 15 [RS]: K4, CO 2 sts. 6 sts
Row 16 [WS]: K all sts
Row 17 [RS]: K6, CO 1 st. 7 sts
Row 18 [WS]: BO 3 sts, k to end.
4 sts
Row 19 [RS]: K all sts
Row 20 [WS]: BO 2 sts, k to end.
2 sts
Rows 21-52: Work Rows 13-20 four
times more. Total of 5 large spines made
Corner Spine (Fits in small of Norberta's
back):
Row 53 [RS]: K all sts
Row 54 [WS]: K all sts
Row 55 [RS]: K2, CO 1 st. 3 sts
Row 56 [WS]: BO 1 st, k to end. 2
sts
Row 57 [RS]: K all sts
Row 58 [WS]: K all sts
Rows 59-82: Work Rows 13-20 three
times
Rows 83-90: Work Rows 1-4 twice
Tail Spike
Row 91 [RS]: K2, CO 4 sts. 6 sts
Row 92 [WS]: K all sts
Row 93 [RS]: K6, CO 1 st. 7 sts
Row 94 [WS]: BO 4 sts, k to end.
3 sts
Row 95 [RS]: K 1 row. BO all sts
Hind Legs (Make 2)
Note: The hind legs are worked partly
in stockinette st, and partly in garter st
Using two strands of MC held together, CO
6 sts
Row 1 [WS]: P all sts
Row 2 [RS]: [Kfb] 6 times. 12 sts
Rows 3-5: Work in stockinette st
Row 6 [RS]: K2, [kfb, k1] 4 times,
k2. 16 sts
Rows 7-11: Work in stockinette st
Row 12 [RS]: K7, [kfb] twice, k7.
18 sts
Row 13 [WS]: P all sts
Row 14 [RS]: K7, [kfb] 4 times, k7.
22 sts
Row 15 [WS]: P all sts
Row 16 [RS]: K7, [kfb, k1] 4 times,
k7. 26 sts
Rows 17-19: Work in stockinette st
Row 20 [RS]: K7, [ssk, k1] twice,
[k1, k2tog] twice, k7. 22 sts
Row 21 [WS]: K all sts
Row 22 [RS]: K7, [ssk] twice, [k2tog]
twice, k7. 18 sts
Row 23 [WS]: K all sts
Row 24 [RS]: K7, ssk, k2tog, k7.
16 sts
Row 25 [WS]: K all sts
Row 26 [RS]: K4, [ssk] twice, [k2tog]
twice, k4. 12 sts
Row 27 [WS]: K all sts
Row 28 [RS]: K2, [ssk] twice, [k2tog]
twice, k2. BO remaining 8 sts purlwise
Front Legs (Make 2)
Using 2 strands of MC held together, CO 12
sts
Beginning with a p row, work 15 rows in stockinette
st
BO all sts knitwise
Wings (Make 2)
Using 2 strands of MC held together, CO 10
sts.
Row 1 [RS]: K10, CO 1 st. 11 sts.
Row 2 [WS]: K11, CO 1 st. 12 sts
Row 3: K7, w&t, k to end, CO
1 st. 13 sts
Row 4 [RS]: BO 2 sts, k to end, CO
1 st. 12 sts
Row 5 [WS]: BO 1 st, k to end, CO
1 st
Row 6 [RS]: K all sts
Row 7: K4, w&t, k to end
Row 8: K8, w&t, k to end, CO
1 st. 13 sts
Row 9: BO 2 sts, k6 (7 sts on right
needle), w&t, k to end. 11 sts
Row 10 [WS]: BO 1 st, k to end. 10
sts
Row 11 [RS]: BO 4 sts, k to end.
6 sts
Row 12: K4, w&t, k to end, CO
1 st. 7 sts
BO all sts.

