I used to like row-by-row
instructions. They told me what stitches to
make, and I made them. It was very simple.
But then I bought a kit for a lace shawl,
and the directions came as charts. No problem,
I thought: I just covered up the rows I hadn't
made yet, and pretended that each row of the
chart was a set of instructions that someone
had written out in a strange language. Annoying,
but if I could learn what "k2tog"
meant, I could learn that "/" meant
the same thing.
And then I realized what
I was missing.
With row-by-row instructions
for, say, seed stitch, you alternate knits
and purls. But if you make one mistake, then
suddenly all of your knitting is off, and
half of a row will be worked in broken ribbing
instead. On the other hand, when presented
with a chart of seed stitch, I know to work
knit stitches into purl stitches only. I can
catch my mistakes, quickly, because the chart
will tell me where my next stitch is to be
worked.
At this point, I'm in love
with charts; for any kind of complicated pattern,
I'd rather work from a chart than from written
instructions. Unfortunately, I keep coming
across patterns with no charts. So I started
making my own. And here is what I know.
Everyone means the same
thing by "k2tog," and every pattern
writer uses "k2tog" as an abbreviation
for "knit the next two stitches together."
Unfortunately, charts are nowhere near as
simple. Different people use different symbols
to mean the same stitch, or use the same symbol
to mean different stitches. Sometimes, there's
a good reason for this.
In lace patterns, the important
point is the gaps and the decreases; the symbols
for plain knit and purl both need to be small
and unobtrusive. In textured patterns, on
the other hand, the whole point is the contrast
between knit and purl; hence, they have to
look very different.
And sometimes there's no
reason for symbols in two charts being different.
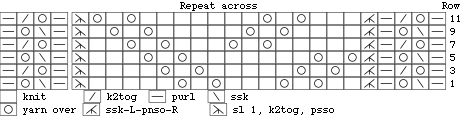
As should be obvious from
all of this, it is absolutely essential that
you include a key with your pattern or chart,
to tell your readers what you intend a dot
or slash to mean.
Here's a listing of some
common symbols that I've seen in American
patterns -- in some cases, different publications
use a different symbol, so you'll see several
for each category. While there's no logical
reason why you couldn't use, for example,
an ampersand (&) to mean k2tog, most readers
will find it easier to read your chart if
your symbols look like symbols they've seen
before.

Knit one stitch

Purl one stitch

No stitch. In some patterns, using this symbol
properly is essential.

Yarn over or make a bobble

Knit two stitches together

Any left-sloping single decrease: ssk, k2tog
through back loop, or slip one, knit one,
psso.

A left-sloping double decrease, such as k3tog
through back loop.

A double decrease that doesn't slope very
much to either side.

A right-sloping double decrease, such as k3tog.

Cables

My first lace project was
the Petal Sonnet shawl from Blackberry Ridge
designs. In the shawl is a large water lily
pattern, designed specifically for this shawl
by Hazel Carter. To get the look she wanted,
she had to let her petals flare out drastically.
This meant that she had to change the stitch
count of her pattern from row to row. To chart
this, she had to include a lot of blank squares
in her chart. Because the spaces were distributed
irregularly, the chart was hard to read: I
had to treat it as row-by-row instructions,
which meant (for me) that the main point of
using a chart was lost.
Most patterns do keep the
stitch count consistent from row, but even
in this case, blank squares at the edges may
be necessary. A triangular shawl will need
to have a steadily-increasing number of blank
squares on the edges; an edging may need blank
squares added to its outside edge to keep
the inside edge straight.
Cabled or lace patterns
which increase or decrease the stitch count
will need rows of blank spaces inside the
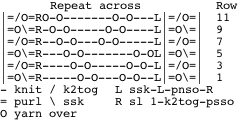
chart, not at the edges. An excellent example
is the Twining
Trees chart. Charts of garments which
taper or flare may also need spaces in the
middle of the chart.
To figure out where to put
blank squares, remember that a chart should
show roughly which stitches are worked into
which other stitches. Add spaces so that symbols
in later rows end up above, or at least near,
the symbols for the stitches into which they
are actually worked.
A chart should include all
of the necessary information, but does not
need to include absolutely everything. There
are a number of things that can be left out.
One example is repeats:
the charted equivalent of "*k2, p2, repeat
from * to end." To get more mileage from
repeats, don't be afraid to use symbols that
change meaning. Consider line 7 of Cozy.
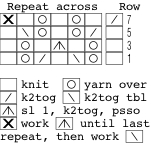
The last stitch in each
pattern repeat is a double decrease, except
for the final repeat, where the last stitch
is a single decrease. Rather than writing
out the pattern twice to show this (nearly
doubling the width of the chart), it is perfectly
fine to use one symbol to mean a double decrease
in internal repeats and a single decrease
in the last one.
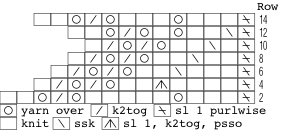
Also, you don't need to
show every row. If all even rows can be summarized
by quick directions, leave them out of the
chart. Put them in the pattern or next to
the chart. If you do it, bear in mind that
your chart might start to look squashed compared
to your knitting. To fix this, if you can,
make the cells of your chart twice as tall
as they normally would be.
Well, we know what we want
our chart symbols to look like. We know how
to arrange blank spaces, and we know what
we can leave out of a chart. How do we make
a chart?
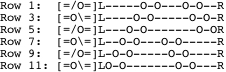
My favorite tool for making
charts is a word processor: I just type my
charts in, one row per line. If you use a
fixed-width font such as Monaco or Courier,
your characters will line up into neat grids
on their own. Alternatively, if you like the
look of charts with a lot of space, you can
put a tab between every pair of symbols to
line them up.
If you don't mind your charts
reading from the top left, you can convert
written patterns to charts fairly quickly
using the "find and replace" function.
I've done this with charts as complicated
as Mon
Petit Chou, with very little editing by
hand afterwards. This method has the most
options for publishing on the web. You can
display your chart as text, since that's all
it is. Alternatively, you can take a screen
picture as for a spreadsheet. Also, most drawing
programs (MS Paint, AppleWorks, and Adobe
Photoshop, for example) will let you type
in your chart and then save it as a JPEG or
GIF. This is especially useful if you use
unusual fonts.
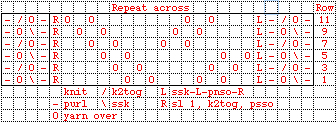
You can find symbols that
look like many of the standard symbols on
the keyboard: dashes, Os, slashes in both
directions, blank spaces. However, you will
not find any letters that resemble the symbols
for double decreases or cables.
You can deal with this two
ways. You can use letters instead of symbols,
or you can download a font with the symbols
you need already in it. For typed charts,
I recommend using David
Xenakis's fonts. Simply download the font
and install on your computer. About.com has
tutorials for installing fonts on Windows
and on Macintosh.
Another way to make a chart
on the computer is to use a spreadsheet: one
symbol per cell, with cells scaled appropriately.
You can even adjust the cell dimensions to
be the same shape as your stitches.
Spreadsheets are easy to
edit. You can insert rows or columns, or copy
and paste large rectangular chunks of stitches.
Inserting a new column into a word processor
can be annoying.
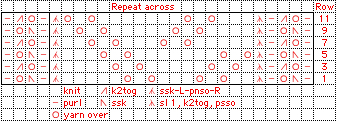
As with typed charts, you
can make your charts look better by using
a better font. In a spreadsheet, I like to
use the font from Aire
River Design. To turn your spreadsheet
into a JPEG image file suitable for web publication,
your best option is to take a screen picture.
Your computer may have come with a program
which will take screen pictures. If not, a
Google search for "screen capture"
and your computer's operating system will
probably yield a shareware or freeware program
which will take screen pictures.
When all else fails, go
back to a good old pencil and a piece of paper.
This method gives the pattern writer the most
control over the finished result. You can
use any symbols you can draw to represent
your stitches. If you're charting a pattern
that uses a lot of unusual stitches, this
can be very useful. These charts can be done
easily on ordinary graph paper.
However, if you want your
chart to look a bit more like the finished
product, you can also print out some knitter's
graph paper. This is graph paper which has
been stretched out so that the boxes are the
actual proportions of knit stitches.
This
page will make graph paper to fit your
gauge. Unfortunately, the only way to make
a paper chart into a digital chart is a scanner.
Either you have one and can do it, or you
don't, and can't. Also, depending on your
handwriting, your readers might be grateful
for a typed chart.
However you make a chart,
anyone following your design who likes charts
will be grateful that you did.