Every single knitting
project involves finding something to do with
yarn tails. Even the smallest project that
only uses one ball of yarn leaves a tail at
both ends from casting on and binding off.
With larger projects, every new ball of yarn
or [heaven forbid] knot in the middle of a
ball leaves two new ends to deal with. Add
in color changes and fiddly bits like neck
shaping and sock heels and any one project
can have a dozen little pieces floating around
on the wrong side. What shall we do?
When I first started knitting
and was ready to "weave in all ends",
I threaded my trusty yarn needle and, catching
a few purl bumps, ran the yarn end across
the wrong side on a diagonal. Problem was
that diagonal line wound up showing through
on the right side a little too often --
not a pretty sight.
Fortunately I came across
an article in Cast On magazine in the spring
of 2003 about using a duplicate stitch on
the wrong side to weave in yarn ends and
had a "aha!" moment. It's a marvelous
way to deal with this universal dilemma
-- the yarn end is nearly invisible on the
right side of the work and, just as importantly,
stays where you put it, proving once again
that you're the one in charge of your knitting.
First let me just say
a few words about what to do when you come
to the end of one ball of yarn and are going
to start working with the next. What I do
-- and this under the influence of Elizabeth
Zimmerman in Knitting
Without Tears -- is work the next stitch
with both the old yarn and the new, held
together, leaving a 5-6 inch tail of both
yarn ends dangling.
On the next row, be very
sure to treat these two strands of yarn
as one stitch. No knots necessary and a
good thing, too, since everything out there
says to avoid them like the plague. Knots
have a terrible tendency to pop through
to the right side of the work when you're
least expecting it or leave an unseemly,
not to mention uncomfortable, lump. I have
yet to be troubled by a hole this way, especially
when the left over ends are secured as securely
as we're about to secure them.
But before the leave the
subject of knots...when you come across
one in the middle of a ball of yarn (and
is there anything more annoying?) untie
it or cut it out and treat the join as a
new ball of yarn. You'll be glad you did.
Now, moving on to securely
securing those yarn ends. First of all be
sure you've got a proper yarn needle, one
with a large eye and a not-too-sharp end
as you don't want to split the yarn as you
weave in ends. Have a nice sharp pair of
scissors on hand and a good light source
so you can see what's going on. Take a good
hard look at the "wrong" side
of your knitting, or, if it's reversible,
figure out which side you want to hide the
end on. Follow the yarn horizontally across
one row, noticing where the yarn travels
and how it connects to the rows above and
below. This is your guide for where to make
the yarn end travel. The wrong side of stockinette
stitch is the most straightforward for this
type of duplicate stitching (or at least
it is for me) so let's start with...
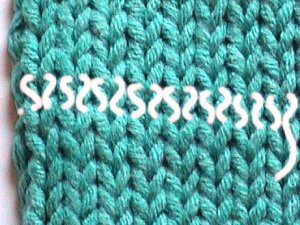
Reverse Stockinette

(By the way, the "yarn
end" has been digitally drawn onto
this and some of the following images to
more clearly illustrate the path of the
yarn.)
Thread the yarn end onto
your needle and guide it through the purl
bumps as shown, trying to match the tension
of the knitting as closely as possible.
I'm having a hard time trying to come up
with a way to describe this in writing except
to say that going through two purl bumps
at a time you'll be inserting the needle
on the diagonal first one way and then the
other. Do this for a couple of inches or
so and you'll have one seriously secure
piece of yarn -- in fact, I had a hard time
removing the ends from my sample pieces
when I was practicing. Cut the remaining
end with your scissors, leaving a short
tail on the wrong side. If it's a particularly
slippery yarn end you might want to double
back through the last two purl bumps and
leave a slightly longer tail.
Stockinette
The principle for stockinette
stitch is exactly the same -- following
the path the yarn takes across the row --
but instead of inserting the needle into
the bumps of purl stitches, you'll be inserting
the needle under the lower part of the V
created by the knit stitch on the row above...
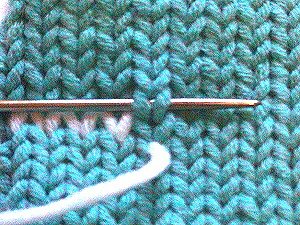
and the inverted V of
two adjacent stitches on the row below.
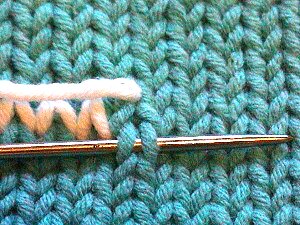
Again be sure to adjust
the tension of the duplicate stitching to
the tension of the knitting. The closer
you get, the more invisible the weaving
becomes.
Garter Stitch
Garter stitch is a bit
trickier than it would seem to be at first
glance. When the finished object is meant
to be reversible, such as a scarf or a dishcloth,
there is no "wrong side" in which
to hide the yarn ends so you'll have to
just pick a side at random. Fortunately
using this method means the ends behave
themselves very well and won't be waving
their little arms at innocent passers-by.
Look at your garter stitch
carefully. When it's just laying there,
it looks quite a bit like reverse stockinette
stitch, with purl bumps waiting around to
be used. And I must admit that sometimes
I treat garter stitch as reverse stockinette
stitch and simply weave the ends through
those purl bumps... one can't be a perfectionist
all the time. But we all know that garter
stitch isn't the same as reverse stockinette
stitch. Looking at garter stitch from one
side, stretched a bit so the rows are spread
apart, it reveals itself to be one row of
knitted Vs alternated with one row of purl
bumps.
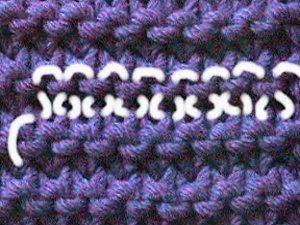
That means you'll be catching
one purl bump (as for reverse stockinette)
and then going through one V (as for stockinette
stitch) for each stitch across the row.
If you're having trouble "seeing"
the stitches, try pulling the rows apart
a bit by stretching it over your index finger.
As a final note, it must
be said that this method works best with
yarn that's worsted weight or thinner. If
you're working with a thick yarn, duplicate
stitch will add too much bulk and show itself.
If that's the case try this: split each
yarn tail in two and pull it gently apart
to the point from which it emerges from
the work. Release it and let it relax so
some of the excess twist comes out then
weave each in separately, moving to one
row above or below for the two extra ends.
References:
Knitting Without Tears by Elizabeth
Zimmerman
Those pesky yarn tails by Arenda
Holladay. Cast
On magazine, spring 2003.