|
| By Ariel Barton |
  It
started with The Lord of the Rings
-- specifically, all of the tree motifs on
Gondorian armor and clothing. I wanted a sweater
with a tree on it. Unfortunately,
the obvious way to get an image on a sweater
is through colorwork. I am terrible at colorwork.
So I gave up on that idea for a while. Then
I came across a twining trees pattern, and
I realized that I could do trees as cabled
patterns rather than as colorwork. It
started with The Lord of the Rings
-- specifically, all of the tree motifs on
Gondorian armor and clothing. I wanted a sweater
with a tree on it. Unfortunately,
the obvious way to get an image on a sweater
is through colorwork. I am terrible at colorwork.
So I gave up on that idea for a while. Then
I came across a twining trees pattern, and
I realized that I could do trees as cabled
patterns rather than as colorwork.
Having just completed my
first cabled sweater, I thought I could design
something like that. Unfortunately, cabled
patterns are harder to design than colorwork
patterns. But I worked out a method that works
fairly well.
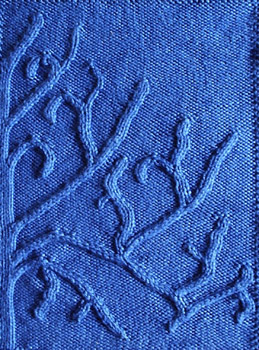
This article will teach
you how to design your own charts for cabled
trees. If you want to practice knitting trees
before you start designing them, the pattern
for Leaves
in Relief, a tree sweater I designed,
appears in this issue of Knitty.
Our friends the colorworkers have it
easy. They just take a sketch and convert
it to a chart.
Unfortunately, cable
knitters cannot do it this way. Cables
pull in a lot. So if we tried to follow
this sort of chart, then we would end
up with a piece of knitting which puckered
and changed its width along with the
cabled design. So we have to add increases
and decreases to smooth out the fabric.
By measuring a few
cabled swatches, I discovered that cables
add very little to the width of a piece.
For example, a swatch which contains
nineteen purl stitches per row, plus
a few cables, will not be much wider
than a simple rectangular swatch which
has nineteen stitches per row. The stitches
in the cables (or branches) usually
do not count towards the width of the
piece. So if we want to add a new branch,
unless it runs straight up and down,
we should increase by approximately
the width of the branch.
But all the increases
and decreases make it difficult to write
out a conventional chart for a tree.
You need the chart to change its width
at the start and end of every single
branch, and unless you're designing
an extremely simple tree, you'll need
stitches to appear and disappear from
the middle of the design. For a while,
I was designing trees by adding and
deleting long columns of blank space.
This was tedious.
Then I realized that there was no reason
why a two-stitch-wide cable should take
up two stitches of a chart. Once I'd
realized this, design became a lot easier.
Here's the method
I eventually worked out. It consists
mainly in inventing a whole new system
of chart symbols, which are quite different
from the usual ones. They are slightly
more confusing and harder to work from,
but for trees are vastly easier to design
with. As a result, while I do all my
designing using these methods, whenever
I try to publish my designs, I first
translate them to a more conventional
chart form.
I strongly advise
that you do the same.
First, go and get
some graph paper, preferrably knitter's
graph paper
which matches your gauge. Also, get
a pencil (not a pen) and an eraser.
(I have never made it through an entire
design without needing to erase.)
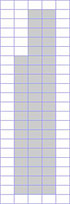
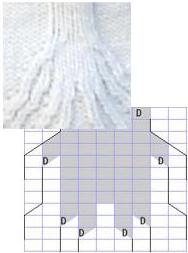
If you are planning
on designing your own tree or trees
to use with Leaves
in Relief, use this.
The dark lines indicate placement of
the raglan decreases for the three smallest
sizes (plus a few stitches as margin
for error); if you are making one of
the smaller sizes, avoid those top corners.
Otherwise, think about
what you want to put your tree on, and
about how big you want it to be. Get
graph paper in that size, or get larger
paper and mark the edges. If you have
a sketch of a tree you'd like to imitate,
you could use carbon paper to transfer
a sketch onto your graph paper. Or,
if you're clever with Photoshop, you
could put the tree onto the grid before
you even print it out. In any case,
make sure that the sketch comes out
light; you will need to draw over it.
If you're planning
to work your tree flat, going back and
forth, you may want to mark alternate
rows as wrong-side rows, and try to
minimize the number of cable crossings
on the wrong-side rows. If you're planning
on knitting in the round, or if you're
adventurous when it comes to cabling
on the wrong side, don't bother.
Begin
with the trunk. Unlike branches,
trunks usually go straight up
and down. Thus, they do not pull
in, and so the trunk stitches
do count towards
the width of the piece. So we
indicate them by shading in the
stitches we intend to knit.
Three to five
stitches is a good width. You
can use a wider trunk, but it
will be much thicker than all
the branches. Conversely, you
could make your trunk only two
stitches wide, but then it would
(usually) be the same width as
several branches; unless you want
an extremely small tree, I don't
recommend it.
If your trunk
is only two or three stitches
wide, you can just stop at the
top edge. If it's wider, you may
want to taper it off one stitch
(or one stitch per edge) at a
time. Plan on putting a branch
everywhere you taper off. |
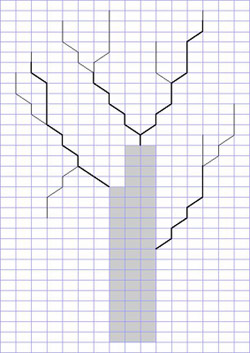 Now,
here's the counterintuitive part.
Start drawing branches, but make
the branches simple straight lines,
not fat rectangles and parallelograms. Now,
here's the counterintuitive part.
Start drawing branches, but make
the branches simple straight lines,
not fat rectangles and parallelograms.
Despite the
fact that the branches look like
lines on the chart, they are going
to be knitted as cables, so in
your actual knitting, they will
be one or two stitches wide. So
on a normal knitting chart, they
would take up one or two squares.
This means that
in your knitting, your branches
will be fatter than they look
in the chart. Keep this in mind
when including particularly short
twigs.
The reason I
use lines instead of standard
symbols is to keep the chart neat.
I don't have to go through tediously
adding in columns of "no
stitch" placeholders. This
makes design much easier; however,
it does mean that we can't use
most chart symbols. So I've invented
new ones.
Think about
which branches you want to be
thin (one stitch wide) or thick
(two stitches wide.) Indicate
the difference by drawing thicker
lines or doubled lines for the
thick branches. Or just write
the numbers 1 and 2 next to your
branches to remind yourself. |
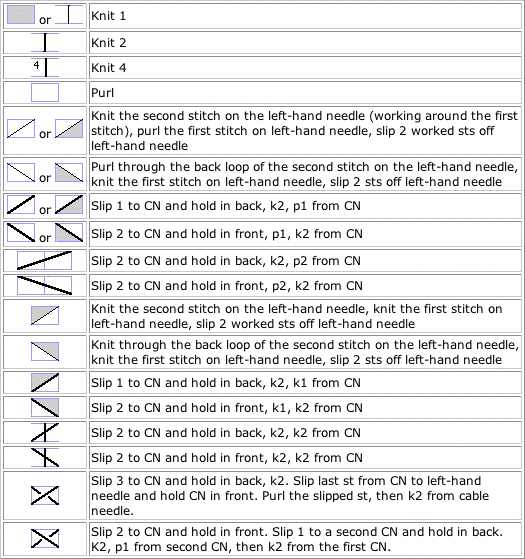
| The
most basic symbols are the lines,
which represent cables. To get
instructions out of your chart,
you will need a special key. It
looks something like the key above.
Now, if you
tried to follow the chart as you
have it written now, you'd be
in trouble: when your first branch
formed, you would suddenly need
to have more stitches than in
previous rows. Obviously, to deal
with this, you will need use increases
and decreases.
I will explain
how to do increases and decreases.
But first I'd like to warn you
about a few things that don't
work. |
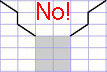
| 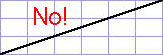 Don't
try to make your branches slope
too steeply. In particular, never
cross a one-stitch branch across
two squares at once, and never
cross a two-stitch branch across
three squares at once.
Don't
try to make your branches slope
too steeply. In particular, never
cross a one-stitch branch across
two squares at once, and never
cross a two-stitch branch across
three squares at once.
If you're designing
a tree to be worked in the round,
try to minimize the number of
times you cross a branch across
two squares at once. If you cross
a branch too steeply too often,
then your branches will start
to look very stretched out. If
you're designing a tree to be
worked flat, the problem will
usually not arise, as you will
usually be alternating rows with
crossings with rows that are worked
plain. |
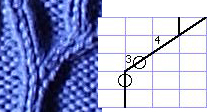
 If
you want to cross one branch over
another, you'll need to leave yourself
space for it. You will need to have
the crossing branches run straight
up and down beside each other for
a row or two or three. Label the
line where you would like the crossing
to occur, as shown above. If
you want to cross one branch over
another, you'll need to leave yourself
space for it. You will need to have
the crossing branches run straight
up and down beside each other for
a row or two or three. Label the
line where you would like the crossing
to occur, as shown above.
If you have
two-stitch cables and an odd total
number of stitches, you might
want to make some of your crossings
five-stitch cables instead of
four-stitch cables. Such cables
show up often in knitted knotwork,
and help preserve symmetry, but
are slightly harder. |
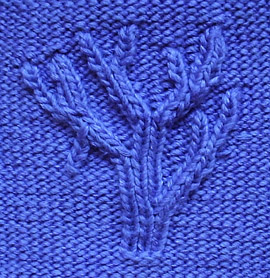 Also,
the branches on the chart look a
lot thinner than they will once
they are knit up. (This is one of
the biggest disadvantages of this
style of chart.) Be sure not to
make your branches too short, or
you'll end up with a design that
looks less like a tree and more
like a cactus. Also,
the branches on the chart look a
lot thinner than they will once
they are knit up. (This is one of
the biggest disadvantages of this
style of chart.) Be sure not to
make your branches too short, or
you'll end up with a design that
looks less like a tree and more
like a cactus. |
| Remember,
we will need to add one or two
increases at the start of every
branch, and one or two decreases
at the ends.
To avoid confusion,
we will want to indicate them
on the chart.
It's a good
idea to avoid doing two nearby
increases in the same row, except
in a few special circumstances.
Thus, if you want to start a thick
branch, you should do two increases
on consecutive rows. This includes
those designing trees to be knit
flat. You will have to work increases
and decreases on wrong-side rows.
I prefer to
increase by working a yarn over,
and then twisting it by knitting
into the back loop on the next
row. Alternatively, you can substitute
an e-loop increase, as suggested
by Elizabeth Zimmermann, or experiment
with any other type of increase
you like.
(I prefer to
avoid twisted make-one increases.
First, they pull in if you have
to start two nearby branches in
the same row. Also, if you try
to work an increase while cabling,
which is sometimes necessary,
it can be hard to figure out exactly
which loop to pick up and knit.) |
 There
are basically three places where
a branch can start: at the trunk,
in midair, and in another branch. There
are basically three places where
a branch can start: at the trunk,
in midair, and in another branch.
If a branch
starts in midair, it usually means
that the branch will be slanting
downwards and away from the trunk.
One-stitch branches can be started
with a single increase. Two-stitch
branches should be started with
two increases, in two consecutive
rows. The first few rows should
run straight; a slant won't really
be noticeable and will just make
doing increases harder. |
 Often,
a branch will split into two smaller
branches. (Most real trees do not
split into three smaller branches
simultaneously. This is good, as
knitting such things is difficult.) Often,
a branch will split into two smaller
branches. (Most real trees do not
split into three smaller branches
simultaneously. This is good, as
knitting such things is difficult.)
Count the number
of stitches in both of the branches
above the split. Subtract the
number of stitches in the branch
below it. (I'll discuss the other
kind of split-with two branches
below and one above-later.) This
gives you the number of increases.
So, for example, a thick branch
which splits into two thin branches
will require no increases, while
a thick branch which splits into
two more thick branches will require
two. |
 It's
generally a good idea to work increases
either two rows or two and three
rows below the split, rather than
in the last row before the split.
Mark your increases by drawing a
circle around the line in the appropriate
row. It's okay to work increases
while cabling. You may wish to indicate
to yourself that the next few rows
will have three or four knit stitches
in the branch, rather than the usual
two. This will mean that sometimes
you will have to do cable crossings
which cross four knit stitches over
a purl stitch. It also means that
you will sometimes have to work
increases in the middle of a cable
crossing. Don't worry; it's easier
than it sounds. It's
generally a good idea to work increases
either two rows or two and three
rows below the split, rather than
in the last row before the split.
Mark your increases by drawing a
circle around the line in the appropriate
row. It's okay to work increases
while cabling. You may wish to indicate
to yourself that the next few rows
will have three or four knit stitches
in the branch, rather than the usual
two. This will mean that sometimes
you will have to do cable crossings
which cross four knit stitches over
a purl stitch. It also means that
you will sometimes have to work
increases in the middle of a cable
crossing. Don't worry; it's easier
than it sounds. |
 Branching
off from the trunk is sometimes
much like branching off from another
branch. You work an increase or
two, a few rows beforehand, and
then simply move your cables as
you desire. The exception is the
case when you want the trunk to
be narrower after a branch comes
off. In this case, after the branch
point, you will want to have one
or two more stitches than
before, but only one (or zero!)
more knit stitches. Thus,
one of your increases should be
a purl stitch. Branching
off from the trunk is sometimes
much like branching off from another
branch. You work an increase or
two, a few rows beforehand, and
then simply move your cables as
you desire. The exception is the
case when you want the trunk to
be narrower after a branch comes
off. In this case, after the branch
point, you will want to have one
or two more stitches than
before, but only one (or zero!)
more knit stitches. Thus,
one of your increases should be
a purl stitch.
I still would
do this by twisting a yarn over,
but (as shown) I would mark the
next row to remind myself to purl
it through the back loop rather
than knitting it. |
 Note
that it is best not to try to make
the trunk too much narrower at once.
This generally means decreasing
one trunk stitch per branch, and
starting the last two branches from
the middle of the trunk, rather
than the outside. Note
that it is best not to try to make
the trunk too much narrower at once.
This generally means decreasing
one trunk stitch per branch, and
starting the last two branches from
the middle of the trunk, rather
than the outside. |
| |
 You
will need to get rid of those stitches
eventually, usually when your branch
ends. Branches end in the same three
ways that they begin. Sometimes,
two branches come together to form
one. You
will need to get rid of those stitches
eventually, usually when your branch
ends. Branches end in the same three
ways that they begin. Sometimes,
two branches come together to form
one.
Unlike increases,
it's not a good idea to try to
do decreases and cable crossings
simultaneously. This is because
decreases and cable crossings
both make your fabric thicker;
doing both at once results in
a very thick spot. Thus, it's
a good idea to do a few decreases
just before the two branches join,
and then to to get rid of the
inside branch by crossing the
outside branch over it. |
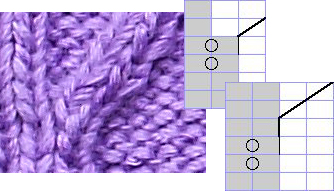
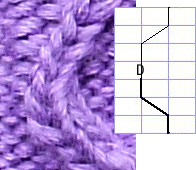
| Here's
what those decreases are actually
doing: they take a knit stitches
in a cable --
which do not count towards the
width of the piece-and a purl
stitch, and convert them into
into a single knit stitch which
does count towards
the width of the piece. We then
want to keep knitting upwards
until we cable over the stitch
in question, so we shade up to
the cable line.
On my charts,
I indicate such a decrease with
a triangle and a D, as shown above.
The D is there to avoid confusion:
there is another possible meaning
of a triangle, which I use for
roots and stems. |
 To
end a thick branch, I would decrease
the two knit stitches together using
either a k2tog or ssk, and then
do a p2tog on the next row. I indicate
these using a D, as shown at left.
To end a thin branch, I would work
a k2tog or ssk with a neighboring
purl stitch. I indicate this the
way I did at left, with branches
coming together: with a triangle.
Decreasing a branch into the trunk
is usually done by doing one or
two ssks or k2togs, which I indicate
with a D. To
end a thick branch, I would decrease
the two knit stitches together using
either a k2tog or ssk, and then
do a p2tog on the next row. I indicate
these using a D, as shown at left.
To end a thin branch, I would work
a k2tog or ssk with a neighboring
purl stitch. I indicate this the
way I did at left, with branches
coming together: with a triangle.
Decreasing a branch into the trunk
is usually done by doing one or
two ssks or k2togs, which I indicate
with a D. |
| |
 Roots
are a little different, because
we use them to get the trunk stitches.
So we do decreases over knit and
purl stitches, as we do when turning
two branches into one, and indicate
them the same way. Sometimes you
may find yourself wanting to make
a trunk wider without adding a root,
or narrower without working a decrease
or branch. Roots
are a little different, because
we use them to get the trunk stitches.
So we do decreases over knit and
purl stitches, as we do when turning
two branches into one, and indicate
them the same way. Sometimes you
may find yourself wanting to make
a trunk wider without adding a root,
or narrower without working a decrease
or branch.
It's generally
not a good idea to just start
knitting into more than one previously
purled stitch. (If you're enamored
with symmetry, it's sometimes
necessary.) The way to avoid this
is to use a cable crossing to
turn a column of knit stitches
into a column of purl stitches.
This is the other stitch where
the best way to indicate it is
with a triangle. Be careful; try
not to confuse this symbol with
the one for decreases. |
Here's a key to the symbols
I use for increases and decreases:
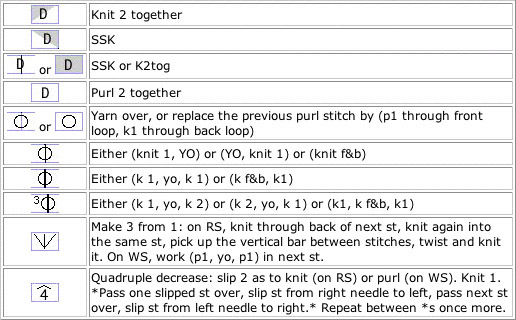
Wrong-side
directions are provided for
"make 3 from 1" and
"quadruple decrease"
because it is usually necessary
to do those on the wrong side.
If a symbol for an increase
or decrease is superimposed
over the symbol for a cable,
you will have to work a cable
crossing and increase at the
same time.
For
example,  means, on the right side, "Slip
1 to CN and hold in back, work
(k1, yo, k1), p1 from CN."
means, on the right side, "Slip
1 to CN and hold in back, work
(k1, yo, k1), p1 from CN."
|
| |
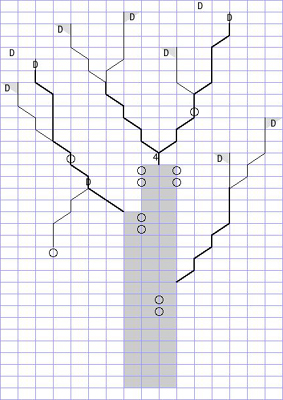
 At
this point, you should be able to
design a simple bare tree, where
all of the branches go either straight
up or straight down. However, if
you're designing a large tree, you
have room to add leaves, flowers,
fruit, and curving branches. At
this point, you should be able to
design a simple bare tree, where
all of the branches go either straight
up or straight down. However, if
you're designing a large tree, you
have room to add leaves, flowers,
fruit, and curving branches. |
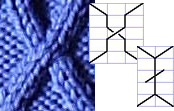
| |
 You
may want some of your branches to
change direction. This means that
you want cables that make U or inverted-U
shapes. To do this, I use a technique
taken from closed-loop cabling. You
may want some of your branches to
change direction. This means that
you want cables that make U or inverted-U
shapes. To do this, I use a technique
taken from closed-loop cabling.
A branch that
changes direction should be a
thick branch. (Thin branches that
change direction have to bend
at a fairly sharp angle rather
than curving, which looks odd.)
The bottom of a curve is usually
done by doing two double increases,
stacked one atop the other. The
top of a curve, similarly, is
done by doing a quadruple decrease.
Note that, if you are designing
a tree to be knit flat, you should
do quadruple decreases, and the
second double increase, on wrong-side
rows.
I know I advised
against crossing a branch over
two squares at once. However,
with curved branches, it's not
a bad idea to have one or two
double crossings to keep the curve
fairly flat and smooth. |
| |
|  Leaves
are already quite common in lace.
They are often made by working
two increases (usually yarn overs)
every other row, and then working
two decreases (or, eventually,
a single double decrease) every
other row. A normal-looking chart
for this is shown at left. Leaves
are already quite common in lace.
They are often made by working
two increases (usually yarn overs)
every other row, and then working
two decreases (or, eventually,
a single double decrease) every
other row. A normal-looking chart
for this is shown at left.
I adapted this
leaf form for sweaters by twisting
my yarn overs. Note that this
sort of leaf does increase the
stitch count, without pulling
in as a cable would. If you don't
make the leaves too big, or have
too many of them, this does not
pose much of a problem. |
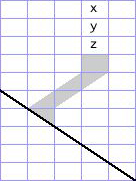
 I
find that the best size of leaf
for a tree is seven rows tall. This
is not so big that it causes the
fabric to become unmanageably puffy
or wide, but is large enough to
look like a leaf. I tried making
five-row leaves once; they did not
look particularly leaflike. If your
artistic vision requires lots of
very small leaves, I recommend looking
into embroidery. There is no way
to neatly fit a leaf of this sort
onto a chart and have it look remotely
like a leaf, or like the result.
I don't bother trying; instead,
I just label a seven-row column
with letters, as shown. I
find that the best size of leaf
for a tree is seven rows tall. This
is not so big that it causes the
fabric to become unmanageably puffy
or wide, but is large enough to
look like a leaf. I tried making
five-row leaves once; they did not
look particularly leaflike. If your
artistic vision requires lots of
very small leaves, I recommend looking
into embroidery. There is no way
to neatly fit a leaf of this sort
onto a chart and have it look remotely
like a leaf, or like the result.
I don't bother trying; instead,
I just label a seven-row column
with letters, as shown.
It's a good
idea to keep leaves fairly far
from everything else. Try to avoid
drawing branches (or other leaves)
within about two stitches above
and to the sides of a leaf. |
| Key
to symbols for leaves and
flowers |
| a |
Slip 1 as to
knit, knit 2 together, pass
slipped st over |
| b |
Knit 3 |
| c |
SSK, knit 1, k2tog |
| w |
Knit 1, front twist or knit
tbl, knit 1, knit 1 tbl, knit
1 |
| x |
K1, yo, k1, yo, k1 |
| y |
Front twist or knit tbl,
knit 1, knit 1 tbl |
| z |
Yo, knit 1, yo |
| B |
Make bobble: (k1, yo, k1)
in one st, turn, k3, turn,
sl 1, k2tog, psso |
For
the sake of symmetry, I try to twist
my yarn overs in opposite directions
on either side of the central stitch.
To do this, on one side, I knit
my yarn overs through the back loop,
and on the other side, I *slip a
yarn over as to knit, slide it back
to the left needle, and then knit
through then front loop.* (I refer
to this as a front twist. If it's
too confusing, just knit through
the back loop as usual.) |
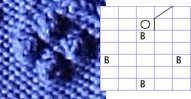 Flowers
and fruit are simple. Any set of
four to six little round things,
arranged in a circle, will look
like a flower. A single round thing
will look like fruit. Flowers
and fruit are simple. Any set of
four to six little round things,
arranged in a circle, will look
like a flower. A single round thing
will look like fruit.
In knitting,
we have two options for little
round things: bobbles and yarn
overs. (Yes, that means ordinary
untwisted yarn overs, not the
kind I use for increases.) |
| Since
I don't like holes in my sweaters,
I prefer to use bobbles instead
of yarn overs. To get a flower,
I make them as small as possible,
and space them out a little. (Otherwise
they look too crowded.) Since there's
nothing connecting the petals of
one flower, again, it's a good idea
to keep the different flowers fairly
far apart; otherwise, it's difficult
to tell which petals belong together. |
| |
|  These
sort of leaves need stems. They
should come from below, and they
should be exactly one stitch wide.
I tried working leaves that hung
down below their stems once; they
didn't look particularly leaflike. These
sort of leaves need stems. They
should come from below, and they
should be exactly one stitch wide.
I tried working leaves that hung
down below their stems once; they
didn't look particularly leaflike.
While
stemless flowers and fruit will
not look weird the way stemless
leaves will, you may wish to include
them anyway.
If
you want to put a leaf or flower
on the end of a thick branch,
you should turn it into a thin
branch first. If you've got plenty
of room, you can do this by splitting
the thick branch into two thin
branches. However, if you will
have to make one of the thin branches
less than about seven rows tall,
and won't be able to fit leaves
or flowers onto both thin branches,
then don't bother. Instead, work
a decrease (or increase, if it's
a stem coming out of the top of
a flower) along the branch. Indicate
with a D.
If
possible, try to do this on a
row where you're not cabling that
particular branch. |
 Now,
sometimes you will want a very short
stem. In this case, you may not
want to bother with increases at
the start and decreases at the end.
Knitted fabric is usually stretchy
enough to deal with one short cable
which pulls in and does not have
compensating increases and decreases.
You can start this sort of stem
by taking it out of another branch's
cable crossing, as with the roots.
To indicate what the stem is doing,
you have to use thick bars. Now,
sometimes you will want a very short
stem. In this case, you may not
want to bother with increases at
the start and decreases at the end.
Knitted fabric is usually stretchy
enough to deal with one short cable
which pulls in and does not have
compensating increases and decreases.
You can start this sort of stem
by taking it out of another branch's
cable crossing, as with the roots.
To indicate what the stem is doing,
you have to use thick bars.
If you ever
find yourself in a situation where
you can't do all your increasing
before a branch starts, or if
you have a branch that runs straight
up and down for a long way (and
therefore doesn't pull in much),
you can use similar notation.
|
You may find yourself
making mistakes when working from charts
this complicated. If this happens, don't
panic. Just knit across, trying to get
the proper number of knit stitches in
each branch and the proper number of
purl stitches between each two branches.
Increase or decrease as necessary.
Nobody is going to
inspect your work with a magnifying
glass to make sure that you followed
the chart exactly.
|
| |
|
 Ariel is a graduate student in mathematics at the
University of Chicago. In her spare time, she reads,
plays bridge, folds origami, and, of course, knits.
Ariel is a graduate student in mathematics at the
University of Chicago. In her spare time, she reads,
plays bridge, folds origami, and, of course, knits.
You can read about her knitting
projects in her journal.
|
| © 2005 Ariel
Barton. Contact Ariel. |
|