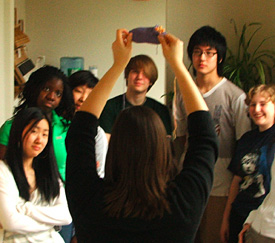
| It happens without
fail. I arrive at my LYS's knitting
drop-in an anonymous nobody and I leave
revered as a knitting goddess.
Most recently at
a drop-in, I sat down next to a sock
knitter who was extolling the virtues
of the Magic Loop. While I listened
to her quietly, I pulled out my own
socks on DPNs and set to work. Another
woman noticed my knitting. "Oh,
you're doing socks, too! Is that your
first or your second one?"
I straightened and
tried not to look smug. "Actually,
it's both the first and second sock."
The Magic Looper
smiled, speaking slowly for my benefit.
"But there's only one
sock leg on your needles."
I looked her in
the eye, smiled back, and reached
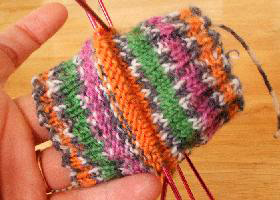
into the tube on my needles -- and
pulled the second sock out from inside
of it. "I knit them at the same
time. Inside of each other."
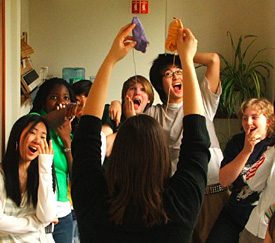
Five sock knitters
from across the room jumped out of
their chairs and zoomed over to see
how I did it. "Brilliant!"
one breathed. "Don't you get
confused?" "How do you keep
them separate?"
Magic Looper slowly
deflated and then muttered in awe,
"I hate you."

Double knitting is a technique
that's been used for centuries to create a double-thickness
of knitted fabric. To begin, cast on twice as
many stitches as the width of the finished fabric
using two different strands of yarn (the "front"
and "back" yarns). Knit and purl each
stitch, alternating between the front and the
back yarns, and occasionally switch it up, knitting
a "front" stitch with your "back"
yarn, to tie the two pieces together. That's
the technique in a nutshell -- an appropriate
receptacle.
Ready to go back to the Covet
Central page now? Just wait -- once you
see how it's done, double knitting actually
makes some sense. And it has endless applications
(apart from announcing your status as the Dalai
Knitter). Knitting a sweater with shaped sleeves
and sick of counting and recounting and re-recounting
to make sure that second sleeve matches the
peerless, perfect first? Double knit 'em. Like
those tube scarves but hate circulars or DPNs?
Double knit it. Cursed by Second Sock Syndrome?
Yes, that's right, double knit them.
Double-knitting (DKing) is
the ultimate knitting party trick -- extreme
knitting at its best. Any sock knitter worth
their salt should give it a whirl.
You don't even have
to give up your favorite knitting
devices. DKing is not so much a new
sock-knitting technique as it is a
framework to hang all your techniques
onto. You swear by the two-circ method?
Dandy. Prefer DPNs? Fine by me. Can't
break off your long-standing relationship
with the Magic Loop? I affirm you
in your Magic Loopiness.
Before you grab
your favorite sock yarn and your instruments
of choice, let's take a moment to
collect our tools, collect our wits,
and learn the basics of technique.
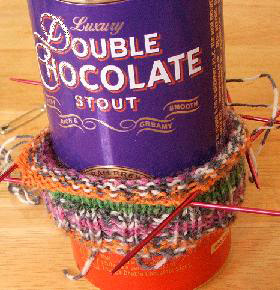
Tools: pointy
sticks of choice, two (yes, two) balls of yarn,
a tapestry needle, and two short stitch holders
or waste yarn. Chocolate is optional.
For this exercise,
use comfortable needles and a decent
fingering to DK-weight yarn. It may
be helpful to use thicker yarn than
you normally would for socks so you
can get the hang of the technique.
Size and gauge don't matter here.
Wits: a deep
yogic breath, my (and your) implicit permission
to throw the mess across the room when your
brain seizes up, and the ability to hold two
different strands of yarn however you like.
Basics: We'll
make a pair of practice socks in two different
colors. This is cheating (see "cheating,"
below). If you dislike the sound of that, call
it "technique refinement."
This is, without
a doubt, the second most difficult
thing to do in DKing. Unfortunately,
the rules of string-play dictate that
you have to do this part first, so
just remember -- if you can cast on,
you can double-knit.
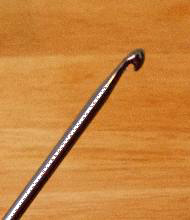
You can use a variety of cast-ons
though I can tell you that, from experience,
the Continental (long-tail) cast on requires
two more hands than most of us are naturally
equipped with. I'll show cable cast-on here
for DKing.
| Cheating
is an option. In fact, it's a dang good
one. If you love long-tail cast on, or the
directions below make you want to smash
things, then cast on the requisite number
of stitches from one ball onto one needle
and the same number of stitches from the
other ball onto another needle. Transfer
those stitches to one needle, alternating
between Ball A and Ball B. Cheaters
never win and winners never cheat, but smart
knitters who want to retain an iota of sanity
do, cheerfully. |
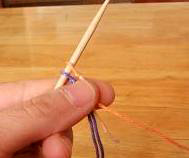
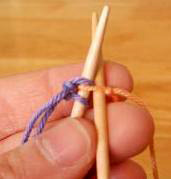
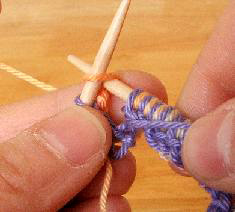
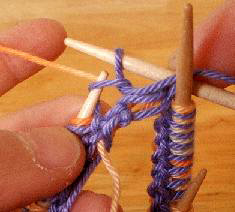
To DK cast-on, form
a slip knot in color A and color B
and put them on your working needle,
side by side.
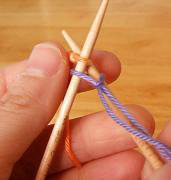
Pull the B strand
to the left so the bottom of the B
stitch is facing to your left; pull
the A strand to the right so the bottom
of the A stitch is facing to your
right. Begin by knitting the color
A stitch with color A and putting
the stitch you just made back onto
the working needle.
 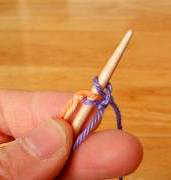
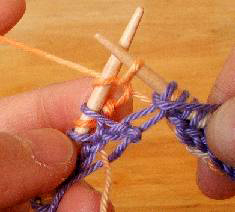
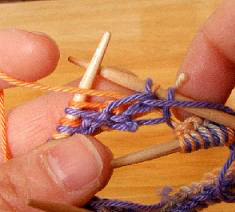
Now spin your working
needle 180 degrees so the bottom of
the two A stitches face to your left
and the B stitch now faces to your
right. Knit the B stitch (I know,
that's difficult to do since there's
a freaking A stitch on either side
of it), and place that new stitch
back onto the working needle. Spin
the needle 180 degrees again.
Repeat this process
slowly and mindfully, flipping back
and forth, until you have 32 stitches
of each color on the needle (64 total).
Put the knitting
down, walk to the kitchen, and eat
an entire bar of chocolate.
Your mantra will be "A
in front, B in back." That's not a very
spiritual mantra, but it's a helpful reminder
of basic technique. It is also is spare enough
that you can breathe serenely through it or
insert the swear words of your choice into it.
We'll begin by joining
the round. As experienced sock knitters
know, joining the round can get tricky.
Joining the round in DKing is no less
so. But it's also no more so.
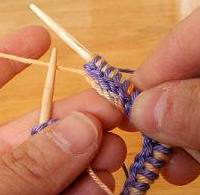
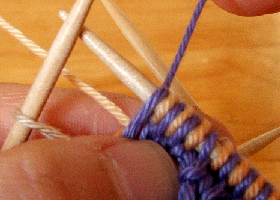
So. Take that lovely caterpillar
of cast on yarn and redistribute it however
you need to (in this case, I've used DPNs).
Squish the two lines of knots together so you
have an open-ended triangle, and make sure the
lines of knots are aligned to the inside of
the needles.
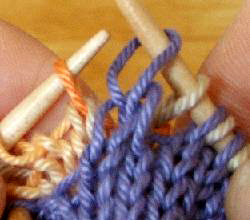
The A yarn will
hang naturally to the front and the
B yarn naturally to the back. Pick
up the strands now.
Yeah, right. How
do you hold this mess? Do whatever
you need to be comfortable. That's
right, comfortable. Some people like
those little stranded-knitting thimbles
that sort out each color on your left
finger; some people just drop the
strand they are not using. I use a
combined method, holding one strand
in my left hand and one in my right.
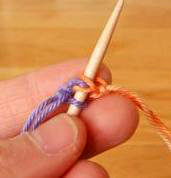
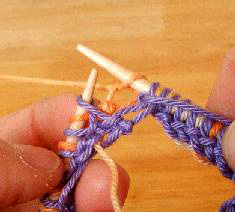
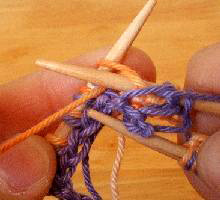
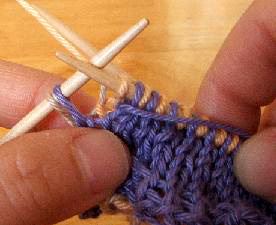
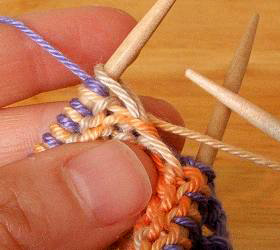
You'll have finished
the cast-on with a B stitch and the
first stitch you will knit will be
an A stitch, knit with the A yarn.
As A hangs in the front in purl position,
move strand A to the back. I know
it looks messy. Soldier on and knit
stitch A with strand A.
 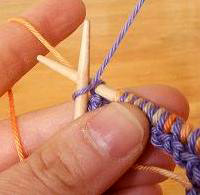 
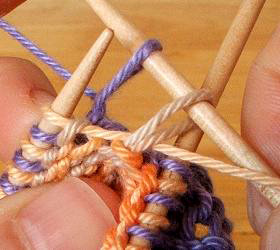
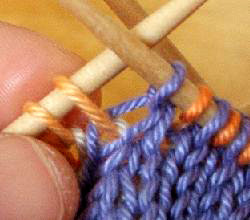
Once the first stitch
has been made with A, move the A strand
back to the front.
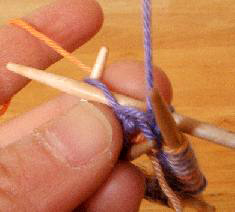
Now knit B. Since the B strand
is already in back, this is just like regular
knitting -- and, just like in regular knitting,
you will keep strand B in back when the stitch
is complete.
 |
 |
 |
I
find that sometimes with DPNs it's easier
to knit the first two stitches with the
last holding needle, not the empty working
needle. This helps you see the alignment
of the stitches better. Once they are knit,
you can transfer the first two knit stitches
off the last holding needle and onto the
working needle. |
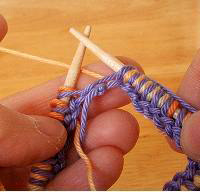
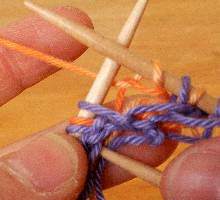
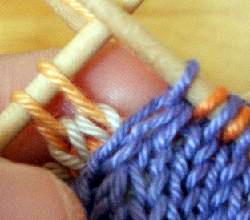
To knit the next
stitch (A), move the A strand to the
back, knit, and return yarn to front.
Knit the next B stitch with the B
strand, keep strand to back.
Repeat this slowly
until you have knit all the stitches
on one round.
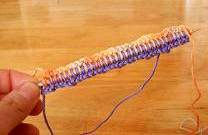
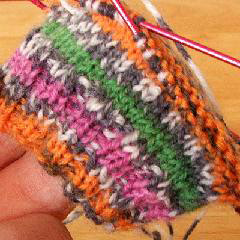
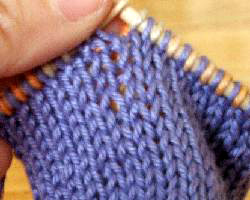
Looky! You did it!
The beginnings of two socks, right
there on the needles! Have some chocolate.
What about purling?
Let's assume that
A is next up to bat. Insert your needle
into the A strand next, and purl the
stitch. A is in front already, so
that makes life easy.
Leave the A strand
in the front. Even with a different
stitch, A is always in front and B
is always in back.
To purl the B stitch,
bring the B strand to the front as
if to purl, 'cause that's what we're
gonna do with it. I find it helpful
to hold it far down in front of the
knitting so I don't get tangled up.
Insert your needle
purlwise, purl the B stitch with the
B yarn, then immediately take the
B yarn back where it belongs.
Take a moment now
to organize your yarn, and reflect:
now that you can knit and purl, you
can DK any knit-purl pattern at all
into your socks. Bask in the heady
glow of it all and go have more chocolate.
While you are munching
happily on your reward, let's consider
how this technique differs from traditional
DKing.
Simply put, traditional DKing
crosses the A and B strands. When you use two
different colors, this gives you a thick reversible
two-color pattern. There are many benefits to
this, namely, the "thick" and "reversible"
ones.
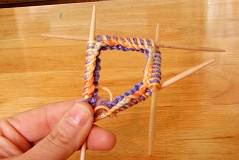
This triangle is a
side-view of what your DKed socks of the
uncrossed variety will look like. The
leg labeled A is the front piece of fabric.
This is what you knit with the A strand
from the A ball of yarn. The leg B is
the back piece; it's knit with the B strand
from the B ball of yarn. The apex C: that's
the needle where all the stitches meet.
You can see that by
keeping one strand in back and one strand
in front and not crossing them, we are
creating two pieces of fabric at the same
time.
|
 |
| If we wanted to knit
something reversible, we'd cross the strands.
That ties the fabrics together to make one
monster thick piece of fabric. This makes
very cool shadow-knitted scarves, hip baby
blankets, and all manner of good things,
but it makes for wretched socks. |
 |
Go back to the knitting,
get in position, and keep going on those legs.
Go, go, go! Take frequent breaks!
You
may notice that these socks are knitting
up a little looser than you would like.
That only makes sense -- you've got something
resting between each stitch you make.
Since this is a practice pair of socks
and gauge doesn't matter, this is okay.
When you take this
technique on the road and want to knit
real socks, however, try going down a
needle size to maintain true gauge. If
you're starting a new pattern with a new
yarn and don't know if just going down
a needle size will work, you will have
to knit a swatch. Sorry. |
Always make sure to stick
your hand between the layers of your knitting.
For even the most careful among us will space
out, thinking about how our fellow knitters will
be amazed when we whip this baby out at the next
SnB, how they will surrender their ebony needles,
bowing in worship, offering up unto us the costliest
yarns they have in homage of our greatness, how
that chica who is knitting the lace bedspread
with cobweb-weight yarn is going down.
When we succumb
to the narcissistic tendencies of
the flesh, my friends, things can
happen. You knit an A stitch with
the B yarn, or vice versa. Sticking
your hand between the fabrics helps
you find where you've done that.
Typical problem
areas are at DPN joins or Magic Loop
transfer points. The best way to find
those while you are only a row or
two past from that cross-over is to
stick your fingers through the huge,
gaping hole between DPNs or at transfer
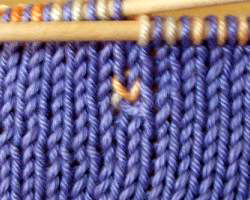
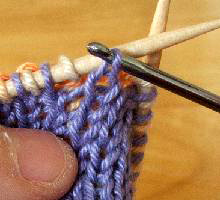
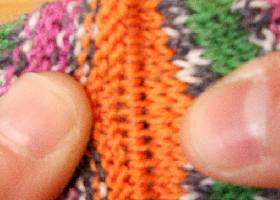
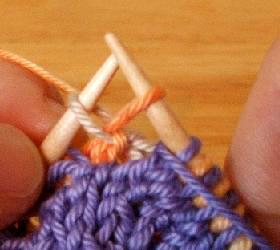
points. If you notice an X in the
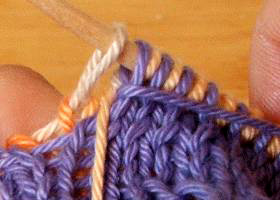
stitches, it's a crossed stitch:
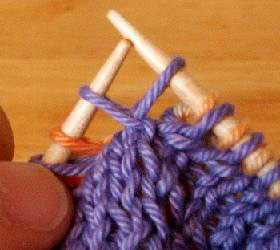
If you can fit your
finger(s) through the hole without
encountering any extra yarn, you're
good to go:
Find a catch?
FIX IT! FIX IT NOW!!
Alas, the road to becoming
a knitting guru is filled with many travails.
The path to sock-knitting perfection is not
a smooth or easy one. You may have to fix things.
There are two main problems you encounter while
DKing.
Crossed Stitches
Every once in a while,
you may stick your hand up your knitting and
find this:
This is obvious
with the two-color socks we're using.
But someday, you may want to actually
make a matching pair of socks, which
means that catch will look like this:
Whatever you may
be feeling at this moment, this is
not the answer:
This is the answer:
Very carefully,
find the catch and follow it up to
the working needles. Mark this with
a twist tie, or stick your thumb and
forefinger between the stitches that
are okay and the stitches that are
crossed. Transfer those beautiful
uncrossed stitches to a stitch holder
or another needle. And drop the offending
pair of stitches.
I know, this is
painful. There may be tears. That's
fine. Salt water won't hurt the yarn.
Unravel the stitches
down to the starcrossed pair. They
will separate fairly easily.
Separate the two
sides and, starting with the B side
(or the inside of the sock), begin
catching and fixing the stitches.
Do the same for the front.
Put the new stitches
back on the working needle, and transfer
those uncrossed stitches back on.
All better.
You've worked several
inches on your DKed sock and have decided it's
time to, oh, I don't know, eat some chocolate.
You set the knitting down, and when you come
back, you have no idea if you're on the front
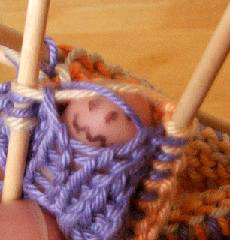
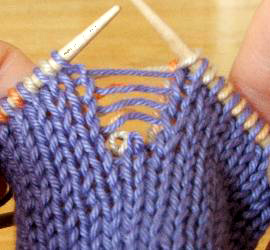
or the back.
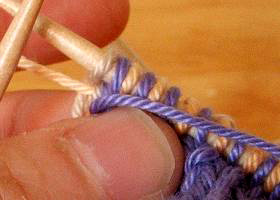
Simply reach into
your tube and pull the second sock
out. If you look carefully at the
needle (the apex of our triangle),
you will see where the stitches for
the back and the front are:
Stuff the second
sock back into the first and continue.
When you are ready
to knit the heel, put the knitting
down and go for a long walk. Or listen
to your favorite CD. Or, if your hands
won't stop knitting, work on some
mindless stockinette for a while.
Chocolate is also an option.
Short-row heels are probably
the easiest heel you can make on DK'd socks,
so basic technique will cover them. With the
short-row heel, there are no tricky SSKs or
K2togs that require some extra needle acrobatics
with DKing. (For basics on the short-row heel,
visit Wendy Johnson's article.)
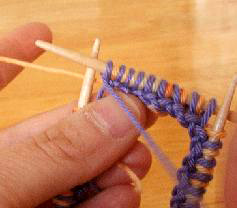
Begin by dividing
your stitches so that half of them
are on one needle and the remainder
are on another (or a stitch holder).
You'll work across half of the stitches.
It looks like a lot of stitches, but
remember you're turning two heels
at once.
Sit back and savor
that thought for a moment before continuing.
Working on a right-side
row, knit across to the last two stitches
on the needles (one A, one B).
We're going to wrap
each stitch. Take the A yarn to the
back, as if to knit. Then slide the
A stitch to your right needle knitwise.
Bring your A yarn back to the front.

Now, bring the B
yarn forward as if to purl. Slide
the B stitch to your right needle
knitwise, and bring the B yarn back
to the back.
When wrapping stitches, think
a bit about our triangle. You'll want to bring
both threads into the apex and then pull them
right back out. Inside-out.
If you've worked
a short-row heel before, you know
this is all wonky, but if you reverse
it and go from the outside in....
We can't have that
now, can we?
Once the stitches
are wrapped and all on your right
needle, turn your work.
This is one of those
(many) points when you may want to
throw the knitting accidentally-on-purpose
on a lit gas burner, but all that
is needed here is a deep breath and
the ability to untangle yarn. The
B strand will now be in front, held
in your dominant hand. The A strand,
which has been in front, is now in
back in your not-dominant-but-doing-its-dangedest
hand.
Slip the first B
stitch and A stitch onto your working
needle. Slipping them will finish
wrapping them.
Now, purl across
to the last two stitches (see instructions
for purling above). And again, move
your A yarn to the back, slip the
stitch, move the yarn to the front;
move the B yarn to the front, slip
the stitch, move the yarn back. Wrap
from the inside out.

Set the sock down,
get up and stretch, and, yes, have
some more chocolate.
When you're done
and your hands are clean, turn your
work and knit across to the two stitches
before the wrapped ones. You'll wrap
these stitches just like you did above.
Once you have wrapped
all the heel stitches (you should
start with a knit row), stick your
hand up the sock and make sure you
didn't cross any strands while wrapping.
Now, knit across and pick up those
A wraps
and knit them. Pick
up the B wraps
and knit those.
And wrap the next A stitch and B stitch
going inside-out again.
Turn and being purling
your way across. You'll continue in
this way, picking up and knitting
or purling wraps as you go, until
you've picked up and knit and purled
all wraps.
At this point, put
your knitting down and stretch. Revel
in the knowledge that you just turned
two sock heels at the same time and
go buy two nice skeins of yarn in
celebration.
The foot is just like
the leg, only on the other side of the heel.
You'll be knitting in the round again, A in
front, B in back. After the heel, this is a
relaxing moment, just miles of stockinette stitch.
Remember to stick your hand in between the knitting,
though, to make life easier.
Short-row toes are easier
to construct when you DK socks, but the seaming
could drive you to a nervous breakdown (if the
rest of the sock hasn't already, that is). I
would recommend a simple French toe to aid in
seaming. This also introduces you, for a very
short period of time and in a manageable way,
to how to work a k2tog in DKing.
If the very idea
of a k2tog makes you want to lie down
quietly for several years, skip down
to the second help box which provides
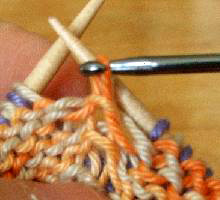
an easy but sane cheat.
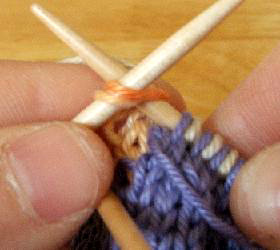
Begin by making
sure that your needles are aligned
properly.
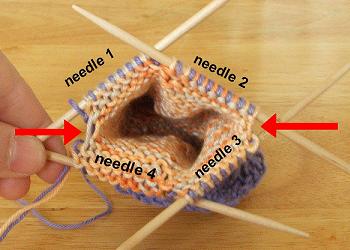
You'll be decreasing
on either side of the foot parallel
to the heel (marked with arrows above).
Work the round until you have the
last four stitches on the inside of
the foot. You should have just worked
a B stitch and ready to work an A
stitch. We'll number these last four
stitches 1, 2, 3, and 4.
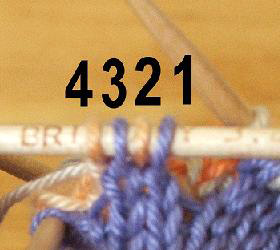
Moving A to the
back as if you are going to knit,
you will slip your needle through
stitch 3 as if to knit. Then, using
the fingers on your holding hand to
help spread out the stitches, you
will slip the tip of your needle in
front of stitch 2.
This may or may
not involve swearing.
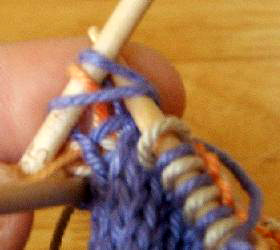
Now slide the needle
through stitch 1 as if to knit.
Knit the stitches
together. Slide sts 1, 2, and 3 off
the needle, and pick stitch 2 back
up.
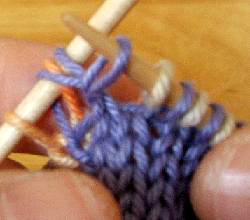 
| When
you slide stitches 3, 2, and 1 off the needle,
you'll notice that stitch 2 is trapped in
the loop of the new k2tog you've made. Make
sure you move stitch 2 so it's clear of
the new A k2tog. |
Move A back to the front.
Pick up stitches 2 and 4 and knit those using
B.
Knit across to
the other side of the foot and repeat.
 Cheating!
You can also slide the remaining 4 stitches
off the working needle and pick them up
in a k2tog-able way---> Cheating!
You can also slide the remaining 4 stitches
off the working needle and pick them up
in a k2tog-able way--->
No one's going
to argue with you. They may even think
that this is way cooler than the technique
above because you're intentionally dropping
stitches and picking them back up.
|
Continue the decreases until
the toe looks about right to you.
You've done it! You made
two socks at on-- not so fast, we need to seam.
Do not be downcast. There
really is no way you can seam two toes at once.
Consider this: you will be joining one end of
fabric A to the other end of fabric A. What
does this mean for the ends of fabric B?

Right.
Though you may think
this is the easy way out, it's really
the only way out. Using one needle
and a stitch holder, place the A stitches
on a needle and the B stitches on
the needle holder. I find that waste
yarn works just fine as a stitch holder
in this case
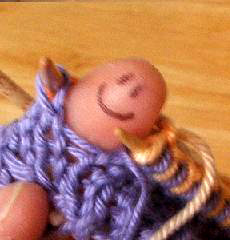
When you are finished,
please pack away the socks until you
are in the company of other sock knitters.
Then pull your knitting out, announce
you have to seam your socks, and when
everyone swivels their heads your
way, calmly pull one sock out of the
other and claim your new status as
Dalai Knitter.
Like all techniques,
DKing takes a bit of time getting
used to it. You may find that your
speed increases as you go and that
you can drop into the rhythm of it
mindlessly with little effort and
few mistakes. You may try it once
and hate it, and that's just fine.
The secret of being an extreme knitter
is knowing what works for you and
what doesn't.
But do try it just once. And
make sure that there are plenty of other sock
knitters whining about that dread second sock
when you pull your two socks apart and dance
on the table.
|