|
Knitty has had cabled
patterns from the beginning. Anniversary
used simple cables; Josephine
used much more complicated ones. Many
of these patterns have involved mini-cables:
that is, cables only one stitch wide.
Ripley,
Leaves
in Relief, and Trellis
all used a few; Zigzag,
Party
Apron, and Bamboozelle
used them exclusively.
Most of these patterns
instruct you to work a mini-cable as
you do a normal cable, using a cable
needle. And yes, this will produce a
perfect cable, with no twisted stitches.
It's also an easy method. The problem
is that you need a third needle to do
it with, and picking up and putting
down a cable needle is slow. And a mini-cable
involves two stitches-less than a lot
of fancy lace decreases, all of which
can be made with only two needles. Surely
there should be a fast way to work such
small cables.
Well, the whole point of a mini-cable
is to work the second stitch before
the first stitch. So why not just do
that? After all, there's only one stitch
in the way.
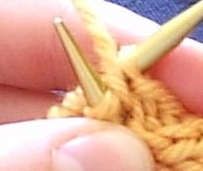
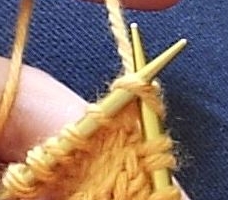
Just stick your working needle into
the second stitch on the left-hand needle
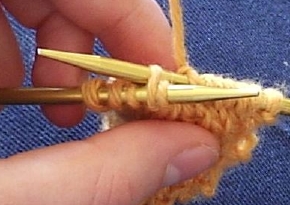
and knit it,
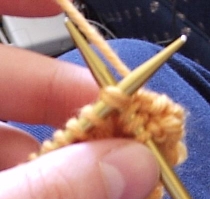
...then knit through the first stitch
(the one you skipped) and slide them
both off the left needle.
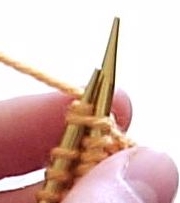
To get a cable that slants to the left
(if you knit right-handed), you knit
the second stitch through the back loop.
To get a cable that slants the other
way, you knit the second stitch through
the front loop.
Note that this is just the opposite
of what you would do with a cable needle!
With a cable needle, you hold the first
stitch to the front to get
a cable that slants to the left. This
shouldn't be too surprising: if the
first stitch goes to the front, the
second stitch needs to go to the back.
If you're good at it, this is the fastest,
most efficient way to work a mini-cable.
On the other hand, for many people,
it's the hardest. Also, depending on
which direction you go in, you may end
up twisting the second stitch as you
work it. (This is sort of like the left-slanting
decrease k2tog tbl.) You may not care,
but many knitters (including me) are
picky and think that this looks bad.
Now, we could get rid of the twist by
rearranging our stitches. This is what
you do when you work an SSK or an SSP
tbl.
But if we're going to all that trouble
already, we might as well take a second
to switch the order of the two stitches
to make the knitting a little easier.
Like reorienting stitches, I picked
up this technique from lace decreases,
specifically from the central chain
decrease. (It's the decrease running
up the center of Branching
out.)
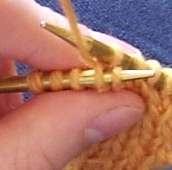
This begins as follows: slip two
stitches as if to knit two together.
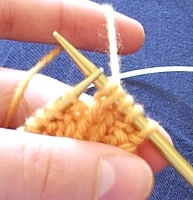
At this point, the first two stitches
from the left needle are sitting on
the right needle, crossed. All you have
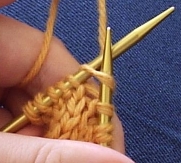
to do to work a cable crossing is to
slip them back to the left-hand needle,
and then knit (or purl) them through
the back loop.
Because of the way stitches are aligned,
this procedure can only produce a cable
that slants up and to the right. However,
the whole setup involves two transfers
of stitches from one needle to the other.
We can take advantage of this by realigning
stitches while slipping them from left
to right, and then switching the order
when slipping from right to left.
To get a left-slanting decrease, you
slip two stitches as if to knit.
Then you slip them back to the left
needle, switching them as you do it.
To do this, you slip the left needle
through the two stitches at once, going
from right to left and from
front to back.
Then you work the two stitches through
the front loop.
Sometimes, you will end up with the
stitches on your needles aligned in
a nonstandard way. For example, if you
had to rip back, you
may have picked up stitches facing the
wrong way. Or if you knit using
Anne Modesitt's Combined method, you
may form your stitches aligned in an
unusual way. In this case, you have
to work a right-slanting cable in a
similar fashion. You have to slip two
stitches purlwise, then switch them
and return them to the left needle by
inserting the left needle from right
to left, and from back to front.
Are you confused yet? If you are, relax.
This part is very simple.
It is often necessary to work mini-cables
from the wrong side. (See Bamboozelle
for an example.) Don't worry. It's easier
than it sounds.
If you want to cross a line of knit
stitches across a background of reverse
stockinette, then you do exactly the
same thing on both the right and wrong
sides. A left-slanting crossing, with
the right (back) stitch purled, looks
like a left-slanting crossing with the
back stitch purled on both sides.
If you want the right side to show two
crossing knit stitches, then you have
to make one minor change to work on
the right side. You manipulate the stitches
the same way, but then instead of knitting
them both, you purl them both.
Simple, no?
There is not a single consistent system
used for naming cables. There are a
few common ones.
"Cable" means that the front
and back stitches are knit. "Twist"
usually means that the front
stitch is knit and the back stitch is
purled; however, some people use it
to mean the same thing as "cable".
"Right" and "left"
refer to the direction the cable slants.
"Front" and "back"
assume that you are working cables with
a cable needle; thus, "front"
means "left" and "back"
means "right."
Sometimes, numbers are included to specify
the size of the cable. This is usually
the total number of front and back stitches,
but some people just use the number
of front stitches.
Abbreviations, thankfully, tend to be
simple: C means cable, T means twist,
L, R, F, and B mean left, right, front,
and back, and 2 means two.
Thus, "C2L" probably means
a left-slanting mini-cable with the
back stitch knitted, but it might mean
a left-slanting cable which crosses
two stitches over two other stitches.
"Front twist" means left-slanting;
it probably means for the back stitches
to be purled.
Aside from the fact that the direct
method occasionally produces twisted
stitches, all three of the above methods
produce identical cables. However, there
are a number of methods of producing
something that looks a lot like a cable,
but if you look closely, isn't one.
Grecian
Plait uses such a pattern. To get
something like a right-slanting cable,
instead of passing the second stitch
in front of the first stitch, the Grecian
plait passes it over the second stitch.
Another common technique is: slip 1,
k2, psso, and then on the next row,
work a yarn over between the two knit
stitches.
Many other techniques exist. Most of
them use a decrease to produce the appearance
of a slanting front cable. I'm only
going to discuss Barbara Walker's method,
because it is the only one I know of
that can readily be substituted for
the other kinds of mini-cables.
She advocates working mini-cables by
working a decrease, and then knitting
again into the back stitch of the decrease.
This only really works well for right-slanting
decreases worked from the right side:
you knit 2 together, but don't slide
the old stitches off the left needle,
and then knit through the first stitch
again.
It is possible to do something similar
for left-slanting right-side cables
and right-slanting wrong-side cables.
However, in both cases you have to start
by knitting or purling into the second
stitch on the needle, as for the direct
method, and follow it by a k2tog tbl
or a p2tog. And if you're doing that,
you might as well just do the direct
method.
This method could possibly be made to
work with left-slanting wrong-side cables,
but would probably be far too much work
to really be worthwhile.
Here's a summary of all four methods
of working a mini-cable, going in either
direction, and crossing over either
a knit-stitch or a purl-stitch background.
In this table, "work 1" means
"knit 1" when working from
the right side, and "purl 1"
when working from the wrong side.
|
Knit-on-knit cables |
| |
Left-slanting
cables |
Right-slanting
cables |
| Common
abbreviations |
C2L, C2F, cable
2 left, cable 2 front |
C2R, C2B, cable
2 right, cable 2 front |
| Cable
needle method |
Slip 1 st to
cable needle and hold in front,
work 1, work 1 from cable needle |
Slip 1 st to
cable needle and hold in back, work
1, work 1 from cable needle |
| Direct
method |
Work second
st on left needle through back loop,
work first st on needle, slip both
worked sts off of left needle |
Work second
st on left needle through front
loop, work first st on needle, slip
both worked sts off of left needle |
| Slip
and switch method |
Slip 2 as if
to ssk, insert left needle through
slipped sts from right to left,
remove right needle and then work
next 2 sts |
Slip 2 as if
to k2tog, insert left needle through
slipped sts from left to right,
work next 2 sts |
| Mock
cables (right side) |
Knit second
st on left needle through back loop,
k2tog tbl |
K2tog, but do
not remove stitches from left needle;
knit through first stitch again
and remove stitches from left needle.
|
| Mock
cables (wrong side) |
|
Purl through
front loop of the second stitch
on the left needle, p2tog |
|
Knit-on-purl cables |
| |
Left-slanting
cables |
Right-slanting
cables |
| Common
abbreviations |
T2L, T2F, twist
2 left |
T2R, T2B, twist
2 right |
| Cable
needle method |
Slip 1 st to
cable needle and hold in front,
purl 1, knit 1 from cable needle |
Slip 1 st to
cable needle and hold in back, knit
1, purl 1 from cable needle |
| Direct
method |
Purl second
st on left needle through back loop,
knit first st on needle, slip both
worked sts off of left needle |
Knit second
st on left needle through front
loop, purl first st on needle, slip
both worked sts off of left needle |
| Slip
and switch method |
Slip 2 as if
to ssk, insert left needle through
slipped sts from right to left,
remove right needle, purl 1, knit
1 |
Slip 2 as if
to k2tog, insert left needle through
slipped sts from left to right,
knit 1, purl 1 |
| Mock
cables (right side) |
Make 1 purlwise,
SSK |
K2tog, make
1 purlwise |
| Mock
cables (wrong side) |
Slip 2 and insert
left needle as if to SSK, then remove
right needle. P2tog tbl. Then make
1 knitwise. |
Make 1 knitwise,
p2tog |
|