 |
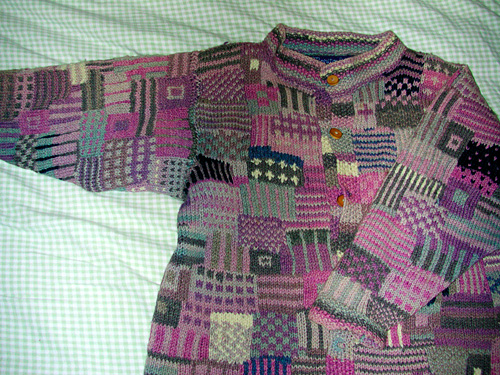
| The definition of a before
picture. |
In the early 1990s, I was
a knitting teenager. I chose to express my youthful
rebellion by creating bold sweaters without following
a pattern. These
were heady times for fashion in general: shoulder
pads and bat-wing sleeves had only recently
left the runway, and fluorescent pink was the
new black.
My pattern-free habit may
in part have been due to hard-headedness, but
I suspect it was also due to the influence of
the works of Elizabeth Zimmermann (who was essentially
saying "just do it") and Kaffe Fassett (saying
"yes, just do it, but do it with about 32 different
colors while you're at it.")
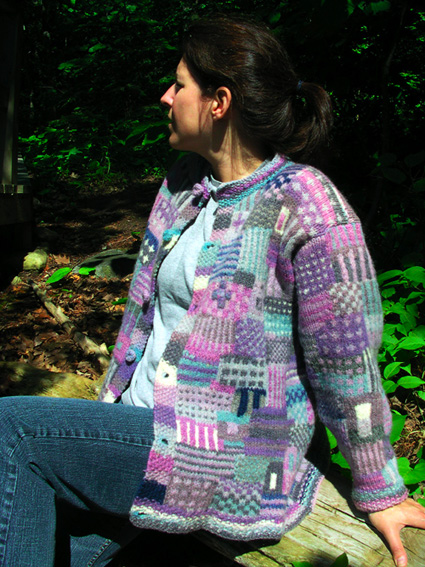
And so it was that I found
myself creating a one-of-a-kind cardigan made
of more than a dozen shades of blue, purple and
grey from Woolly
Harvest (who are still producing beautiful
yarns today, from their home base in Evansville
on Manitoulin Island, Ontario). I placed all the
colors in a big basket in front of me and went
nuts, randomly cutting lengths of yarn to be used
in intarsia-bound patches of all shapes and sizes.
The finished sweater
had vivid colors, and gave me that je ne
sais quoi that comes from sporting handmade
work.
It also had dreadfully ill-shapen
sleeves and shoulders, poorly matched buttons,
and was large enough to wear a knapsack underneath
(front or back) without impacting the silhouette.
The trend back then was baggy, but this was
more bag-lady.
  Although
I did wear it once in a while, some time in
the mid 1990s, my best friend Jenny asked to
borrow it, and I didn't really argue when it
didn't come back for a long, long time. Although
I did wear it once in a while, some time in
the mid 1990s, my best friend Jenny asked to
borrow it, and I didn't really argue when it
didn't come back for a long, long time.
The next time I saw the sweater,
things had gone from bad to worse. Jenny, who
is always freezing cold, had been wearing it
daily while training racehorses in Florida.
The sun had faded the colors dramatically, and
farm life had left it badly soiled and with
a couple broken buttons.
And now after 15 years and
many miles, it had come back to me like the
prodigal son.
In the meantime, I had learned
to weave, spin, crochet and felt, and I had
designed many sweaters and other garments which
actually fit. I couldn't wear this sweater in
public and deal with the "Did you make
that?" comments anymore. Yet leaving all
those thousands of neatly tacked down ends to
fester in the closet hoping for a moth infestation
didn't seem right either.
And so I did what any reasonable
textile creator would do: I took it apart, felted
it, tailored the pieces, and put it back together.
Some disassembly required
To take apart a well-worn
wool sweater, some care and thinking is required.
The sweater was made of two front panels, a
back and two sleeves. These parts were whip-stitched
together and then the collar was knit up. To
undo effectively, I had to undo it in reverse
order. Here are the steps I took.
- Unravel collar.
The cast off edge was worn away so I had to
find the first stitch where the yarn had integrity
and gently undo from there.
- Set aside collar yarn.
I changed color 5 times over the collar,
so I had several short lengths of different
colors, and the yarns were so faded that they
looked like they were space-dyed at 1/2"
intervals (the faded part being where the
stitch was exposed, the original color persisting
where the yarn stayed between stitches or
at the back of the work). I made mini-skeins
tied with loose figure-8 chokes and put them
aside for washing separately by hand.
- Unstitch all seams.
This took some serious focus to make sure
I was unpicking the seam yarn and not part
of the sweater itself, since it was before
I learned how to sew seams with a crochet
hook, making that nice one-tug-removes-all
situation. Again, I skeined and set aside
the seam yarns.
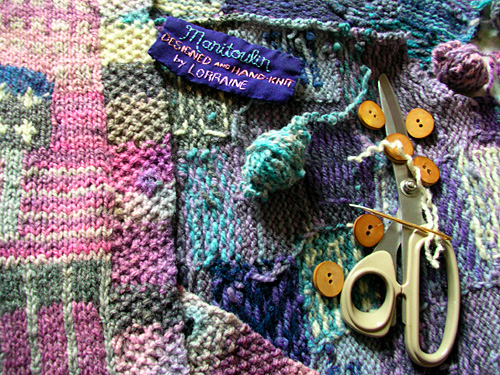
- Remove buttons.
I put them aside and hoped never to need them
again.
- Felt sweater pieces.
For this stage I washed all the sweater pieces
(not the mini-skeins -- too likely to felt
into tangled balls) in a hot, full-agitation
cycle in the washing machine with plenty of
soap (I used dish soap -- it's just so handy
and lathers well). I turned the machine back
to the agitating part of the cycle 6 times,
occasionally spinning it out and refilling
with more hot water and adding more soap.
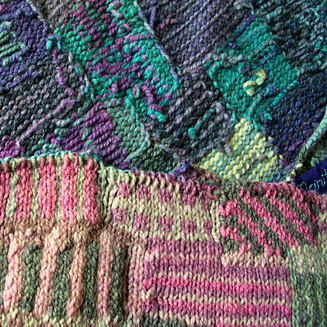
- Check often during
felting. My goal was to felt the pieces
so completely that I could cut them up and
not worry about the edges coming undone. Possibly
because the wool was quite tired, it took
a lot of heat, soap and agitation, but finally
the felting process progressed. Occasionally
I pulled the pieces out of the wash and rinsed
them under hot water to assess. When I saw
a real blurring of the pattern and stitch
definition, I decided they were felted enough.
- Throw in dryer.
I wanted to put the pieces through their paces
before reassembly, so there wouldn't be any
remaining sections that could protest later
by doing something annoying like shrinking.
I threw all the pieces in the dryer till they
were nearly dry (the remaining moisture is
handy for the ironing process: built-in steam).
- Tidy up. All this
agitation created two effects that needed
to be dealt with before proceeding: there
were huge chunks of lint clinging to the pieces,
that were very easy to remove in handfuls;
and several of the intarsia joins in the pattern
came apart and left holes. I repaired these
holes using a darning needle and the yarn
that had worked itself loose. The pattern
is so busy that no one will ever know where
those repaired spots are, and as I mended
I counted my luck stars that there weren't
more weak spots, given how my knitting naivite
at the time of original construction.
- Iron. I pressed
all pieces with warm iron directly on the
wool fabric; I leaned the iron very firmly
into the fabric, similar to a process in weaving
referred to as wet-finishing, where the heat
and pressure help to create a more finished
fabric. (Note: this ironing technique will
not work with all knitted fabrics -- test
a small section first.)
Putting humpty together again
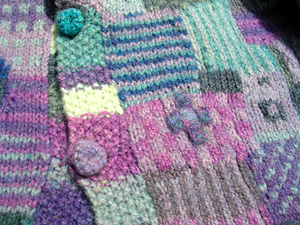
The pieces had shrunk on
the whole about 15%, which served to tighten
up the fabric, re-intensify the colors, and
make a firmer, cushy feeling material. Since
the refurbished piece was intended for me, I
referenced several other garments that fit me
well, including a suit jacket and another cardigan.
I then trimmed the sweater pieces accordingly.
Most of the trimming occurred
in the upper half of the sleeves, both in width
(about 4" came off, 2" per sleeve edge) and
in shaping (I cut them to curve into a set-in
sleeve style). I also trimmed the body pieces
to create a more flared shape, measuring 21"
across the bust and 24" across the waist band.
The reassembly and finishing
steps are as follows:
 Re-stitch.
Using a sewing machine set at medium stitch
length and using grey thread, I machine-stitched
the pieces back together. Re-stitch.
Using a sewing machine set at medium stitch
length and using grey thread, I machine-stitched
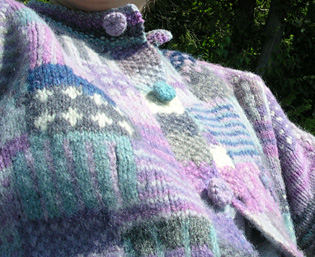
the pieces back together.- Re-knit neckline.
After vigorously hand-washing the mini-skeins
to match the felted look of the main sweater
parts, I re-picked up the neck stitches and
re-created the seed-stitch collar.
- Re-inforce sleeve cuffs.
Both sleeve cuffs were worn to the point where
the cast-on edge was mostly gone, and live
stitches were just drifting sadly along the
edge. Using yarn from the mini-skeins, I crocheted
a re-inforcing single crochet edge.
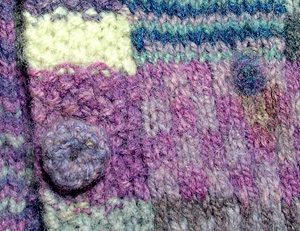
- Make new buttons.
I tried out several other button ideas, but
I finally settled on ones that appear to be
of the sweater as opposed to adding
more noise to the busy pattern. I had just
enough yarn in the mini-skeins (since I machine
stitched the pieces back together, the original
seam yarns remained) to crochet six buttons.
- Re-press. Again
with a warm iron and light steam I re-pressed
the sweater firmly to set the seams in place
and give the garment an extra smooth finish.
The insurmountable splooch
After all this hard work,
there was still one stain on the front that didn't
disappear in all the suds and which really was
apparent, even to the non-knitting eye (based
on several rounds of informal polling). This stain
came to be known as the "splooch", and
I feared that although I had eliminated most of
the reasons to spare the sweater from a mothy
death, there was still one insurmountable issue
that kept the piece from public viewing.
And then I remembered
needle-felting.
 Using
my hand-cards, I blended primary colors of Corriedale
wool roving to create a color that complemented
the patch where the splooch lived. I needlefelted
small bits of this colored fleece over top of
the stain in a way that matched the little section.
While this place now has a slight 3-D texture
that the rest of the sweater doesn't, at a glance
it fits in with the mess of motifs and my informal
polling confirms that no one is the wiser. Using
my hand-cards, I blended primary colors of Corriedale
wool roving to create a color that complemented
the patch where the splooch lived. I needlefelted
small bits of this colored fleece over top of
the stain in a way that matched the little section.
While this place now has a slight 3-D texture
that the rest of the sweater doesn't, at a glance
it fits in with the mess of motifs and my informal
polling confirms that no one is the wiser.
More
lives to live? I
still haven't told my best friend Jenny that
the sweater has been rebuilt. She's now studying
tree rings in old growth forests and I fear
what her lumberjack lifestyle might mean for
the refurbished garment.
Then again, maybe in its
next life the sweater will be refurbished into
a foot-stool cover. And then perhaps into matching
pin cushions. |


 Lorraine
Smith is a spinner, knitter and weaver, and
the publisher of
Lorraine
Smith is a spinner, knitter and weaver, and
the publisher of