| This issue we turn
our attention to bags. Surely there are bags
for all seasons, but fall, with the start of
school and larger knitting projects inspired
by cooler weather, is surely the time for a
new bag -- be it a little purse, a totebag,
or a backpack.
Bags are really fun to make,
because you can hardly go wrong. They are a
great place to experiment, they don't have to
fit, it's okay to have lots of them and they
make great gifts.

  Materials Materials
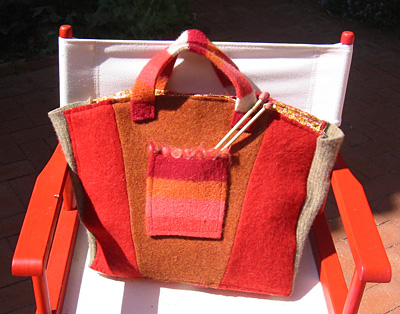
A tube of knitted fabric of
some dimesion that says "bag" to you.
It can be a sawed-off sweater, adult size for
a tote, baby size for a purse, or, as I used
here, a cowl neck that threatened to eat me
whole [right]. You'll also need handles, a needle
and thread and the embellishments of your choice.
Directions
As luck would have it, this
turtleneck was apparently knitted top down and
then crocheted on to the finished sweater neckline,
so the surgery was easy. It was easy to cut
loose, and left me with live stitches on the
narrower end of the neck. But every sweater
is different. You may have to resort to scissors.
If your sweater tube was knit in the round,
it will be easy to unravel it to live stitches
after you hack it off at the armholes. Then,
bind off, or, if you like, knit on a border
with some jazzy yarn. If your sweater is wool
and you wish to felt it, then knit your novelty
yarn along with some pure wool so it will felt
too.
Close the bottom of the bag.
With live stitches at the bottom, you can divide
the stitches between two needles and, working
from the wrong side of the bag, use the three-needle
bind off to close it up. If you want to close
the bag on the opposite end, simply sew it shut
from the wrong side, either seaming it in a
knitterly fashion or sewing it seamstress style.
Note that this bag is floppy.
A felted bag using the same technique would
be a bit less so. A bag with real structure
needs to be stiffened or lined.
The other issue is handles.
Many knitted bags have some variation on the
knitted i-cord handle. These are fine, but they
do tend to stretch over time. Linen stitch (and
its variants) creates a nice, flat strap that
is rugged and won't stretch. Try it in a multicolored
yarn to really add something to an otherwise
bland bag.
Linen Stitch (for
an odd number of stitches)
Row 1: k1, *slip 1 wyif, k1*
Row 2: slip 1 wyib, *p1, slip 1
wyib*
Truth be told though, I almost
always prefer a non-knitted handle. Again, the
thriftstore is a great place to look for handles
of all kinds at reasonable prices. Craft stores,
fabric stores and many yarn stores carry a nice
selection of handles too. Often, a great handle
can really inspire you to create a great bag
so you might want to put the cart before the
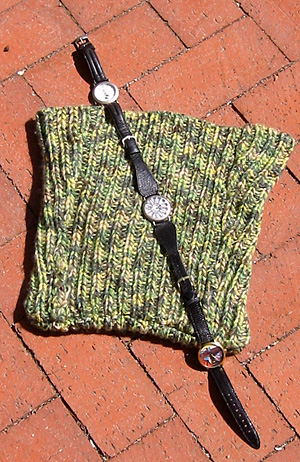
horse and get your handle first. And remember
a handle doesn't have to start its life as a
handle! A belt makes a great strap for a shoulder
bag. A series of broken watches buckled together
also makes a great strap.
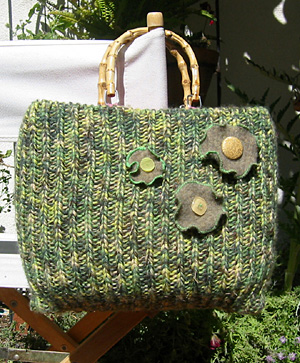 If
you look at the finished the green bag [right],
you'll notice that it has great shape and nice
bamboo handles that really set it off. How did
that happen? The knitted purse is simply slipped
over a straw bag and tacked in place. All the
lining and handle attaching is instantly resolved.
Knitting is stretchy, so you may be surprised
what you can make your bag fit. Take it with
you to the store and try it on for size. If
you look at the finished the green bag [right],
you'll notice that it has great shape and nice
bamboo handles that really set it off. How did
that happen? The knitted purse is simply slipped
over a straw bag and tacked in place. All the
lining and handle attaching is instantly resolved.
Knitting is stretchy, so you may be surprised
what you can make your bag fit. Take it with
you to the store and try it on for size.
Another option: Take
a cereal box that fits your knitted overcoat.
Cut off one side, then cut down the four seams.
Glue your lining fabric to the inside of the
box, leaving at least an inch of excess on what
will be the top edges. Fold the box back up
and secure the seams with heavy duty tape. Fold
over the top edges so they meet the top of the
knitted purse, leaving at least a quarter inch
of doubled fabric to sew the lining to the purse.
Sew the lining to the purse and add the handles
of your choice.
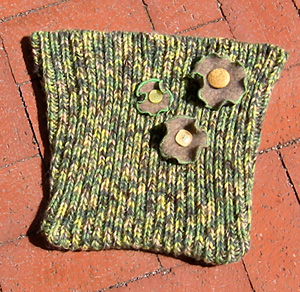
Adorn it with buttons, knitted
flowers, embroidery or whatever inspires you.
My easy flowers were simply circles cut from
a felted sweater, and then tightly zigzagged
in contrasting thread to create the lettuce
edge. Vintage buttons add a final touch. And
a hint: don't attach your adornments more permanently
than you need to. My flowers are safety pinned
on so I can swap them out when my mood shifts
of the seasons change.
Materials
 An assortment of old wool sweaters, scarves,
mittens, swatches, etc.
An assortment of old wool sweaters, scarves,
mittens, swatches, etc.
Sewing machine
Lining fabric, if desired
Plastic canvas or heavyweight fusible interfacing
Washing machine repairman
(or zippered pillowcase)
Directions Go
to the thriftstore on a sale day and pick up
a bag of wool sweaters. Not all sweaters will
felt, not even all wool ones. The sweaters should
be at least 90% wool, and generally, the more
dire the directions on the care tag, the better
luck you'll have. Note that things knit in garter
stitch like scarves will felt harder than stockinette
stitch and make great choices for the bottoms
of bags or handles.
Take your bounty home and
throw it in the washing machine. No. Wait. Don't!
I joke that this is my $250 bag -- that's how
much it cost to get the repairman out to install
a new pump in my washing machine. Always put
anything you are going to felt inside a zippered
pillowcase or lingerie bag. Hot water, lots
of agitation. A bit of soap. You may need to
run it through the agitation cycle several times
depending on your machine.
When your little circus of
tiny mis-shapen sweaters have dried, think about
what shape you'd like your bag to be. You can
do a very quilterly ninepatch, a series of strips,
or just sew pieces together as the spirit moves
you. Once you've created some pieces of fabric,
cut out 2 large sides, 2 small sides and a bottom.
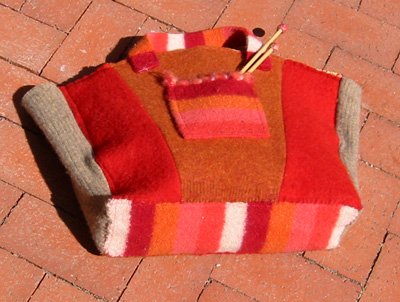
Once you've laid out and cut
your patchwork pieces (allowing for 1/2 inch
seam allowances on the sides of all pieces),
sew the components of each side together on
the sewing machine. Your seams can be on the
inside for a more tailored effect, or showing
on the outside if you want that deconstructed
look. With felt, you can trim the seam allowances
quite close to the seam. Nothing will ravel.
Before the bag is fully assembled, add pockets
and handles.
The larger the bag is, the
more necessary reinforcement is. Add reinforcement
before you sew the sides together. You can cut
plastic canvas to the size of each piece (or
at least the two larger sides and the bottom)
and whip stitch it to the felt, or, you can
buy heavyweight fusible interfacing. With the
aid of an iron, you can sandwich your felt,
the interfacing and the lining fabric together
in one step. This is great leap forward in the
world of bag lining, trust me!
Sew the two larger sides to
the bottom of the bag, then sew the smaller
side panels in place.
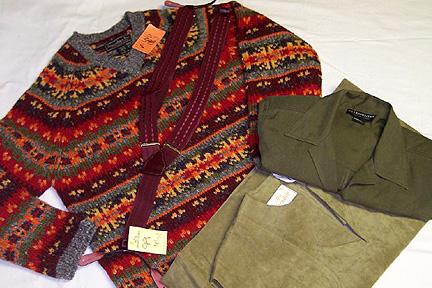 For
this issue's final project, I've called in some
help. Diana Hammons has been creating one of
a kind coats from recycled sweaters for several
years at Mosaic
Fashions. After seeing her work, I challenged
her to come up with a bag pattern. The result:
a backpack created from a second-hand sweater,
a pair of suspenders, and other thriftstore
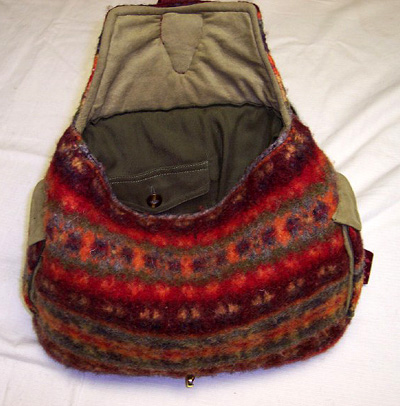
finds. For
this issue's final project, I've called in some
help. Diana Hammons has been creating one of
a kind coats from recycled sweaters for several
years at Mosaic
Fashions. After seeing her work, I challenged
her to come up with a bag pattern. The result:
a backpack created from a second-hand sweater,
a pair of suspenders, and other thriftstore
finds.
Diana
used a man's raglan V-neck fairisle sweater
(which should be at least 90% wool), a silk
blouse for the lining and an ultrasuede skirt
for the detailing.
Directions
Prewash the clothing (not
the sweater).
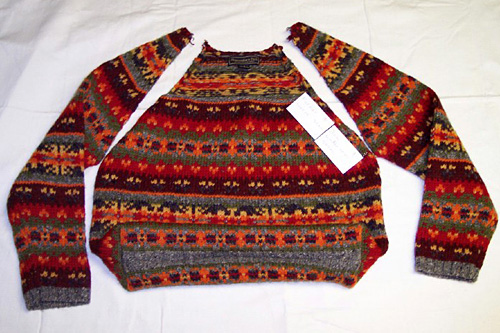
Carefully detach the sleeves
from the sweater body, by clipping the yarn
at the shoulder and opening the seams. The body
will still be attached at the sides.
Use the bottom of the V-neck
as your guide to cutting the front of the backpack.
Cut evenly across the front of the sweater a
few rows below the bottom of the V. Rip back
a couple of rows and then bind off loosely with
waste yarn from the sweater or a similar weight
wool. (Obviously, you could use a sweater with
a different neckline, and just cut 6 or 7 inches
below the shoulder.)
Turning your attention to
the back of the sweater, remove the label and
unknit the tips of the raglan until you have
an even row. Bind off with waste yarn. The back
will now be 6 to 8 inches longer than the front.
 Join
the raglan edges of both sides of the sweater
from the armhole up to the edge of the front
using mattress stitch. Join
the raglan edges of both sides of the sweater
from the armhole up to the edge of the front
using mattress stitch.
Turn the sweater inside out
and machine sew, with a long basting stitch,
the lower cuff edges of the front and back together,
leaving a 1" seam allowance. To minimize
distortion of the seam, Diana suggests that
you put your finger behind the presser foot
to bunch up the fabric a bit. This helps avoid
stretching the seam too much.
 Add
some depth to the backpack by creating a purse
bottom. With the backpack still wrong side out,
flatten the seam and pull it out on each side
creating a triangle on each side. Measure from
the tip of the triangle in about 3" and
seam across the base of the triangle. Repeat
on the other side. Add
some depth to the backpack by creating a purse
bottom. With the backpack still wrong side out,
flatten the seam and pull it out on each side
creating a triangle on each side. Measure from
the tip of the triangle in about 3" and
seam across the base of the triangle. Repeat
on the other side.
Wash the sweater on hot with
a cold water rinse. (If you haven't felted before,
use the sleeves for practice!) You want to create
a fabric in which the stitches are no longer
distinguishable, but the fabric still has some
drape. Do not overfelt the sweater, as something
too stiff won't look as good. Washing machines
vary. You may need to run the sweater through
more than one cycle.
Once the sweater has dried,
finish the flap by cutting a piece of ultra
suede a couple of inches larger than the flap.
With right sides together, sew around the flap
starting where it connects to the rest of the
bag, across the bottom of the flap and up the
opposite side. Trim the seam allowances, turn
right side out and top stitch on the three sides
of the flap. Leave the open edge of the ultra
suede long enough to cover with the lining fabric.
If you wish, make and attach
exterior pockets for your phone, sunglasses
and etceteras. Use spare sweater fabric from
sleeves and line them or decorate them as desired.
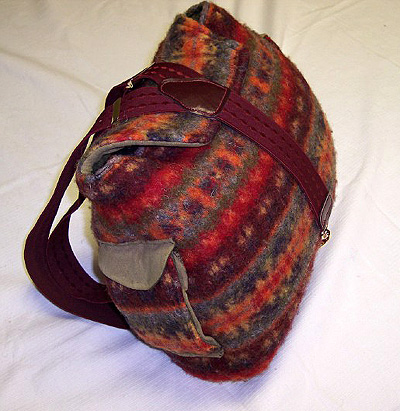 Attach
the suspenders. Remove the leather button flaps.
Place the two adjustable straps attach at the
bottom back of the backpack near the side seams.
The remaining suspender strap is cnetered at
the bottom of the flap to act as a closure. Attach
the suspenders. Remove the leather button flaps.
Place the two adjustable straps attach at the
bottom back of the backpack near the side seams.
The remaining suspender strap is cnetered at
the bottom of the flap to act as a closure.
Slip a D-ring into the flap
on the suspender that used to hold the button
down strip. Attach a clasp to the front of the
bag to secure the D-ring when the backpack is
closed.
To line the backpack, lay
it on the lining fabric (a double layer) and
cut out a piece that is at least 1" larger
than the backpack in all directions and a couple
of inches larger at the top. (Better safe than
sorry!). Stitch the seams and insert the lining
into the backpack with wrong sides together.
Fold the excess fabric down at the top and then
topstitch it in place.
Some links to some great bags
made from recycled products:
|